Editor’s note: This text-based course is an edited transcript of the webinar, Visual Supports, presented by Kimberly Norris, MEd.
Learning Outcomes
After this course, participants will be able to:
- Explain the role of visual supports in the early childhood classroom.
- List three types of visual supports.
- Explain how to design visual supports for the early childhood classroom.
Introduction
Today we are going to be talking about visual supports specifically for use with children with autism spectrum disorders, but I hope that you'll find that this can also be a successful strategy for assisting other children as well. To start, I would like for you to think about a time when you were lost at night on an unfamiliar highway. As you're thinking about that experience, think about these questions:
- How did you feel in that situation?
- How did you act in that situation?
- What things did you look for when you were lost at night?
Take a moment to write down the answers to these questions, then we'll talk about some possible responses. I remember being in a similar situation when I was on a very unfamiliar highway to me in Baton Rouge, Louisiana. I had taken my daughter to a vocal competition there, and we were heading out for an evening with her voice teacher and another teacher. We started out looking for restaurants and we ended up in the middle of nowhere. No streetlights, no residential sections, nothing to guide us whatsoever. I ended up pulling up behind a utility substation in pitch black darkness only to turn around and head back toward the street lights and the businesses where I had come from. One of my passengers, who was usually a very calm, confident, and assertive woman, was exhibiting some signs of emotional distress, demanding to know what in the world I was thinking to pull into a remote site like the one I had in order just to turn around. Well, you might have answered some of these questions with similar responses to what she was exhibiting. If I were to have asked her in that situation how did you feel, she might have responded, "Well, it made me kind of anxious. I was a little scared, and I was pretty frustrated." That anxious, fearful, frustrated feeling you get when you're lost is sometimes similar to how a child with autism or delayed communication skills feels much of the time when they don't have supports in place. The next question was, how did you act in that situation? Sometimes we might act a little panicked. We may become very fretful, and sometimes some folks get a little paralyzed because they just can't act due to the fear that they're feeling. So what did you look for? Did you look for signs such as street signs or highway signs that would help you along the way? Did you look for a service station that you could pull into and ask for help? Or did you look for familiar landmarks to you? One of the most important supports we look for is visual supports when we're in a situation like this. One of the most important things that we can do for children in a classroom who have autism and have these feelings of frustration and anxiety is to provide them with visual supports.
What are Visual Supports?
Let's talk a little bit about what visual supports are. Visual supports are things that we see that enhance the communication process. They can be objects, photographs, drawings, written words, schedules, or lists. We're going to look at some common examples of visual supports in our world to start.

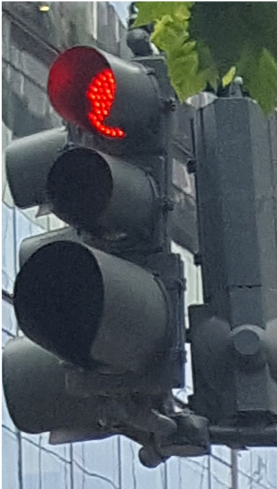
Figure 1. Stop sign and stop light.
When we see these things in our world, what do they communicate to us? If we see a stop sign or a red light on a traffic signal, these things tell us that we're going to bring our vehicle to a stop before entering the intersection. That's a lot to communicate with a single word on a sign or a simple colored light.

Figure 2. One way sign.
Another example is a one-way sign. I remember one time when I traveled to Kansas City, Missouri for a conference, my co-worker was driving, and we were in the unfamiliar streets of the downtown area. She expressed at one point that her driving experience was feeling a little strange to her and we soon discovered why. She was driving the wrong way on a one-way street. When we tried to rectify the situation, she ended up driving the wrong way on yet another one-way street, and after a few false starts we finally figured out where to look for those one-way signs. Once we did that, it became much easier for us to discover our way.
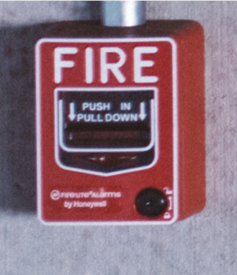
Figure 3. Fire alarm.
This simple little box of the fire alarm can be very attractive to curious children and you may have experienced the results of someone pulling the handle on this type of device. It's a helpful tool to have in a situation that could prove dangerous very quickly. If you ever smell smoke unexpectedly in a public place, it's good to know the location of one of these fire alarms to get help quickly. You could save precious lives and minimize loss of property by knowing what this visual support means for us.
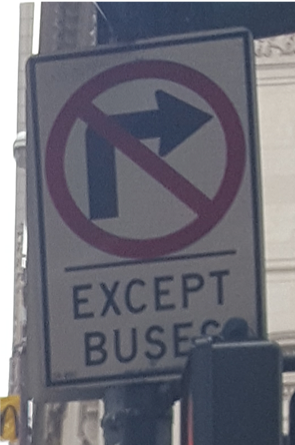
Figure 4. No right turn.
Finally, I noticed this no right turn except for buses sign when I was traveling in New York City. Now if I were driving a car, and my destination was to my right at this intersection, I would have to delay my right turn until I reached an intersection where I was allowed to turn right. If I was driving a metro bus, however, I would be allowed to make that right turn. Again, it's a lot to communicate, but it gets accomplished with a fairly simple sign. This is one of the things that we need to keep in mind as we make visual supports available to our students with autism spectrum disorder.
Adult Visual Supports

Figure 5. Adult visual supports.
- Maps
- Charts
- Calendars
- Watches
- To-do lists
- Road signs
- Body language
- Organizational apps
Adults use visual supports all the time. Here's a list of things that we often use. I can assure you that the picture of the desk in figure 5 is much much neater than the one that I have at my workplace. It shows several of the visual supports that are common for adults to use. Why do we use these things? To keep us on schedule, to help us keep track of what we need to do next, or to help us organize our work and make our lives more efficient. I cannot count the number of times that I have heard women proclaim themselves to be the sticky note queen, and as a person who tends to like to have a variety of sizes and colors and sometimes even different shapes of these types of notepads around, I find it easy to imagine myself being able to work efficiently with someone who uses that type of visual support system to keep themselves organized. Visual supports can also give us a way to relate to people.
Why use Visual Supports with ASD?
So why use visual supports with children who have autism spectrum disorders (ASD)? The visual support utilizes the part of the brain that is more developed in children with ASD. Visual processing is a complex task requiring sight, in-tact nerves that carry the impulses correctly to the brain, healthy brain function that actually interprets the information it receives and prompts responses, and in-tact nerves to carry that information back out to the motor, speech, or emotional centers of the brain to give the response.
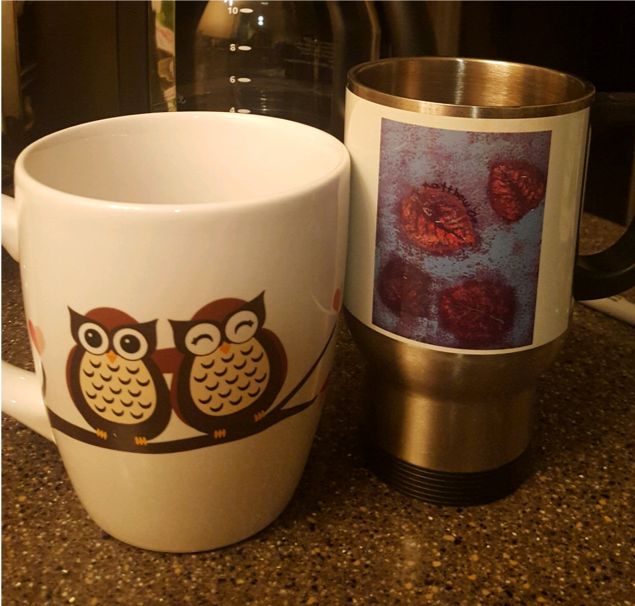
Figure 6. Favorite coffee cups.
What you see in figure 6 are my two favorite coffee cups. The one on the right features art that was made by my son when he was in elementary school. I use it every weekday morning on my way to work. The one on the left was a gift from my daughter. The other side says, "Owl always love you." I use this cup on weekends, especially Saturday mornings when I can take my time to savor a large cup of coffee with my breakfast. When I see either one of these cups, I think of enjoying a cup of coffee, and it also evokes an emotional response because of the way each cup came into my life. Visual processing must possess a component of learned information as well. In the case of my coffee cups, my desire to have them as vessels for coffee was an acquired thing, not something I innately knew. It also had that emotional response for me.

Figure 7. Game.
Let's play a little game to illustrate the prior knowledge portion of visual processing. Quickly look at the image in figure 7. What did you see? Think about how much prior knowledge had to be processed as you looked at that image. For example, you may have seen some large letters. For that, you would've known how to distinguish size. You could've been able to distinguish if those letters were large versus being small. You may have recognized that the symbol was in Word Art, and to have recognized that, you would have to know how Word Art differs in appearance from just simply enlarging a font size. You may have recognized that the font was red, so you have to have color knowledge for that. You may have also recognized that the word was G-R-E-E-N, and you needed to know how to read that word and how to recognize that those symbols in that order spelled the word green. If you recognized that the word was in all capital letters, then you would've had to have had letter recognition and to be able to distinguish all caps from all lowercase. In the case of my son that I tested this on at home, he recognized that this was in Calibri font. In order to recognize that, you would've had to have been able to differentiate the characteristics of specific fonts from others. What you actually saw was the word green in red letters. That's a lot of prior knowledge that you had to have in order to process that image.
So again, why use visual supports with children who have ASD? Children with ASD tend to be visual processors. This means that the part of the brain that processes visual information is more developed in children with ASD than in other children. It also is indicative of the speech and communication deficits that these children tend to have to overcome, so they are slow language processors. This means that they are going to require more time to process language. As we all know, once a directive is spoken, it doesn't remain in view for us to continue to reference. Visual supports are a big help to these children.
Let's talk a little bit more about slow language processing. It may take 30 to 60 seconds to process auditory stimuli. By pairing visuals with the language, it improves the child's understanding of that spoken language. They have difficulty following verbal directions. To demonstrate we're going to do a timed exercise to help you see how challenging it can be to give a child with ASD time to process. I want you to give the instruction out loud, "Give me the blue car," just as you would prompt a child. Then count to 30, pretending that you are waiting for the child to respond. After 30 seconds, the child would give you the blue car. You didn't have a visual timer as the 30 seconds passed, but it can help the time seem shorter. It often seems longer to wait 30 seconds in silence.
Do you think that you typically allow silent spaces of this length waiting for a response from a child? We usually find ourselves giving only a three to five-second pause before repeating the request or information. I imagine that a more typical interaction with a child would sound something like this: "Give me the blue car. Look, see the cars? Find the one that's blue. Give me the blue car." Now the problem this creates for the child who processes slowly is that when the instruction is repeated, the brain has to start over again. Remember, the words you've spoken don't remain visible for continued reference, so the brain has to go back to the beginning and process everything from scratch. The more words that are spoken to fill the silence, the longer the time it will take for the child to process. This can lead to frustration and anxiety on the part of the child because they just can't seem to get to an end response.
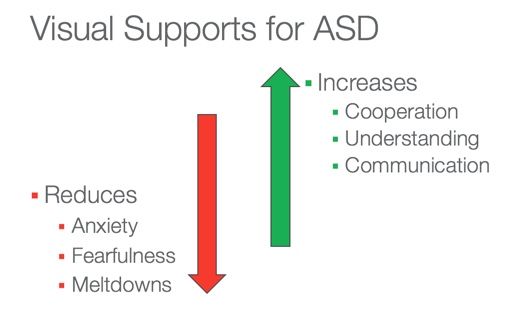
Figure 8. Visual supports for ASD.
When we use visual supports for children with autism spectrum disorders, we often find that their anxiety and fearfulness are reduced, as well as their incidences of meltdowns. It reduces their anxiety because they may not have to stress so much about trying to figure out what's being asked of them. The same goes for the fearfulness. If you think about being in a situation when you really don't know what to expect or what's expected of you, it does tend to increase your anxiety and your fearfulness. But if it's clearly presented to you in a way that you can understand, it's easy to see why that would reduce that amount of anxiety. Visual supports can also decrease meltdowns. If their frustration and their anxiety are going to be reduced, we can understand why that could also reduce the incidents of their acting out.
What does the use of visual supports increase? It increases a child's cooperation because they're better able to understand the communication that you are providing for them, and it also gives them a medium to communicate back with you. So, if you're able to comprehend the visual communication you're being offered better than just auditory information, and you can process that expected response better as well, it obviously would make your level of cooperation increase.
Visual supports help children to anticipate the order of events. They help them increase their independence, identify changes in their regular schedule, and help with them with the transition from one activity to the next. We all know transitions can be difficult for children at times, but for children with autism spectrum disorders, this is a real hotspot. Visual supports can cue the children to what's expected and help them organize their environment. They give the children time to focus their attention on a visible message, time to work out the meaning for that message, and time that that message is visible so that they can refer to it again and again if necessary. It's very specific and consistent. These pictures are not going to change, and so children can understand that there is a certain thing that's expected, and it's expected every time. It helps make their life predictable and it helps them track their daily routines and their tasks so that they're being very consistent about how those things are carried out. A visually supported timetable also provides a framework for talking about change, and we'll talk about that a little bit later when we discuss visual schedules a little more. Children with autism process visual information faster and better than auditory information, and I'm going to keep repeating that because that's a very key point for us to get through this presentation.
Tips for Using Visuals
For these visual processors, what are some tips that we're going to need to know for using visuals? First, we need to make sure that we're using it as part of the day. It doesn't need to feel like it's one more thing that we've had to add into our schedule, but incorporate it into what we're doing, and we'll cover that a little bit more. Supports must be accessible and durable and easy to use. We'll cover some other tips for that here in a moment. Supports must be relevant and contain up to date information. For example, if you're using a visual schedule and you know that the fire truck is coming later that afternoon, that would be a really good thing to incorporate into your visual schedule, so that children will know that everything is as up to date as it can be.
Types of Visuals
Real Objects
Let's talk a little bit about types of visuals. The first type of visual that I want to talk about is it is the most cumbersome and difficult to organize for adults, but it's also the most concrete. Using real objects as visual supports is a good way to offer choices, or to cue children for a transition. For example, if it's time to change a toddler's diaper, you may need to bring the real diaper to them and point to it in your hand and say, "It's time to change your diaper," which cues them oh, okay, I'm going to be picked up, I'm going to have to go to the changing table and it is time to change my diaper. Offering choices such as in figure 9, you could ask which color cup that they want to use for that time. Now a caution to using real objects is that it may also hinder social interaction with other children as the child gets older, but using real objects as a starting point for visual supports is a really good way to go.

Figure 9. Visual supports - real objects.
Photographs
The next most concrete way is to use photographs. It can be very time-consuming to find all of the pictures that you want or need because we have to individualize these photographs for each child. What you see on the left in figure 10 is an example of a photograph that we might want to use with a child with autism spectrum disorders. It's very clear that we're focused specifically on this particular train. If I were to take a picture of the same train in its natural environment so to speak (photo on the right in figure 10), it might be confusing to the child which item I'm trying to cue them toward. It's very visually cluttered and it's not at all easy to identify the train as the subject of the picture. We want to make the object as clear as possible without visual clutter. Make sure that you're isolating the train in a fairly neutral sort of background so that it stands out to the child that this is what you want them to focus on.
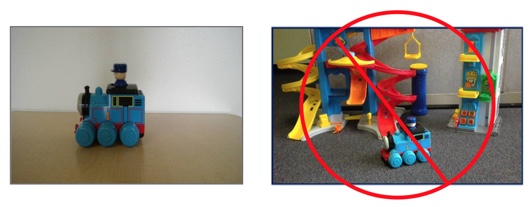
Figure 10. Visual supports - photographs.
Line Drawings
Now let's move into less concrete types of symbols such as line drawings. There are software programs available that generate these types of drawings, but they may be expensive. The symbols do need to be consistent between environments, meaning school, home, or other places. You may also find that you can make simple line drawings of your own. A colleague of mine likes to tell a story about having worked with a child we'll call CJ in a situation where she had pulled him out of his preschool classroom for therapy. When it was time to return to his room, CJ didn't want to go, and he threw himself on the floor in an emotional meltdown. Knowing that it was the classroom's outdoor playtime and knowing that CJ loved to play outside, the therapist began to try to explain to him that they were going outside to play. CJ was not having any of it, so he continued to cry out and thrash around on the floor. The therapist grabbed a scrap piece of paper that was lying nearby and quickly drew a simple line drawing, presenting it to him with the words, "CJ, it's time to go outside." As she said the child's name, she simply pointed to the stick figure CJ, and said, "It's time to go outside." She said it was amazing what happened. CJ immediately stopped what he was doing, quickly got up off the floor, and proceded out the door to the playground with no more tears. That is a very dramatic example of what visual supports can do.
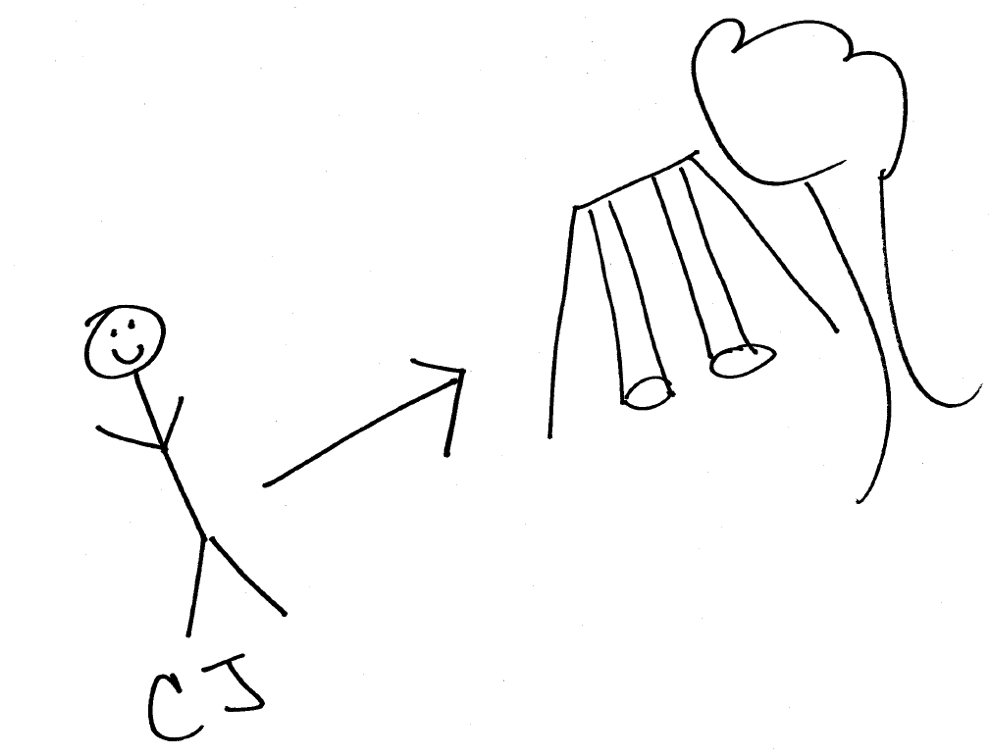
Figure 11. Visual supports - line drawings.
Words
Finally, we have simple words. As a child gets older and begins to read, we can teach them that these symbols, in this case, T-O-I-L-E-T, represents something. It represents the toilet. See figure 12. Now, if using a word only, the child must be able to comprehend that the word represents that actual object. If we pair it with a picture word card, it can aid the child in assimilating the relationship between the word and a real-world object that it represents.
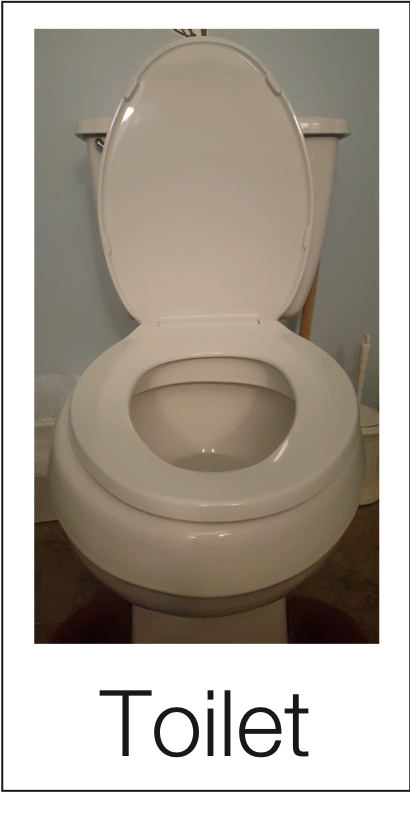
Figure 12. Visual supports - words.
Action Photos
Action photos can be a very good help for folks in a classroom situation, but we have to make sure again that there's not a lot of visual clutter. So, if I wanted to use an action photo to indicate to the child that it was time to line up, for example, I might not want to choose the photo on the left in figure 13. It's not clear from this picture that the action I'm intending him to focus on is to line up. He may think it's time to go for carnival concessions. It's not very clear that these people are in a cue. However, if I were to show him the drawing on the right in figure 13 for an example of the children lining up, it's much clearer for him to understand the expectation. All these children are facing the same way, their hands are by their sides, and there are still words at the bottom of the visual for the child to associate with the action.
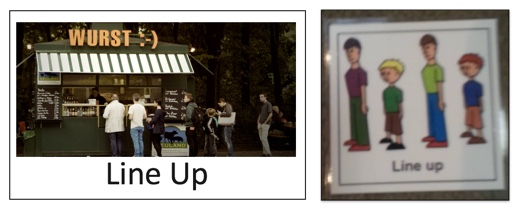
Figure 13. Visual supports - action photos.
Let's go back to talking about our tips for visual supports. Any time we use any type of picture card, photo, or even a word card with the children, it needs to be clear what we want. It needs to be durable and it needs to be accessible. In my own experience and in working with others who've used visual supports in the form of pictures, we have found that laminated cardstock tends to be far more durable than simply using copy paper, even if the copy paper is laminated. As far as accessibility is concerned, you need to consider how and when you intend to use the visual symbol. I've seen some early educators use metal rings that open with pictures strung on them that they could easily clip to a belt loop or carry in their pockets. The pictures they've placed on these rings often have to do with making transitions or with routine activities that they may need to prompt the child to do. I've also seen three-ring binders placed in classrooms with Velcro strips placed on plastic divider pages to hold the pictures and group them by activity type or by the time of day they might be needed. Do whatever works for your situation. It's a good thing to explore how you're going to organize it so that you can easily access these different visual supports. Some teachers even keep small picture cards in the pocket of a carpenter's apron that they might wear during center play, or in the box of their circle time supplies so that those supports are close at hand when needed.
Making It Part of the Day
Making it part of the day is really important. How are you going to use visual schedules to organize your room or to schedule or order your events for the day? Are you going to use these supports to make transition cues? There are so many different ways that you can use visual supports. I don't recommend trying to do it all at once because that would be an overwhelming thing to do, but these are some different ways that you can make it part of your day and help you organize your life a little bit better.
Visual Guidance and Boundaries
For example, if we're wanting to give visual guidance and boundaries for a child, we can highlight those environmental boundaries by putting some tape on the floor or, as seen in figure 14, we've got Velcro on the bottom of our center sign. The Velcro spots are circled in blue for you to see them and they indicate how many children can play at the sand and water table at a single time. This teacher printed out photos of the children that are also laminated and have Velcro on the back. The children carry those photos with them from center to center as they make their choices. If both of the Velcro spots are filled up, that's all the children that can play there and they need to make another choice. You can define a child's personal boundary as well by using carpet squares at circle time, by putting their names or their faces on the table for example where they sit, or you might provide mats for their block structures. These small things can give them a little bit more structure and boundary for their own space.
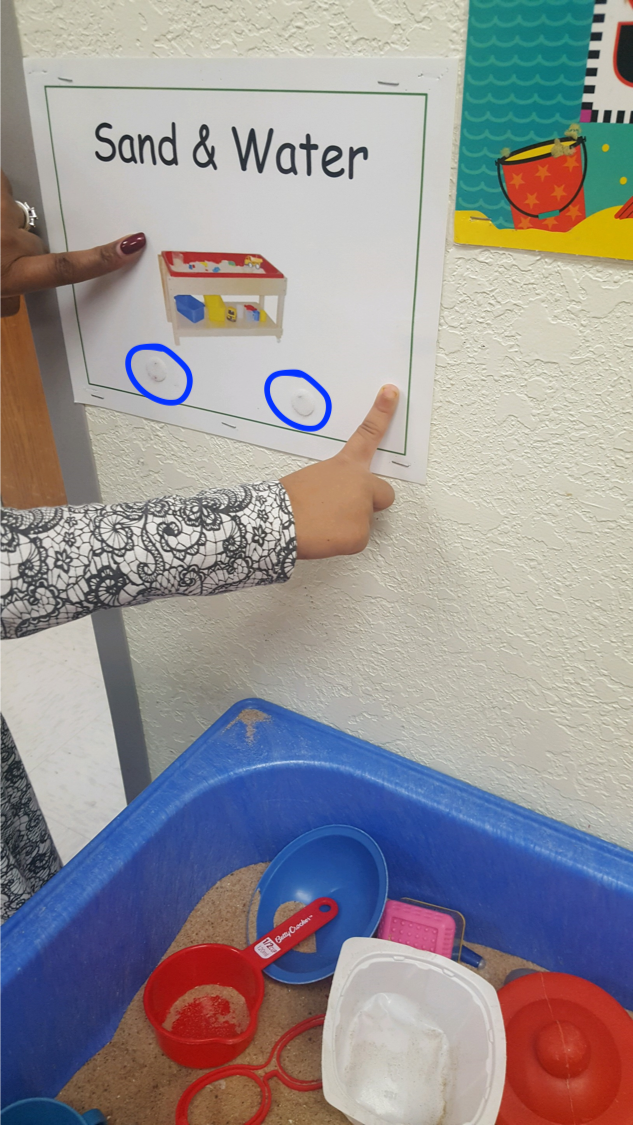
Figure 14. Visual guidance and boundaries.
Environmental Boundaries
Environmental boundaries are really important for children with autism spectrum disorder. In this case, figure 15 shows how the centers have been pictured on the magnetic whiteboard and the children's names are written on craft sticks that have a magnet on the back. You'll notice that the centers have been identified by word next to each picture. In the book center, there's room for one child and in the blocks center, there's room for two children to play. These blue strips with the names of the centers are the same length and size as the craft sticks, so the children were able to not only practice their fine motor skills by placing the craft sticks on the blue strips, but this made them easily identifiable as to which centers had room for them from across the room. The children could look at this magnetic board and see oh, there's a blue strip next to the books center, so I can go there now if I'm finished playing in dramatic play, for example. This gives the children an easy visual of where there are vacancies available for them to move to an area of interest.
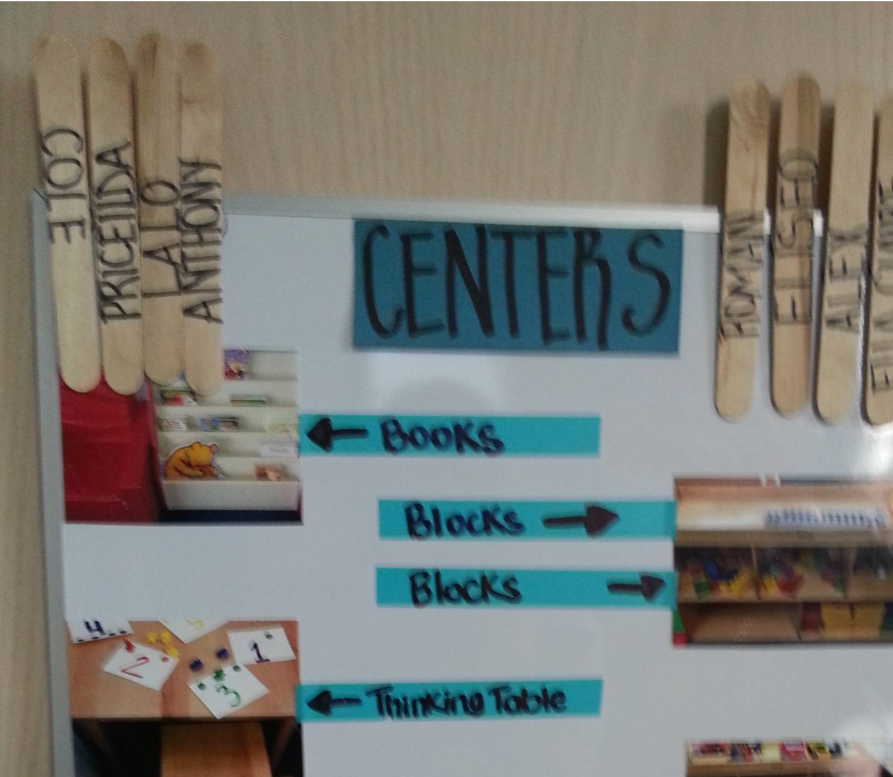
Figure 15. Environmental boundaries.
Visual Schedule
A visual schedule is a really important representation of the activities in the person's day. It's presented in sequence to bring order and security and to communicate changes with minimal stress. In figure 16 you can see that the pictures are ordered horizontally left to right, and they would go in that order throughout the course of their day. In figure 17, it's a vertical orientation. I have found that with very young children, the vertical orientation is easier for them to follow first. Either way is fine for you to use but, if you have children who are having a hard time with their left to right progression, you might want to change your visual schedule orientation to a top to bottom.
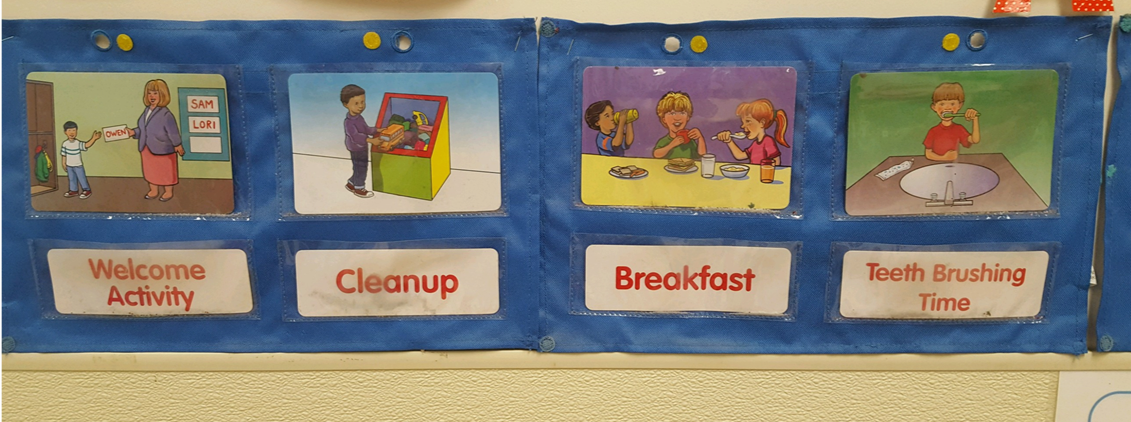
Figure 16. Horizontal visual schedule.
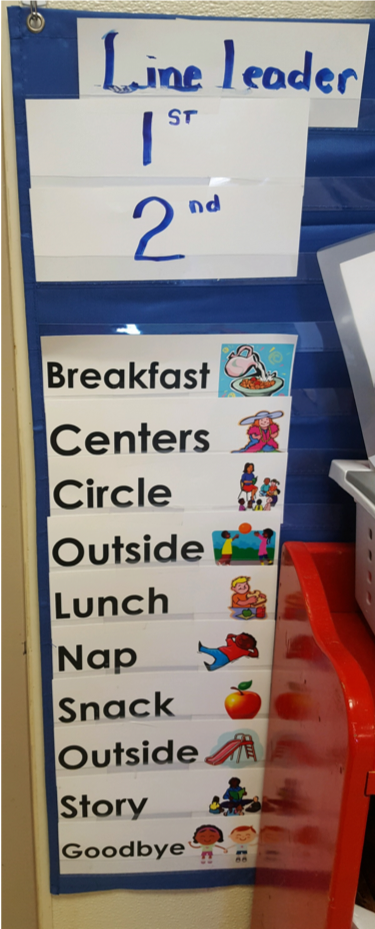
Figure 17. Vertical visual schedule.
Using photographs or line drawings for your visual schedule is really helpful to the children. These children may not be able to handle seeing all of the details of the schedule, but you will want to depict the major activities or the major steps of an activity. It's also helpful to the child if you take the visual off the schedule when the activity is completed. You can just put it in a folder, envelope, or some sort of container to indicate that that's all done. This way the child will see that as the time of day moves down the schedule, then he's completed all of these things and doesn't have to be concerned about what came before. Some children are not going to be able to handle seeing the schedule for the entire day displayed at once. You may need to display only the morning activities at one time, and then the afternoon. When a visual schedule is being used to bring order to your day, and you anticipate a change in that schedule, make sure to incorporate it into your visual schedule. Let's go back to our example of the fire truck. If we know that the fire truck is coming this afternoon, and it's going to happen during the time we would ordinarily have story on this visual schedule, then I would want to replace the word story and the picture for story time with a fire truck. I might want to put some sort of indicator that lets them know that we're going to do a little short story first and then we're going to go outside and see the fire truck. These are ways that we can prepare children for what's coming next. Again, we are helping to reduce that anxiety and that fearfulness so that their level of understanding and cooperation will increase. If you have questions about how to set up an individualized schedule, you may need to consult the child's speech therapist. You may also be able to talk to your director or an early childhood special educator to give you some tips.
Sometimes children with autism are going to require a visual schedule that's all their own. I like to use a visual schedule with the entire group, but if a child needed his or her own schedule, then that's fine, they can have one right beside the group schedule that they can reference as their day goes on. You can use an activity schedule, scripted stories, visual schedules, or other scripts to provide a child with information on when access to a desired object or event or interaction or activity will occur. Figure 18 shows some examples of some scripted stories and social narratives. These would assist a child to handle unusual changes in the schedule, such as the fire truck or Santa Claus visiting. There's one pictured here about biting your food which helps remind children what the rules are. I Can Use My Words and Happy Feet also help remind children of the rules. These are very reminiscent of stories that remind us that we use gentle hands and feet when we're working with our friends.
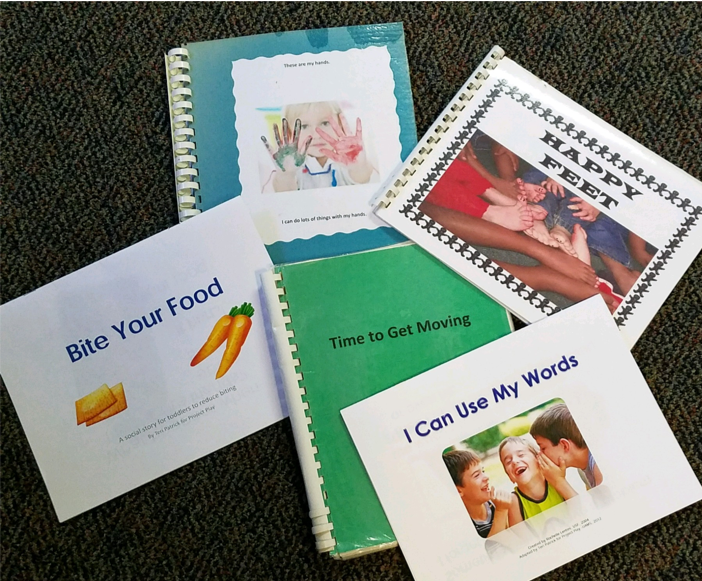
Figure 18. Scripted stories and social narratives.
Now/Next
For the child that has a hard time dealing with the entire day's schedule or even half a day's schedule, you may need to start with a now and next type of visual support. A now and next helps the child to focus on what he's expected to do now and what's coming up immediately following. This is also a good tool to work with a child on a non-preferred task, letting him know that a preferred one follows. I recommend using a timer when using this tool to address skill building. In figure 19, you see that now I'm expecting the child to work on her writing skills, her non-preferred activity. Maybe she loves bubbles, so I'm letting her know that after we work on her writing skills, next we're going to do bubbles. I would start very small, 10 to 20 seconds, maybe 30 seconds at most, depending on what the child can tolerate. When you bring out those bubbles make sure it's big and exciting and wonderful because that is a preferred activity. That will help her to comprehend that she doesn't have to stay in this place where she's uncomfortable forever. It will help her to understand that her preferred activity of seeing the bubbles and blowing the bubbles comes up next. As they progress in learning those skills, we can expand the time that's expected for them to spend on a non-preferred item or activity.
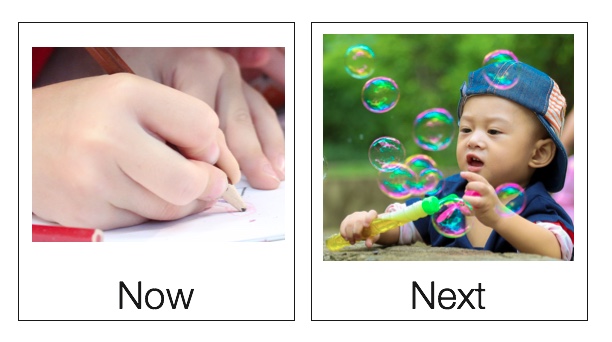
Figure 19. Now/Next.
Timers
Using a timer when you are doing the now and the next, especially when you're working on skill building is really helpful. Timers are your friend and can be used in all these situations, whether we're transitioning, to help a child stay on task, tolerating the non-preferred activities, or helping them to become more independent. There are several different types of timers you can use. In figure 20 you can see your standard wristwatch. You could use that as a timer, but that's going to be more for your own reference than for the child to be able to reference. Figure 21 shows another visual timer that uses sand to show time passing. Figure 22 shows a traditional kitchen timer. These can be a bit loud and distracting for some children, so you may wish to avoid that depending on how well the child can tolerate the noise that comes from it. There are visual timers available on the market like the one pictured in figure 23 that will actually decrease the red that's showing as it nears the end of the time that the child's expected to spend on the activity.
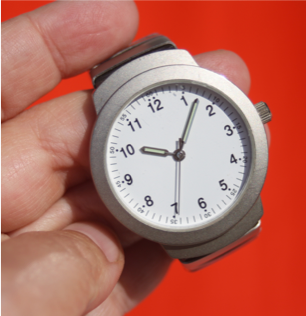
Figure 20. Wristwatch.

Figure 21. Sand timer.
Figure 22. Kitchen timer.
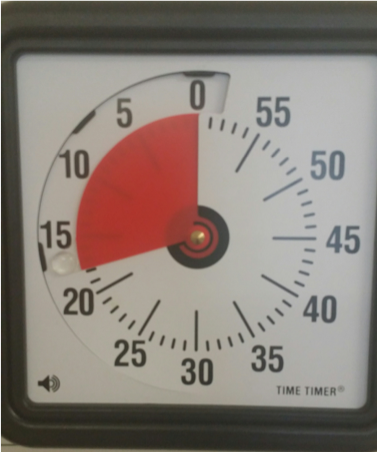
Figure 23. Time Timer.
Transition Cues
So how do we use a picture as a visual support to cue a transition? In figure 24 you'll see the example of our line up card again, because in my experience I've noticed a lot of children have a hard time with stopping what they're doing right now and going to transition hopefully in some semblance of a line to another activity, whether it be going outside or coming in from outside. Sometimes children just don't want to quit what they're doing. These are children that would benefit from that transition cue. You would want to make sure that it's accessible to you and that you have it with you on the playground. If you know that there's a child that has a problem with that particular transition, take your card with you so that when it's time to line up, you can go to him and you can give him that warning. For example, you might say, "All right, in five minutes we're going to line up." Go back to him again and say, "In two minutes we're going to line up," then again, "Now it's time to line up." Some children find that it's helpful to them if they take the card from you and they carry it with them just to help them remember that they are supposed to be in line right now. That helps keeps them on track and keeps them involved in the activity, but it also gives them something to do with busy little hands which is helpful as well.
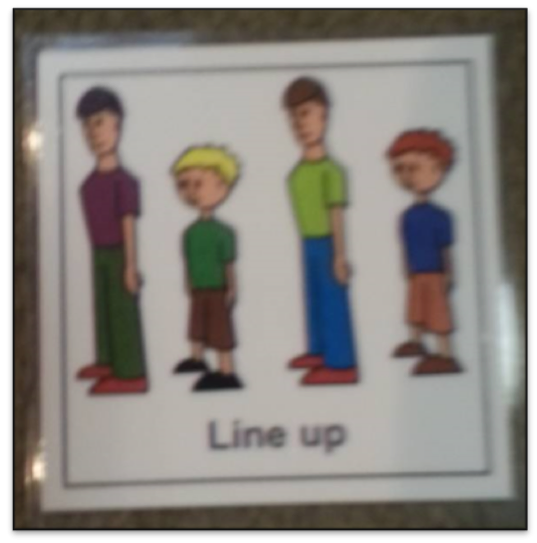
Figure 24. Line up cue card.
Task Analysis (Routines)
In routine situations that we do the same way over and over each day, such as hand washing, tooth brushing, toileting, and things like that, a task analysis can be very helpful. It's a step-by-step guide in pictures that helps a child to organize the process and it's a reminder to them to follow each step sequentially. In figure 25, we have a hand washing task analysis. When you're first starting with using a task analysis you're probably going to want to have some sort of indicator to remind the child where they are in the process. This might be an arrow, a clothespin, a magnet, or a clip of some sort. This is just something to let them know where they are in the process and it might be the adult's finger pointing to the picture. For this task analysis, I started with my friend Brayden and we turned on the water, then we went on to wet his hands, to get some soap, to lather his hands, to rinse them, to get the towel, to dry his hands on the towel, and to turn off the water. Now, this example was done in a home. If you were doing this example for a child care setting, obviously you would probably have a different type of soap dispenser, a different type of paper towel, and probably a paper towel dispenser. You would probably want to show the water being turned off using a paper towel as a barrier between the child's clean hands and the faucet. The point is that you want to be as consistent as you can with the routine because whatever steps you want them to follow each and every time that they follow this process, you want to make sure it's included in your task analysis. That way you can go back and you can say oh, wait a minute Brayden, you're getting ready to turn off the water but we didn't rinse your hands yet. The task analysis allows us to remind them not only where they are in the process but of each and every step that they need to follow.
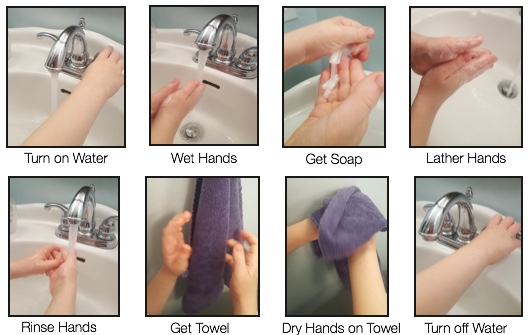
Figure 25. Hand washing task analysis.
Rules
What about rules? How hard is it for children to remember the rules? Posting three or four simple rules with visuals allows children an opportunity to reference what's expected of them throughout the day. In figure 26 you can see the four simple rules of we look with our eyes, we listen with our ears, we use gentle hands and feet, and we talk with an inside voice. If a child's behavior were to move into hitting, for example, we can take them back and reference the rule, remember, we use gentle hands and feet with our friends. That's a good reference for them throughout the day. I've often seen children reminding themselves before they take an action once they learn what these rules are and where to find them in the room.
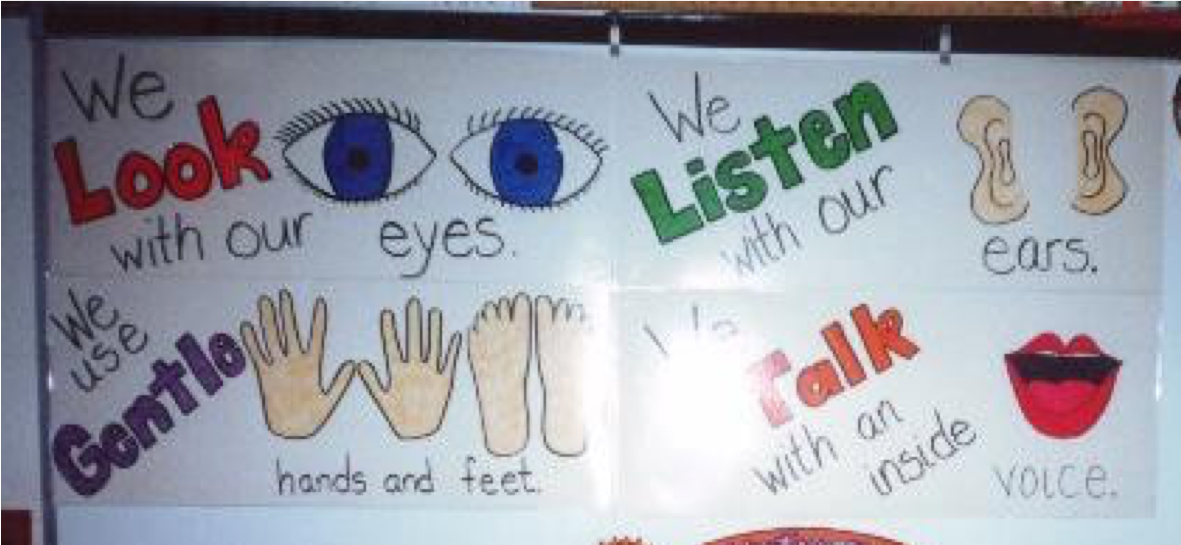
Figure 26. Classroom rules.
Prevention: Offer Choices
We can use visuals to offer choices. They can be offered using photographs, visuals, or actual objects. Choices should represent options of desirable activities or materials. We never want to offer a choice to a child that we don't want them to choose. So for example, if you need a child to come to the table because it's time to eat, and you have a choice of two different colors of chairs that they can it in, we could ask them, "Do you want to sit in the blue chair or the yellow chair?" Those would both be appropriate choices, and we want to make sure that we offer those appropriate choices to the children so that they can learn to make choices on their own. We want to make sure that those choices are developmentally appropriate as well. So back to our chairs. If the blue chair is shorter than the yellow chair and this child is going to be sitting at the table with their chin on the tabletop, we probably don't want to offer the blue chair as a choice for them. So we want to make sure that those choices are appropriate and available. If we don't have a blue chair available or if that is someone else's specified a chair, then we do not want to offer that as a choice to that child. When we use choices as a behavior prevention strategy, the choices must be offered explicitly and personally to the child. Let's say I'm trying to redirect a child, for example, and I need her to go to a center that is quieter and going to be calming for her. If I know that art tends to stress out this child who is already a little frustrated where she's at, I'm not going to offer art as a choice to her. I need to make sure that I go expressly to that child and offer these picture choices to her. Now if she does find art very soothing but she also enjoys looking at the bugs through the magnifying glass, then these might be two very appropriate and available choices, but if the science center is full, I don't want to offer that choice and further frustrate the child.
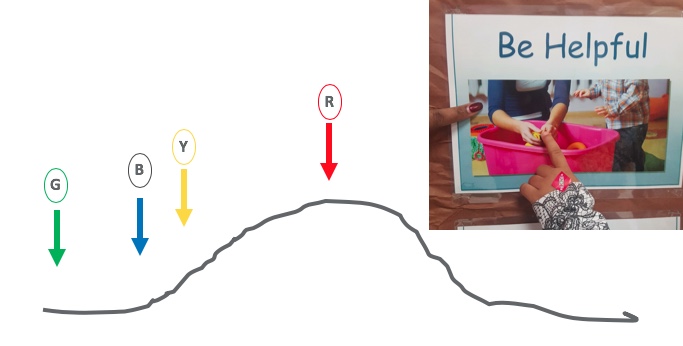
Figure 27. Behavioral timeline.
How would offering choices as a behavior prevention strategy work in the room? Look at figure 27. Let's say that this is the child's behavioral timeline. Little Suzy is playing in the blocks center and she is having a lovely time. She's at the green arrow and she's playing with the blocks and building a structure, and she reaches for the arched block at the blue arrow. Now, at that point, little Johnny reaches over and grabs the arched block, and it's the only one available. Uninterrupted, this might escalate to the point of the red arrow, right? Because Suzy's going to be very upset that Johnny got the block she wanted, and it was the only one and so, she may begin to scream, cry, hopefully not but, she possibly might hit or bite and we definitely don't want to see that sort of thing happen. So, what we would want to do is use our visual support at the point of the yellow arrow. Intervene, remind them of the rules, or offer a choice. Maybe you could use this shape block instead, or maybe you could use a different color. Maybe you and Johnny could work together and be helpful with one another and build your block structures together. We want to intervene with additional visual support to help calm the child or to help remind her of the rules before she reaches a state of emotional upset.
Summary
Let's review, why use visuals? Visual strategies help individuals in many ways. We use visual strategies primarily to help us communicate information to individuals. However, as these children learn what these visual supports mean, they will start to use them to request things, to ask questions, to ask for help, and to communicate to us in ways that we may not anticipate at the outset. Using visual strategies helps not only us to communicate information to children, but it helps children communicate information to us as well. Visual tools help students organize their thinking. Many people with autism spectrum disorders tend to think in pictures, and so they may organize things and categorize things based on how they look or what color they are or something involving that visual sense and that visual processing. Visual tools are going to help students organize their thinking. Visual supports are also used to give choices or to communicate rules. Remember that your timing is very important with this. We need to be clear and simply state the expectations, and we offer appropriate choices. One of the most important uses for visual strategies is to give information about what is happening, what is not happening, and what is changing. This is going to help reduce a child's anxiety. We want to increase their understanding and their communication efforts as well as their cooperation by using the visual supports. If you should have any questions, please feel free to email me at norriskimberlyd@gmail.com.
Questions and Answers
How do you introduce these visual schedules to the children in the very beginning if someone's not been using them at all?
I would recommend starting with something that is a preferred item in that child's life. For example, if we went back to our child who was very interested in bubbles, you might start with a visual support that showed bubbles and then pair that with the real object, the real activity so that they would understand that that picture indicates that activity. We would definitely want to pair that over and over again, and hopefully, over time, they will learn to understand that if I can take this picture and hand it to you, then you're going to take the time to blow bubbles for me. That would be a really easy way to introduce visual support.
I know that it's important to carry things over from school to home, so how do you encourage parents to use a visual schedule when their child is not at school with you and using yours?
I would recommend making a copy of the visual support that you're using at school so that they can use it at home as well, and explain to the parents how successful you've been with that particular item at school. Inform them that they may want to try this at home. You might also ask the parent to send a picture of a preferred item or activity from home. You could then tie that to your work at school and make that a two-way street. I would definitely start by making a copy of what I'm using at school so that the parent can try it at home.
What do you do when these visual supports don't work? For example, when you give the child a line drawing of going outside to play and they rip it up or throw it on the floor and scream, what do you do then?
That's a tough one because that's when we have to go back to our own emotional strategies. We have to calm ourselves and remind ourselves that this is not personal, this child is probably just in a state when he or she was not ready to see that visual support at that moment. We need to remember that they are slow language processors and give them that time to get to the point where they can handle that visual support and then try again. We definitely don't want to give up on the first or second or fourth or fifth time. We definitely want to keep coming back with repetition, but finding them in that calm alert state to present those visuals is key.
Citation
Norris, K. (2018). Visual Supports. continued.com - Early Childhood Education, Article 22929. Retrieved from www.continued.com/early-childhood-education