Editor’s note: This text-based course is a transcript of the webinar, Wheelchair Positioning to Optimize Respiration, presented by Michelle L. Lange, OTR/L, ABDA, ATP/SMS.
Learning Outcomes
After this course, participants will be able to:
- Explain 3 wheelchair positioning scenarios that may compromise respiration.
- Discuss strategies to promote upright trunk and head position.
- Describe strategies to support the diaphragm in wheelchair seating.
Introduction
Thanks, everyone for joining us today for this course. I hope that it is helpful information to you and to the clients that you serve. I am an occupational therapist (OT) and not a respiratory therapist (RT). I am going to be focusing on more of my role, which is how can we position the client to optimize their respiration. If I am not as knowledgeable about the entire respiratory system and function as I could be, I am going to leave that up to you. This is why RTs and OTs need to work as a team.
What We Will Be Covering Today
This is what we will be covering in this course today:
- The relationship of client posture and respiration
- Common client posture and wheelchair positioning scenarios which may compromise respiration
- Strategies to optimize respiration within a wheelchair seating system
We are going to discuss the relationship of the client's posture, their overall position, usually a seated position, and respiration. We are going to talk about some common client posture and wheelchair positioning scenarios that may end up compromising respiration, and then finally, we will discuss specific strategies to optimize respiration within the wheelchair seating system.
It Takes a Team
A few key points about working as a team:
- The wheelchair seating and mobility team may include an occupational and/or physical therapist, an equipment supplier, and other team members
- Work with the team to inform them of respiratory concerns so that these can be addressed
Wheelchair seating and mobility assessment require a team approach. The wheelchair seating and mobility team may include an occupational therapist, a physical therapist, a complex rehab equipment supplier, and perhaps other team members as well. It really depends on that particular setting. There used to be more disciplines involved, but due to funding concerns, the team is typically smaller now. It is really important that the respiratory team work closely with the positioning team to ensure the best outcomes of both positioning and respiration.
The Relationship Between Position and Respiration
How does our position impact respiration? I am sure most of you are familiar with this. Certain positions are going to help to support breathing.
- When the trunk is aligned and extended, the chest wall can better expand
- The position of the trunk greatly depends on the position of the pelvis
When the trunk is generally aligned and extended, the chest wall can better expand. This is an important consideration within the wheelchair seating system. And, the position of the trunk is very dependent upon the position of the pelvis. A lot of what we do within a wheelchair seating system is an attempt to get that pelvis in a neutral position in order to positively impact the position of the trunk and the head above it. When the neck is well aligned, breathing and swallow are optimized. Again, the position of the neck is very dependent upon the position of the trunk (and the pelvis). I work primarily in pediatrics, so you are going to see a lot of pediatric pictures. I do see adults as well, and this information is going to apply to both of these age groups. Here is an example in Figure 1.
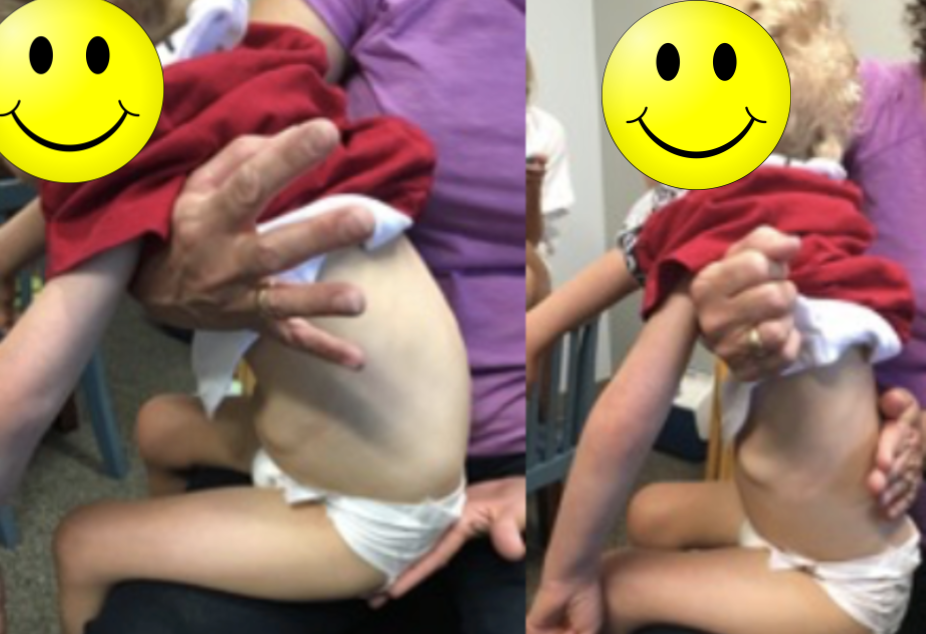
Figure 1. The therapist corrects trunk posture to promote increased head/neck position.
On the left, Riley has a posterior pelvic tilt that is leading to kyphosis, flexion of the trunk, and a forward head. By providing adequate support behind her pelvis and extending her trunk to maintain a neutral pelvic position, she has a better chance of keeping her head upright. Does she still need head support? Absolutely, but she has the ability to right her head. This will improve her swallowing and breathing.
- Gravity pulls down on the head and trunk, particularly in a seated position
Gravity tends to pull down on our head and trunk and particularly when we are seated. Wheelchair seating is used in an attempt to combat these forces and keep a person upright. You can see in Figure 2 gravity is making this client's head feel heavy (about as much as a bowling ball) and pulling it downward. Sometimes using something as simple as a slight tilt can really be helpful for a client.
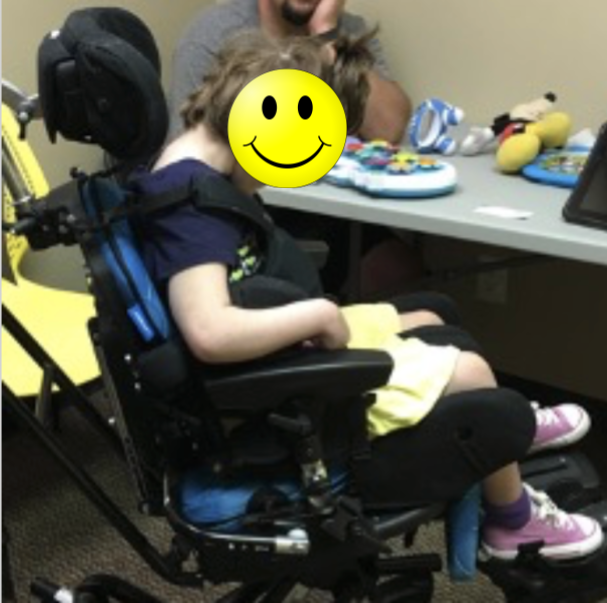
Figure 2. Gravity pulling down on a client in a wheelchair.
Our position impacts our respiration, and that is the case for any of us.
Pathology and Respiration
- Our position impacts our respiration
- When pathology is present, this impact is increased
There can also be specific pathologies that can dramatically impact respiration. Here we see a gentleman (Figure 3) that has a very severe fixed or non-reducible kyphosis that has led to an extremely forward head position. Not only is his vision greatly impacted but we can imagine what impact this has on his swallowing and breathing.
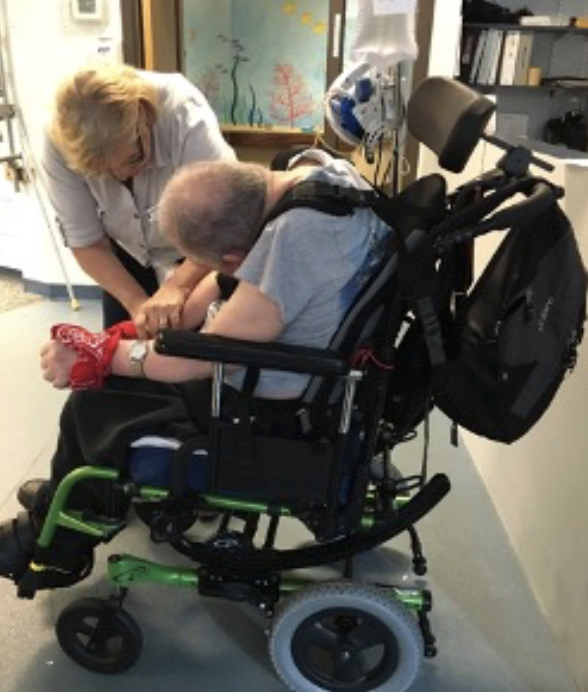
Figure 3. A gentleman in a wheelchair with severe forward head and neck position.
- Paralysis
- Denervation of muscles of respiration
- Muscle weakness
- May limit chest wall expansion
- Spinal curvature
- Can limit chest wall expansion and diaphragm function
- May compress one or both lungs
There are three conditions that can specifically affect respiration. They are paralysis, muscle weakness, and spinal curvature.
In paralysis, depending on the level, there can be a lack of innervation of the muscles that are responsible for respiration. This, of course, is going to impact this person's ability to breathe independently, and some type of assistance is going to be required.
There could be muscle weakness. Perhaps a person has a type of muscular dystrophy, ALS, or spinal muscular atrophy where their ability to expand their chest wall is now impacted. The person will have to have another strategy to get air into their lungs. This may or may not require assistance, such as a ventilator.
If the person has curvatures of the spine, particularly a more significant curvature of the spine, this can also limit chest wall expansion as well as the function of the diaphragm. This can also lead to compression against one or both lungs as well as other body organs.
The spine obviously is connected to the rib cage. And in the thoracic area of the spine, we have a rib attached on either side of those vertebrae. As the vertebrae begin to curve or rotate, we are going to see distortions to the rib cage itself and you can see that with Anderson here in Figure 4.
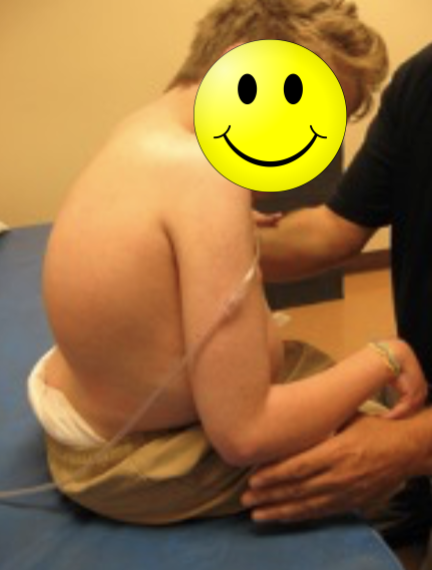
Figure 4. Client with severe curvature and rotation of the spine to the right.
He has a kyphosis and lordosis. He also has some rotation of his spine that has impacted the shape of his rib cage. Undoubtedly, this is also impacting his ability to breathe and breathe well.
- Respiratory conditions
- COPD
- Restrictive lung/airway disease
- Sometimes due to prematurity
- Others
- May already limit vital capacity
- Muscle tone
- May limit ability to expand the chest wall
- May impact function of the diaphragm
Specifically, we can see other respiratory conditions. We might be working with clients who have COPD or other restrictive lung or airway diseases. Again, I work with a lot of children. Some of these kids were preemies. As a result, they have ended up with some airway disease that impacts their overall vital capacity. There can be other respiratory conditions, of course, that already have a limited vital capacity and then we add these compounding scenarios on top of them. The clients I work with typically spend all of their upright time in a wheelchair seating system and already have a decreased vital capacity because they are not as active and able to use their body to take those nice deep breaths.
Increased muscle tone is another factor to consider. This can limit a person's ability to take a deep breath. It might also impact how that person takes that deep breath whether they are expanding their chest wall or doing more of that belly breathing which can ultimately impact the function of the diaphragm. Taylor, in Figure 5, has significantly increased tone.
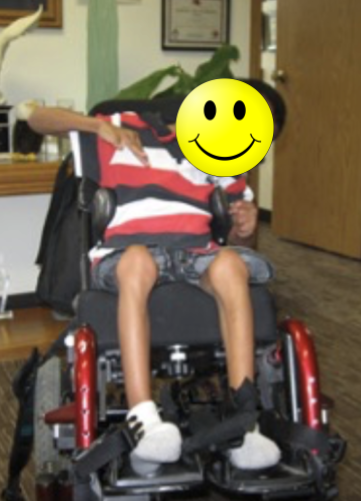
Figure 5. Client with increased tone pulling him to the left side.
His tone pulls him to one side. Have no fear. We did choose a different seating system and improved his position. When he was very excited, his tone pulled them even further into this flexible lateral scoliosis and this impacted his respiration.
The Good, The Bad, and The Ugly
- Common wheelchair positioning scenarios which may compromise respiration
- Strategies to optimize respiration within a wheelchair seating system
We are now going to talk about common wheelchair positioning scenarios which may compromise someone's respiration. These are positions that clients assume that ultimately affect their breathing. We are also going to look at strategies that we can use to optimize respiration as much as possible. Again, it is really important to work as a team on these issues to get the best outcome for our client.
The Trunk and The Pelvis
Let's talk about the trunk and the pelvis. They are interdependent. Our main goal in wheelchair seating is to achieve and maintain a neutral and upright trunk. Again, this is primarily in a wheelchair seating system. Clients I work with often use other positioning systems as well like a stander, a side-lyer, or an adaptive seat. I also look quite a bit at sleep positioning with the clients that I work with. Today, we are going to be talking about positioning in the wheelchair but much of this will carry over, particularly, to other seated systems. For example, many children spend time in their wheelchair seating system and then some time in an activity chair as well.
Positioning the Trunk
- Achieving and maintaining a neutral and upright trunk
- Kyphosis
- Lordosis
- Rotation
- Lateral Scoliosis
- Combined spinal asymmetries
Common challenges we see in the trunk include kyphosis, lordosis, rotation, and lateral scoliosis. We can also see clients who have a combination of these issues. Any of these can be flexible, where I can correct the person back to a neutral position. Sometimes this is also referred to as reducible. It could be a non-reducible deformity called not flexible or fixed. We could also see something in between that is partially reducible. For example, a person may hang out in a 40-degree spinal curve but can be corrected manually to about a 20-degree spinal curve. That would be called a partially reducible curvature. Just because a curvature is non-reducible or fixed does not mean that it cannot worsen. Thus, when we are looking at wheelchair positioning, we want to prevent fixed deformities from worsening as well.
- Why is all this important?
- The position of the trunk, and subsequently the head, is very dependent on the position of the pelvis
- Maintaining an upright trunk requires intrinsic muscle strength, balance, and stability
- If a client lacks intrinsic control, extrinsic supports are required
- Gravity has a profound influence on the trunk
We discussed how the position of the trunk and head are very dependent on the position of the pelvis. Achieving and maintaining the pelvis in a neutral position is key to achieving a more neutral, upright trunk. Ideally, we want the trunk to be extended with some scapular retraction to open up this area. Maintaining an upright trunk requires coordination of muscle groups. These include the flexors, abdominals, extensors (back muscles). These all have to be in balance in order to keep someone upright. This requires a certain level of intrinsic muscle strength, muscle balance, and stability. If the client lacks that control due to paralysis, muscle weakness, or abnormal muscle tone, then I need to bring in extrinsic supports like a seating system. Remember, gravity has a profound and often negative impact on the trunk. It wants to pull that head and trunk down towards the ground.
The Relationship Between the Pelvis and the Trunk: Posterior Pelvic Tilt/Kyphosis
Let's talk a little more about this relationship. I see so many clients who are in a posterior pelvic tilt all the time. Many of us assume a posterior pelvic tilt where we slide the pelvis forward. It is an easy and stable position to fall into, but we do not want to stay there because of its impact on posture. You and I can move in and out of positions readily. Our clients may not be able to so we have to identify a very ideal posture right off the bat.
A posterior pelvic tilt, where the pelvis rocks rearward posteriorly, leads to a kyphosis or forward flexion of the trunk. We can see that illustrated here in Figure 6.
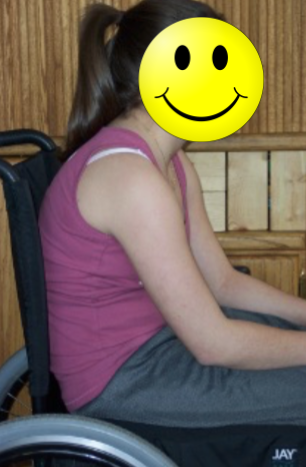
Figure 6. Individual with increased pelvic tilt and kyphosis.
It is a little hard to see the pelvis here but it has slid forward, resulting in that trunk flexion.
Kyphosis and Respiration
- Forward trunk flexion impacts respiratory function as the rib cage cannot expand efficiently and the chest cavity is compressed
(Gore et al., 1986)
We know that forward trunk flexion impacts respiratory function because the rib cage cannot expand very well when it is collapsed forward. The chest cavity is also compressed. There are a few mechanical issues here. When the trunk is forward, it cannot extend and expand that rib cage because of the biomechanical impact of the position of the vertebrae on the rib cage. The ribs also cannot expand the muscles in between. This is a lot of pressure on the chest cavity, and that is going to all impact respiration in a negative way.
- Increases intra-abdominal pressure which makes the movement of the diaphragm more difficult
- This leads to reduced lung capacity and inspiratory flow
(Lin et al., 2006)
Also, when in this kyphotic position, the intra-abdominal pressure increases impacting the movement of the diaphragm. This collapsed position of the trunk is now creating pressure and not allowing that diaphragm to move the way it needs to. This is going to reduce lung capacity because as we know the diaphragm needs to move to draw those lungs downward. This will also reduce inspiratory flow. As a result, the client cannot get as much air in.
- Posterior pelvic tilt and kyphosis facilitate more diaphragmatic breathing
When someone is in a posterior pelvic tilt and a kyphotic position, this is going to facilitate breathing using the diaphragm or belly breathing as I call it, as opposed to expanding the chest wall. This also has an impact. We want to try to open things up so that this client has an opportunity to expand their chest wall as well.
Example
Let's take a break and look at an example of this young man, Kian (Figure 7).
.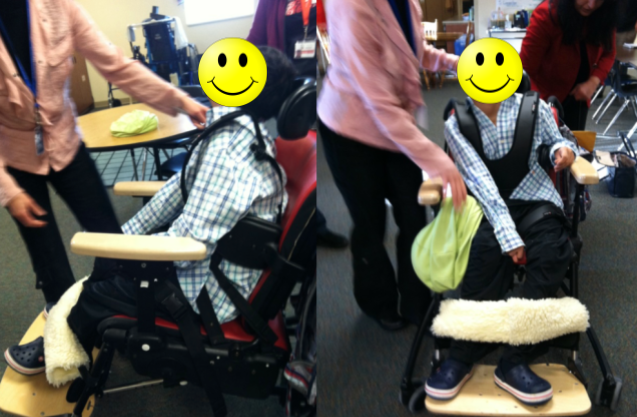
Figure 7. Client with increased kyphosis, lateral sclerosis, and neck hyperextension.
Kian was in a posterior pelvic tilt and had kyphosis, lateral scoliosis, and neck hyperextension. He was actively aspirating. I went to see Kian at his school. He was in this generic activity chair rather than his own custom wheelchair seating system. When I asked the team why he was in this system instead of custom seating, I was told that he looked better in this. That is concerning because he did not look too good in this.
When a client is in a posterior pelvic tilt and kyphotic position, if I want to look up at the world, I have to hyperextend my neck. It's the only way it's going to work. If my pelvis and my spine are aligned, then I can keep my head upright without hyperextension. Now, Kian had a feeding tube when he was younger or at least an attempted gastrostomy surgery that was unsuccessful. He almost didn't survive. And so he does not have currently a way of feeding that way and so he takes all his food and liquid by mouth, which is very, very dangerous because he aspirates. So during this time, his mom continued to put water down his throat and I could hear the gurgling and it was very concerning. So we really wanted to address this position.
- With a corrected wheelchair seating system, his pelvis was in neutral alignment, only a residual non-reducible kyphosis was present, and his neck and head were aligned
- Breathing and swallow improved
With a corrected wheelchair seating system, this is his wheelchair and seating system and we had made a number of changes to it, we were able to get his pelvis in a neutral position and there was only a residual portion of a non-reducible kyphosis that was present.
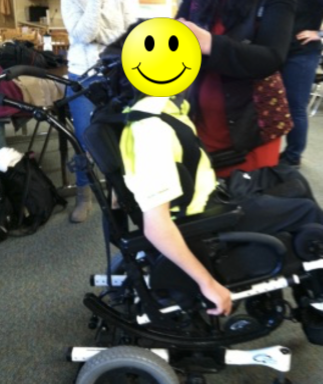
Figure 8. Client with better posture in customized seating.
We were able to greatly reduce that as well and his neck and head were aligned. It looks like his mom is holding up his head in the picture, but she is actually just brushing his hair out of his face. His breathing and swallow were also improved.
The Relationship Between the Pelvis and the Trunk: Anterior Pelvic Tilt/Lordosis
An anterior pelvic tilt, where the top of the pelvis is rocked forward, leads to a more lordotic position of the spine. With this, there is a hyperextension of the spine. Here is an example in Figure 9.
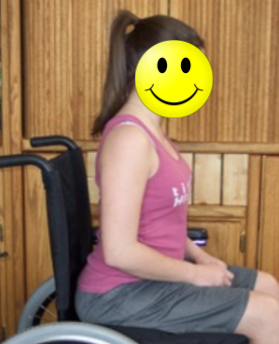
Figure 9. The client has an anterior pelvic tilt with lordosis.
Lordosis and Respiration
- Lordosis, unless quite severe, tends to optimize respiration, as in standing
- Opens the anterior chest wall to facilitate more upper chest breathing
(Lin et al., 2006)
This is really not a horrible position for respiration, but it can lead to other issues within wheelchair seating. We need to bring this person back to as neutral of a position as possible. Again, lordosis, unless it is very severe, tends to optimize respiration particularly when we are standing. It opens the anterior chest wall to facilitate more breathing.
The Relationship Between the Pelvis and the Trunk: Pelvic Rotation/Spinal Rotation
When the pelvis is rotated one side forward, the spine will be rotated as well. Figure 10 shows a young lady with quite a bit of spinal rotation.
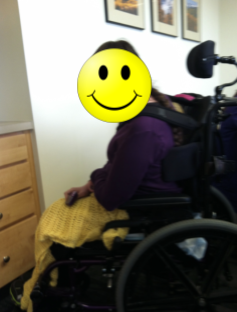
Figure 10. This client in a wheelchair demonstrates pelvic and spinal rotation to the left side.
This is a direct result of pelvic rotation and will have an impact on her respiration as well.
The Relationship Between the Pelvis and the Trunk: Pelvic Obliquity/Lateral Sclerosis
We can have a pelvic obliquity where one side of the pelvis is higher than the other. This tends to lead to lateral scoliosis as we often see these together. This is commonly called a C curve that develops as shown in Figure 11.
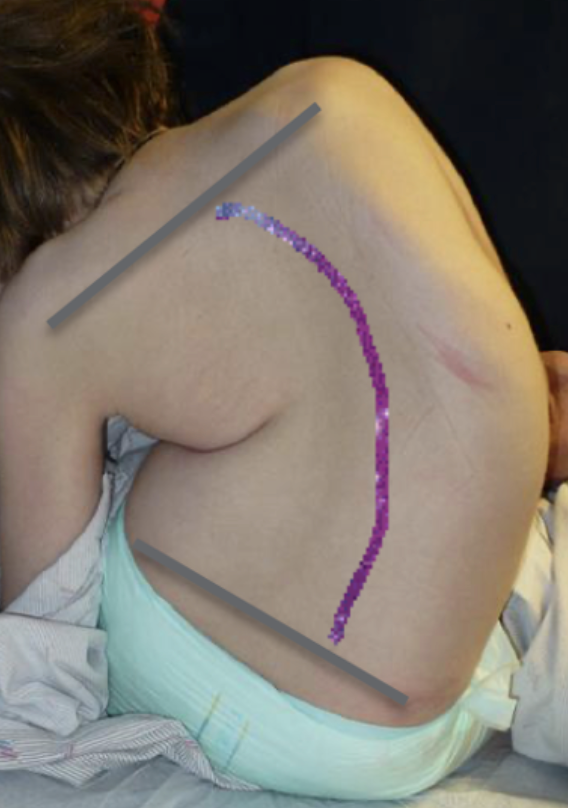
Figure 11. This child has severe pelvic obliquity and resultant lateral sclerosis to the right side.
As the client attempts to right their head, this can quickly turn into an S curve, where we have an accompanying curvature above the initial one.
Lateral Scoliosis and Respiration
- Impedes rib movement
- A mechanical disadvantage of respiratory muscles
- Displacement of organs
- Decreases chest wall compliance
- Decreases lung compliance
- Progressive atelectasis and air-trapping
(Koumbourlis, 2006)
This is a very significant lateral scoliosis, which of course would have a dramatic impact on respiration. This is going to impede the movement of the ribs and leads to a mechanical disadvantage for the respiratory muscles. The respiratory muscles are overstretched on one side and compressed on another. Severe lateral scoliosis can also literally displace organs that can have an impact on the diaphragm. It also decreases the chest wall's movement, flexibility, compliance, and in turn, it decreases the ability of the lungs to function well. This can lead to issues with entrapment of air or shut down of those small vessels within the lungs.
Interventions-Posterior Pelvic Tilt
Let's now discuss some potential interventions to address these concerns. What do we do within the wheelchair seating system to improve someone's posture and also to optimize their respiratory function?
If we are trying to reduce a posterior pelvic tilt, a partial or reducible one, it is important to provide support on both sides of the pelvis. Much of what we do within wheelchair seating involves force and counterforce. If somebody has a posterior pelvic tilt and I only address it on one side, then I am not going to be successful. I need to place my hands, or in this case, the seating components on both sides of the pelvis to achieve a neutral position.
- Posterior Support
- Provide support to the posterior superior surface of the pelvis to block backward movement
- Biangular back or PSIS pad
First, we provide support to the posterior superior surface of the pelvis to block the rearward movement. Because again, when someone falls into a posterior pelvic tilt, their pelvis is actually rotating into that tilted position. We need to block the back of that rotation, as well as, the forward movement of the pelvis. We do this through a couple of different strategies. In Figure 12, we have something called a biangular back.
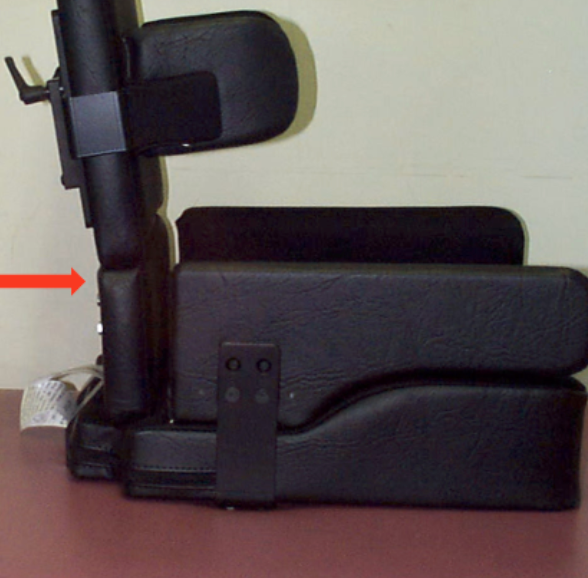
Figure 12. in this seating system, the biangular back corrects for a posterior pelvic tilt. Image courtesy of Rehabilitech.
You can see the back is split into two pieces. The lower piece is usually at a more close seat-to-back angle to support the pelvis and then the upper back extends beyond that to promote trunk extension. This same shape or strategy can often be seen in off-the-shelf backs and in molded seating systems. Sometimes, especially during evaluations, we will use something called a PSIS pad (behind the sacrum) in Figure 13.
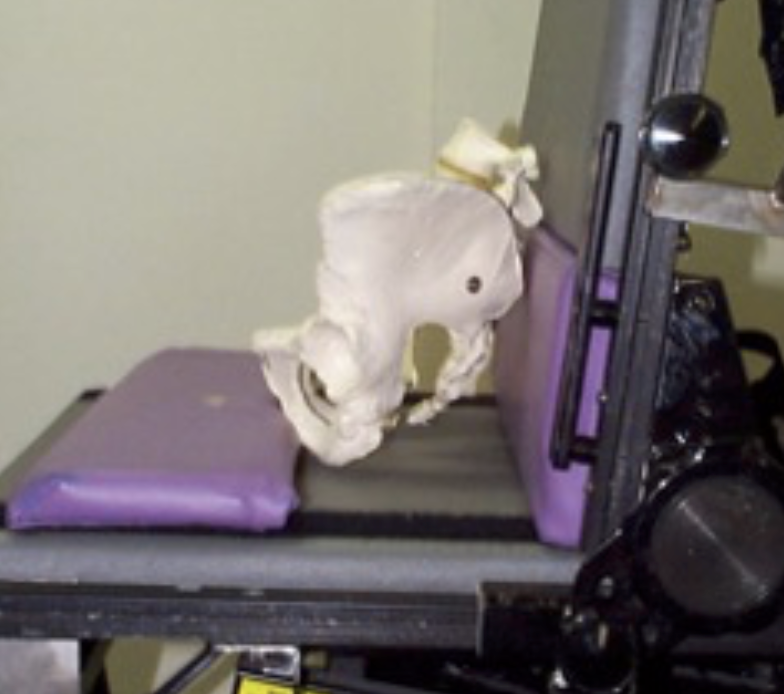
Figure 13. A PSIS pad behind and an anti-thrust curb in front of the skeletal pelvis.
If you look here to the left, we have a purple pad behind the pelvis called a PSIS pad. PSIS stands for the posterior superior iliac spine. It is the upper portion of the pelvis and that mimics a biangular back position. This can help address a posterior pelvic tilt.
- Anterior Support
We need to provide anterior support to have a force and counterforce. In order to block forward movement of the pelvis, a strategy that was used for many years in linear seating systems was an anti-thrust curb (also shown in Figure 13). We still use that today. This curb is a shape that is built into a lot of our options that are available in off-the-shelf cushions as well and a shape that is commonly seen in a molded seat. Again, looking at the bottom of Figure 13 on the skeletal pelvis are two bony prominences called the ischial tuberosities or ITs. As the pelvis rotates forward into a posterior pelvic tilt, we can block the forward movement of the ITs with this curb. As such, it needs to be positioned very precisely to keep the pelvis in a neutral tilt.
Again, if that can be achieved, we do not want this curve to be too high or unweight the ITs completely. If this curb is too high it closes up the seat to back angle and that makes sitting up a little more difficult. Our whole goal here, between providing posterior support to the pelvis and anterior support to prevent that forward movement of the ischial tuberosities, is to obtain an upright pelvis to promote an upright trunk for optimal respiration. Figure 14 shows a contoured seat using some of these components.

Figure 14. This is a contoured seat cushion with a built-in anti-thrust curb. Image courtesy of Rehabilitech.
- Provide support to the anterior pelvis to block forward movement
- Stabilize pelvis using an appropriately angled pelvic belt
- 60 degrees
- Stabilize pelvis using an appropriately angled pelvic belt
In addition to blocking movement behind the pelvis and forward movement of the ischial tuberosities, we can use an appropriately positioned pelvic positioning belt to maintain a neutral pelvis as noted in Figure 15.
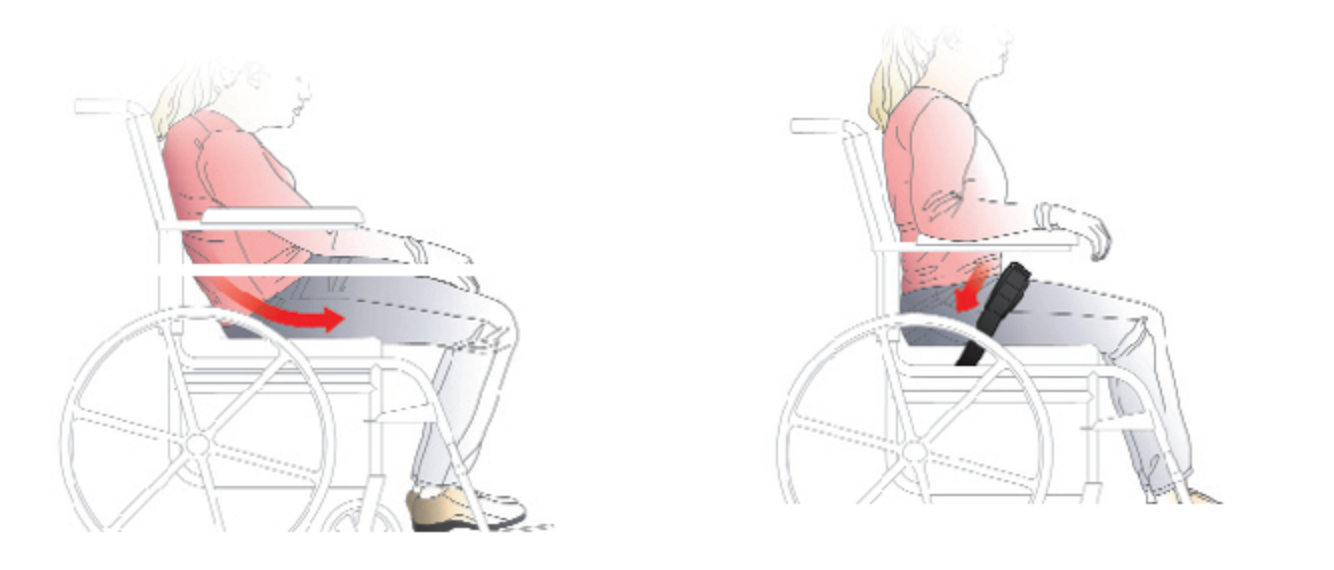
Figure 15. Proper position using a 60-degree pelvic positioning belt. Images courtesy of Bodypoint.
For many of our clients, we can keep them in a neutral position using a biangular back or similar shape and an anti-thrust seat. We can keep their pelvis in a neutral spot until they extend and jump right over that curb. The pelvic belt keeps the pelvis within the confines of the biangular back and anti-thrust seat. We can place these pelvic positioning belts at many angles depending on the movement that we are trying to prevent. In the case of a posterior pelvic tilt, we use a 60-degree angle. If we use a different angle, it will not be effective. We use a combination of posterior support to the pelvis to prevent that rocking rearward, anterior support in front of the ITs, and then we have an appropriately angled 60-degree pelvic positioning belt to keep the pelvis within that well-constructed seating system.
- Opening Up Seating Angles
- Tight hamstrings can pull the pelvis into a posterior pelvic tilt
- Interventions:
- Open seat to back angle
- Decrease thigh to calf angle
Another cause of a posterior pelvic tilt is tight hamstrings. The hamstrings are connected to the pelvis and the knees. They cross two different joints. If a client has long legs or the footplates are interfering with the front casters, we may opt to pull their feet further forward. However, if the client has tight hamstrings, that movement is going to pull the pelvis into a posterior pelvic tilt. This is something that the wheelchair seating and mobility team looks at ideally in a mat exam to determine what is the available knee range of a client. The different angles are shown in Figure 16.
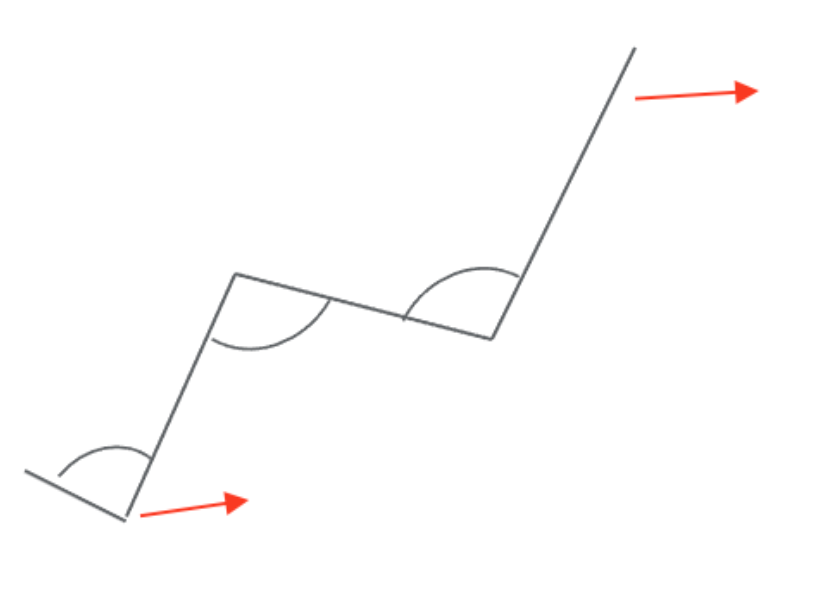
Figure 16. This drawing shows the different seating angles including the back and at the footrests.
There are two different things we can do. We can open the seat-to-back angle a bit. This relieves the pull on the attachment point of the hamstrings on the pelvis. Figure 17 shows an image of a child with tight hamstrings.

Figure 17. Child with tight hamstrings.
We can also decrease the angle at the knee between the calf and the thigh. This is going to relieve the pull where the hamstring attaches to the knee.
Intervention: Kyphosis/Forward Trunk Flexion
- Kyphosis
- Kyphosis can be at various levels of the spine
- Kyphosis may be flexible, partially flexible, or fixed
- It may be combined with neck hyperextension
We know that kyphosis and posterior pelvic tilt go together. We can address the pelvis as much as possible within the wheelchair seating system, but then we need to turn our attention to the trunk. Kyphosis can be seen at various levels of the spine. It is easy to assume this is going to occur at the thoracic level, but it really can occur at lower levels as well. I have seen a very high kyphosis at the cervical level or even down low at the lumbar area.
Kyphosis can be flexible, partially flexible, or fixed, as we discussed earlier. Even if this kyphosis is fixed, we need to address it within the seating system so that it does not worsen. We also need to provide good pressure distribution. This is because if someone has a significant curvature in their trunk and a very flat back behind them, very little of their posterior trunk will be in contact with the seating system. That can lead to pressure and discomfort. It is also very common for someone with significant kyphosis to have neck hyperextension as well.
- Interventions:
- If flexible:
- Anterior trunk support
- Posterior trunk support
- Force and Counterforce
- If flexible:
If the kyphosis is flexible and reducible, we can get this person into a neutral alignment of their spine. Again, we need to provide force and counterforce where we have a combination of anterior and posterior trunk support. Let's take a look at our options.
- Anterior Trunk Supports
- Chest strap
- Shoulder straps
- Shoulder retractors
- Butterfly style vests
- Abdominal supports
- TLSO
We have a significant amount of options for anterior trunk supports. Each of these has its own clinical indicators, and the seating and mobility team will decide which is most appropriate. The most basic is a chest strap that simply goes straight across the mid-chest level to keep someone from moving forward as shown in Figure 18.

Figure 18. Example of a chest strap.
Shoulder straps are pictured in Figure 19 on the gentleman with the purple shirt.
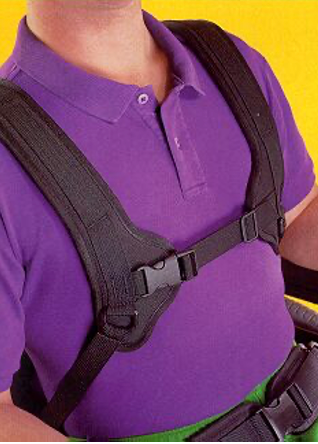
Figure 19. Example of shoulder straps to extend the trunk.
These help to extend the trunk and even retract the scapula a bit to really open up the chest. Shoulder retractors are shown in Figure 20. These are rigid supports that are not used very often.
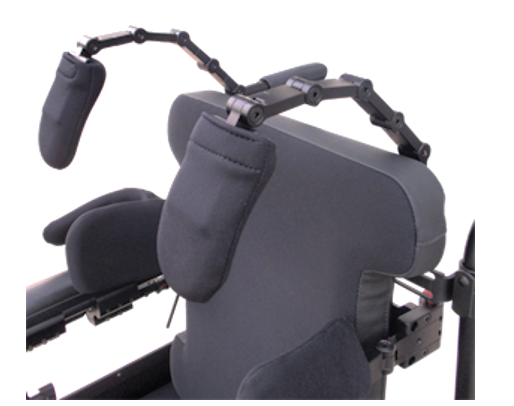
Figure 20. Examples of rigid wheelchair supports.
These work best with clients who tend to collapse forward. If they feel something in front of their shoulders, it will also cue them to resume an upright posture. Figure 21 is an example of a positioning vest.
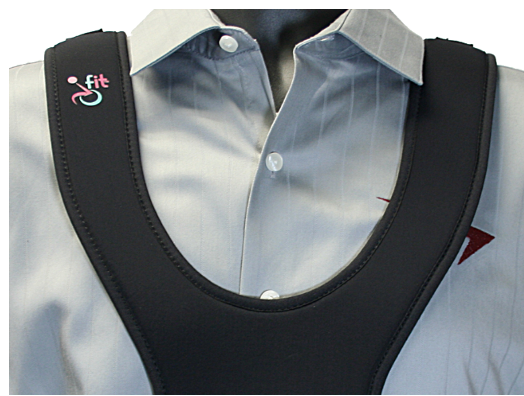
Figure 21. Example of a positioning vest.
These are commonly used especially in the pediatric population to keep the trunk upright. I am not a big fan of these, and I really try to avoid them. If I work with a client who has one, I like to change them over to shoulder straps as there have been a number of cases across our country where people have been strangled using these. Caregivers tend to tighten the straps on the top of the vest and it gets higher and higher until it is right at someone's throat. If the client is not otherwise well-positioned, it is easy to collapse onto these. It is a huge risk so I will change them to something else.
With any of these anterior trunk supports, it is also critical the client also uses a pelvic positioning belt as we do not want the client sliding down while wearing these supports. Any of them can become a danger at that time.
There are also a variety of abdominal supports. We will talk about these in more detail later. Some clients will even use a TLSO (Figure 22) or orthotic approach.
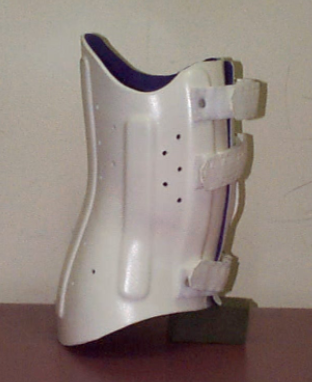
Figure 22. Example of a TLSO.
- Facilitate an upright trunk
- Provide stability
- Maintain client contact with the back
The goal of anterior trunk support is to facilitate an upright trunk, provide stability, and maintain client contact with the back of the seating system. An upright trunk is going to help with respiration, vision, and function. We also want good pressure distribution against the posterior trunk.
- Shoulder straps
- Best for trunk extension and scapular retraction:
- Targeted anterior thoracic support over the clavicles
- Promotes trunk extension and scapular retraction
- More upright trunk and improved head position
As I mentioned before, I use shoulder straps quite a bit (Figure 23).
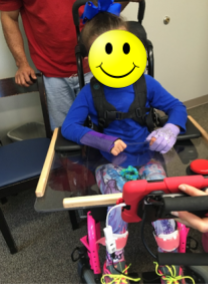
Figure 23. Example of shoulder straps.
Shoulder straps are the most effective for providing trunk extension and scapular retraction. It provides targeted anterior thoracic support at the mid-clavicle region. This is ideal as it is not blocking the head of the humerus impacting function or rubbing against the side of the neck. Again, we are promoting extension and scapular retraction to help open up the chest for breathing and provide an upright trunk. As a result, this improves head position. Even if this person still requires head support, we want to balance the head over the trunk as much as possible.
Intervention: Scoliosis/Lateral Trunk Flexion
- Lateral Scoliosis
- Scoliosis may be C curve, S curve, and/or rotational
- Scoliosis may be flexible, partially flexible, or fixed
Now if someone has lateral scoliosis, this can be that C curve, an S curve or include a rotational component, as noted in Figure 24.

Figure 24. Example of scoliosis to the right side.
Scoliosis can be flexible, partially flexible, or fixed. We want to correct that as much as possible. Can they tolerate the degree of pressure that is required without skin breakdown or discomfort? We want even a non-reducible curvature to not worsen any further.
- Scoliosis/Lateral Trunk Flexion Interventions:
- If flexible:
- Lateral trunk supports (may need to be asymmetrically placed, one lower at the apex of lateral convexity for that force and counterforce)
- Anterior trunk supports to correct any rotation (see forward trunk flexion interventions)
- If flexible:
What do we do? Again, we can use force and counterforce as noted in Figure 25.
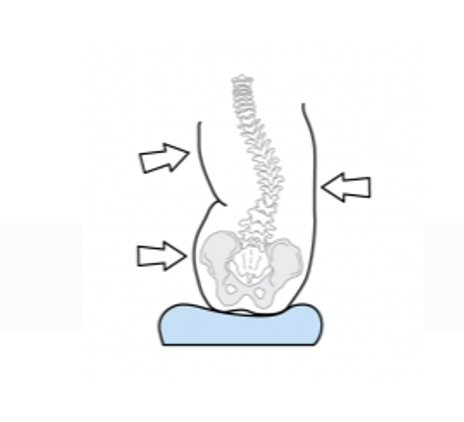
Figure 25. Example of where to apply force for scoliosis.
On the upper right here, we see a picture of a strategy that is commonly used with lateral scoliosis called the "Three Points of Control." We have lateral support on the side of the trunk that is higher at the top portion of the curve. On the opposite side, we have two points of control. One at the pelvis and one at the top where the lateral lean is occurring. The tends to be lower and more at that apex of the curve. What I typically do is put supports on both sides of the pelvis to keep the pelvis in place (not shown in the image). I find that people's tolerance for asymmetry is not very high so I put two points of control on both sides (two at the pelvis, one at the C curve, and one under the area of the lateral flexion).
It is also typical to include anterior trunk supports for this client as well. These will often be required for someone who has a lateral curve with rotation.
- Spinal curvatures
- Sometimes, spinal curvatures require a tremendous amount of force and contact to reduce
- This often requires molded seating which can limit chest expansion
- Non-reducible curvatures may also require molded seating to accommodate the user’s shape
- The rib cage will have lost a great deal of movement, at this point
There are times where a curve will require a lot of force, and it is important that we consider the best seating system solution to address that. Oftentimes, we look at custom-molded seating for significant spinal curvatures for a few reasons. It could be that the client simply can not tolerate the degree of force that is required. Or, they need more intimate contact. Custom-molded seating takes that force and spreads it over a wider area so the client can better tolerate it. Also, someone who has a lot of curvature in their spine that cannot be reduced is also going to have distortions to the rib cage. This results in very little contact between the client and the support surfaces. By using molded seating, we can match the contours of the client to again distribute that contact and support.
Non-reducible curvatures, particularly if they are of any significance, are going to typically require molded seating to accommodate the shape. Remember, the rib cage will have lost a great deal of movement at this point. One challenge with molded seating, depending on how rigid it is (like some of our molded seating systems that use an orthotic approach) may limit the movement that is available within the rib cage itself. By this point, typically rib cage movement is already decreased due to the curvature, but it is something we need to keep in mind as molded seating can also have an impact on the ability of the chest wall to expand.
The Neck and the Head
Forward Head Position and Respiration
- Respiratory function was lower when sitting with forward head position
- Respiratory function was significantly lower during neck lateral flexion and rotation (torticollis)
- Reduced diaphragmatic strength
(Zafar et al., 2018)
For clients who have a posterior pelvic tilt and forward trunk position, the head will assume a forward head position. As a result, this will of course impact respiration. Respiratory function, according to research, is lowered when someone is sitting with a forward head position.
Respiratory function was also significantly lower during neck lateral flexion. This is flexing the ear towards the shoulder with rotation. This is sometimes called a torticollis position. Torticollis is caused by very specific neck muscle tightness that pulls the head into this position. Torticollis could be seen in people who do not have any other health conditions.
There may also be reduced diaphragmatic strength in people with this forward head position. Years ago I was seeing a gentleman who had ALS. His head position was horrible. He did not have enough support within his seating system to keep his head upright. His head was quite forward and to the side. His pulse ox was only 68%. This was of course extremely concerning. When I took my hands and held his head in as corrected a position as I could manage, the pulse ox rose to the high 80s. Considering that he was at end-stage ALS, this certainly was much better. Our goal at that point was to get him an appropriate head support system as soon as possible to optimize his oxygenation levels. The position of his head had a dramatic impact on his oxygen levels.
Neck Lateral Flexion, Rotation, and Respiration
- In lateral flexion and rotation, neck muscles are shortened
- These muscles are accessory muscles in respiration, elevating the ribcage
(Jung et al., 2016)
This is another research study that showed that when the neck is in lateral flexion, the neck muscles are shortened. These muscles assist in respiration because they assist in elevating the rib cage. Not only are we using the intercostal muscles and the diaphragm to help with respiration, but we use these neck muscles as well. Thus, the position of the head is going to have a direct impact on breathing.
Neck Muscle Weakness and Respiration
- Weakness of these muscles can decrease maximal inspiratory and expiratory pressures
(Dimitriadis et al., 2013)
If there is weakness in the neck muscles, this is going to decrease the maximal inspiration/expiration pressures. The neck ideally helps to expand to lift the rib cage, and that is not going to happen if there is paralysis or weakness in those muscles. Many people with conditions like cerebral palsy will have increased tone in their extremities, like their arms or legs, but low tone in the trunk and neck so we could see a similar impact on respiration.
Neck Hyperextension and Respiration
- When the neck is hyperextended, respiration may actually be easier
- However, the airway is less protected, and aspiration may occur
- When the trunk is flexed, the client must lift their head into neck hyperextension to see what is in front of them
When the neck is hyperextended, respiration can be a problem. When the neck is hyperextended a little bit, we are actually opening up our airway so respiration may appear to be easier. The problem is that the airway is now less protected which can lead to aspiration and choking.
When the trunk is flexed, the client must lift their head into neck hyperextension. It is the only way they can see ahead of them. We need to address positioning at the level of the pelvis (get it into a neutral position) to promote extension of the trunk to increase vision without the need to hyperextend at the neck.
Interventions
- The goal is to achieve neck alignment, if possible
- Without flexion, hyperextension, lateral flexion, or rotation
Our goal is to achieve neck alignment, if possible, without flexion. We see here in Figure 26, that each of these people is not in an optimal position in terms of their neck. We need to start at the pelvis, look at the position of their trunk, and then try to optimize the position of the neck. We can see how each one of these clients might have issues with both respiration and swallowing.
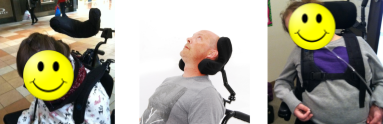
Figure 26. Poor neck alignment examples.
- This can be very complex and requires a comprehensive evaluation
- The position of the Pelvis and Trunk must be addressed first
Interventions at the head tend to be very complex and require a comprehensive evaluation. This goes for the pelvis and trunk as well. First, the seating and mobility team is going to take a look at how to correct the position of the pelvis and trunk as much as possible, and then turn their attention to positioning the head. There are a lot of strategies. This takes quite a bit of work to get to an optimal solution.
- Sometimes a combination of supports are required
- Posterior or Occipital Pad
- Inferior or Suboccipital Pad
- Lateral Pad
- Forehead straps or Collars
Sometimes, we need a combination of supports in order to achieve this alignment of the neck. Again, we may have to use force and counterforce. I see a lot of clients who spend all their time looking at their lap.
For one, if the head support is behind them and they do not touch it, it is not going to do anything. There is nothing magic about a head support. We have to look at the entire position of the client, and then look to see where support is required.
Supports commonly include an occipital pad posterior to the skull. We can also provide suboccipital support to cup the bottom of the head. This can help prevent neck hyperextension and provide more support contact to keep the head upright. We can bring in lateral pads as needed, and if required, collars and forehead straps. I really try to avoid those if possible, but sometimes that is the only way we can maintain an upright and aligned head.
Example
Let's look at an example here and imagine the impact on breathing. This is Hannah (Figure 27). You can see on the left that she is laterally flexed and rotated to the right side.

Figure 27. Head support example with a client.
Her head is laying on her chest. She already is having some respiratory issues and is on oxygen. I am sure this position is not helping. Take a moment and imagine what is going on with the structures that are involved with respiration from her lips, tongue, throat, trachea, and lungs. The rest of her body is actually very well supported, and she happens to be in a molded seating system. However, her head position is not well addressed. Does she have head support? Yes, she has posterior head support, but it is not enough to correct this position. In the center pic, you can see we added a suboccipital pad. This provides support underneath the suboccipital shelf and cups the back of the skull. It also provides some lateral support to the right side of her neck and lower skull. We also added a pad to the side as well above her ear. Now, we are creating three points of contact similar to what we do on the trunk when there is lateral scoliosis. To the right of her head, we have two supports, and in the final picture on the right, you can see the suboccipital pad that provides support along the lower portion of her neck and skull on the left.
She has a switch plate on the left side of her head. Once we corrected her head position, not only did her respiration improve but also her swallow and certainly her vision. Now, she is able to look ahead of her and use her communication device via the switch. This was a big difference with her positioning.
Special Considerations
- Traches and Vents
- Often, the neck must be positioned in slight hyperextension to provide adequate space
There are some other special considerations when it comes to wheelchair positioning when we are trying to optimize respiration. Some of the clients we work with use a trach and/or ventilator. Often, the neck has to be in a slight degree of hyperextension just to make room for the trach itself and for detaching the ventilator tubing. This depends on the client.
This is Julian in Figure 28. He has spinal muscular atrophy and has been using a ventilator since about age one. He is now in his mid-20s.

Figure 28. Client in custom molded seating with a ventilator.
He is in a molded seating system. The use of a ventilator over all these years has resulted in a lot of expansion of the rib cage. The muscles between the ribs are quite weak and so this has allowed those ribs to expand. He has a barrel-shaped chest that we need to accommodate within the seating system. We also need to accommodate the rest of his body and allow him to be as functional as possible. He is able to drive a power wheelchair using alternative driving methods.
Position in Space
We mentioned before that gravity is not always our friend and can tend to pull down on the trunk and on the head. We can do a couple of things to counteract the effects of gravity within a seating system. This is going to be very dependent on the individual client. Using the recline feature on a wheelchair is a strategy that opens the seat to back angle for the client. The client is going to be leaned back within the seating system as the example in Figure 29.
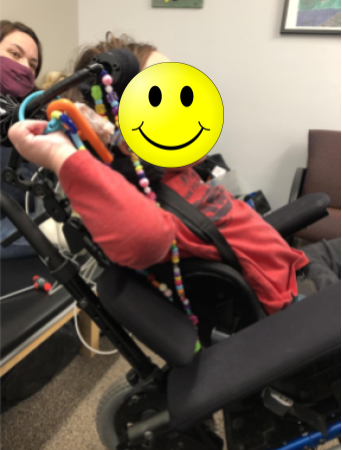
Figure 29. Recline feature helps with head control.
This helps to counter the impact of gravity and make it easier to keep the trunk extended and the head from falling forward. Tilt, rather than opening the seat to back angle, moves the entire seating system in space while maintaining the hip angle. The advantage of that is we maintain the seated angles so that we do not lose the correct posture for the client. Many clients, when we recline them, lose the position of their pelvis and their trunk upon return to upright. Both tilt and recline are going to reduce that impact of gravity.
Strategies to Support Diaphragm
There are some specific strategies we can use in positioning to support the diaphragm as well.
Circumferential Support
- Abdominal Panel or Belly Binder
- Must fit close to the body
- Crosses the upper pelvis and
The main one that you'll see is providing some type of circumferential support as noted in Figure 30.
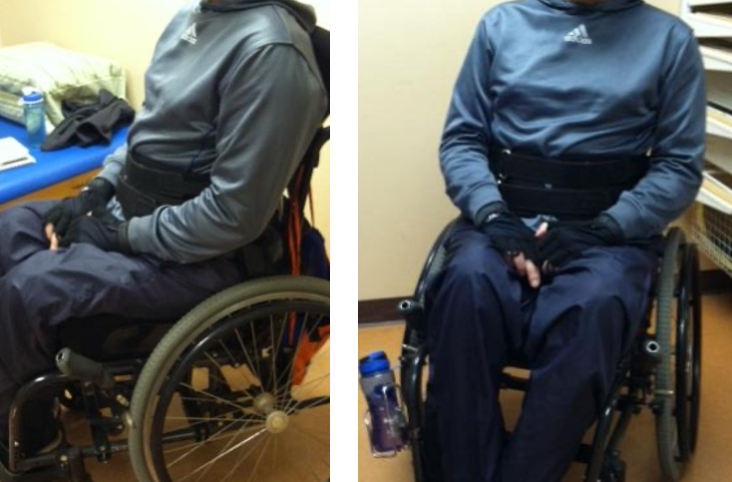
Figure 30. Examples of a belly binder.
These are sometimes called abdominal panels or belly binders. Sometimes, this can be called a corset. This has to fit very close to the body in order to work well. It needs to be in contact with the trunk. If it is attached to the back behind the client and the back is wider than the client's width, it is not going to work as well. It is very important that it is tucked in close. These are usually custom-made. It is also important that these cross both the lower rib cage and the upper pelvis. We do not want this compressing soft tissue. These circumferential supports are often used to reduce a flexible or reducible lordosis, and as a result, provide some nice support to the diaphragm. It also can help some clients for better respiration and vocalization.
Circumferential Support and Respiration
- May be decreased in forced vital capacity and forced expiratory volumes
- Body Mechanics-The Art of Positioning and Moving Patients (Frownfelter et al., 2006)
- Cardiovascular and Pulmonary Physical Therapy Evidence and Practice (Frownfelter et al., 2012)
- However, can support a weak diaphragm
What does the research say? Sometimes, these supports can decrease vital capacity and expiratory volumes because of this compression. This is important to keep in mind. Overall though, this can support a weak diaphragm. I have worked with a lot of teenage boys with Duchenne muscular dystrophy who are not yet on a ventilator or other ventilation assistance. Lordosis is very common in this population. With these binders, all of a sudden they can breathe and vocalize a little easier due to the increased support and control. We need to try this with the client to see if it is helpful.
Take-Home Message
- Wheelchair Seating Systems can optimize the alignment to facilitate respiration
- Upright pelvis and trunk
- Aligned neck and head
- These supports may sometimes limit rib cage expansion
- These supports may support a weak diaphragm
Wheelchair seating systems can definitely optimize body alignment to facilitate respiration for a client. We want to achieve an upright pelvis and trunk if we can because that is going to support the whole respiratory system. We are going to see an expansion of the chest cavity and alignment of the neck and head. These supports may sometimes limit rib cage expansion, especially with circumferential supports and molded seating systems. It is important to balance that for the individual. Is this helpful or not? All of this takes a team approach.
Summary
We have a number of references for this presentation. You are welcome to take a look at those to see if they are helpful. I want to thank you very much for joining us for this session today. I have listed my contact information if you have any questions or comments. Feel free to reach out to me. There are also some helpful resources there under the resource tab. I would encourage you to work closely with the seating and mobility team if you have a client in a wheelchair with respiratory issues. It is important that we work together to achieve not only an optimal seated position but optimal respiration as well.
References
Select references are listed here. A complete reference list is provided in the course handout.
Dimitriadis, Z., Kapreli, E., Strimpakos, N., & Oldham, J. (2013). Respiratory weakness in patients with chronic neck pain. Manual Therapy, 18(3), 248–253. https://doi.org/10.1016/j.math.2012.10.014
Gore, D.R., Sepic, S. ., & Gardner, G.M. (1986). Roentgenographic findings of the cervical spine in asymptomatic people. Spine, 11(6), 521–524. https://doi.org/10.1097/00007632-198607000-00003
Jung, J.H., & Kim, N.S. (2016). Relative activity of respiratory muscles during prescribed inspiratory muscle training in healthy people. Journal of Physical Therapy Science, 28(3), 1046–1049. https://doi.org/10.1589/jpts.28.1046
Koumbourlis A.C. (2006). Scoliosis and the respiratory system. Paediatric Respiratory Reviews, 7(2), 152–160. https://doi.org/10.1016/j.prrv.2006.04.009
Lin, F., Parthasarathy, S., Taylor, S. J., Pucci, D., Hendrix, R. W., & Makhsous, M.