Editor’s note: This text-based course is an edited transcript of the webinar, Autogenic Drainage: Technique for Airway Clearance, presented by Duane Reed, EdD, RRT, RCP.
It is recommended that you download the course handout to supplement this text format.
Learning Outcomes
After this course, participants will be able to:
- Explain the indications for performing autogenic drainage
- Describe the benefits of implementing autogenic drainage
- Identify the procedure for set-up and troubleshooting autogenic drainage
Introduction
We will discuss autogenic drainage techniques for airway clearance management. We will demonstrate how respiratory therapists teach patients the autogenic drainage technique. One thing you need to know about it is it can take several days to learn. It is a difficult subject to teach someone, but once they learn it, it can help them be self-sufficient when trying to remove secretions. Another thing, the patient should know how to do the diaphragmatic breathing technique because it is similar and one of the things that will help the patient to understand what autogenic drainage is all about. The technique requires training, concentration, and effort from the individual. We will include instruction because we will teach the patient how to do this for themselves. We will talk about exactly what autogenic drainage will do and how it is an adequate technique for patients to move some of the secretions without buying expensive devices. In the hospital, we use positive expiratory pressure (PEP) devices and vests, but autogenic drainage is something that a patient can do at home. Once we can get this technique down, we can have the patient learn how to move the secretions without any devices. That is a good thing that I like about autogenic drainage.
What is Autogenic Drainage (AD)?
Autogenic drainage is an airway clearance technique that Jean Chevaillier developed in 1967. Autogenic drainage means "self-drainage" by definition. It is characterized by breath control and self-drainage. The different breathing frequencies are used to mobilize secretions from the lower to the upper airway. It is all about how the patient will control his breathing. The patient focuses on adjusting the rate, how fast the patient breathes, the depth of how they breathe, and the location. We are teaching the patient how fast to breathe, how deep to breathe, and where the location of the movement of the lung volume during respiration.
We are teaching the patient to do this technique to move their secretions from the lower airway until it gets to the upper airway. It sounds like a lot, but once you do it a few times, the patient gets it down. It is not as hard as it looks, but the first time you ever do it might be challenging. That is why I wanted to do this presentation. If you have more expensive secretion-moving devices the patient can use, that is totally different. This is for the patient to learn how to move secretions independently, which I think is a big deal if you can teach them how to do it. We know what will happen once the secretions get to the upper airway when the coughing mechanism occurs, and we can have them cough up the sputum. When we get to the coughing section, we will discuss the huff maneuver and the huff cough. This is also going to be a part of the autogenic drainage.
What is the Autogenic Drainage Principle?
Autogenic drainage is based on multiple principles in which the patient is able to achieve airway clearance independently. Autogenic drainage consists of controlled expiratory and inspiratory reserve volume breathing that is practiced at different levels of lung volume. In this, the subject self-adjusts the force or velocity of the expiratory airflow at different levels of inspiration in order to reach the maximum possible airflow generated in the bronchi without resulting in airway collapses during coughing. The respiratory therapist will teach the patient. Then the patient will be able to achieve airway clearance independently. Remember, it is adapted to their own pathology and pulmonary function. It might be a good idea to have a pulmonary function test on hand to understand the disease pathology that the patient has.
Indications for Autogenic Drainage
- Treat patients with retained secretions
- Treat patients with asthma
- Treat patients with cystic fibrosis
In the past mainly, this was done for cystic fibrosis patients, but as we go through the presentation you will see that it is not only for those patient populations. In the 1980s, the autogenic drainage technique was used throughout Europe for the treatment of patients with asthma who had retention of secretions in the chest and difficulty in clearing the secretions. Who will use autogenic drainage? Anyone with retained secretions is eligible to do autogenic drainage. Retained secretions will decrease flow and lung volume, causing atelectasis and other complications. As we mentioned, it was originally used to treat patients with cystic fibrosis and asthma, but it is not the only thing we can use it for. Anybody with retained secretions that you think will benefit from autogenic drainage, I would try it.
Benefits of Using Autogenic Drainage
- No equipment needed
- Can perform airway clearance as an independent procedure
- Less coughing effort is needed for sputum production
In the past mainly, this was done for cystic fibrosis patients, but it is not only for those patient populations. In the 1980s, the autogenic drainage technique was used throughout Europe for the treatment of patients with asthma who had retention of secretions in the chest and difficulty in clearing the secretions. You do not have to look for equipment, nor is it required. PEP devices, acapella, and vest equipment are not needed. We teach a technique that has been lost in many of the therapy of today because there is much equipment out there. The patient can perform airway clearance as an independent procedure. We know that many patients, if they are weaker, have trouble with their cough, and they are not able to cough effectively as you would think. With this procedure, it requires less coughing because you are going to move the secretions with the technique, and in order to get it to the areas or "zones" that you need to get to, you will not have to cough as effortfully. It is almost like the PEP device where you can do the huff maneuver that would cause you to cough as well. We will talk about it when we get to that section.
Disadvantages of using Autogenic Drainage
- Patient needs to be over the age of eight
- Technique can be difficult to teach
- Patients need the cognitive ability to understand the physiology behind the methods you are teaching
There are always disadvantages to anything, even though we are not presenting or using a device. One is age specific. The patient needs to be over the age of eight years old. If you are going to consider using autogenic drainage on patients, including patients with cystic fibrosis, we want to make sure that the patient should be at least eight or over the age of eight years old. Yes, the technique can be difficult to teach. As we get through this presentation we hope to make it a little easier for you to understand. It can be difficult to teach, and you might have to do it multiple times. For example, you may have to practice for up to three or four days sometimes before the patient is able to grasp it. It depends on the patient and their condition. The patient will need some cognitive ability to understand the physiology behind the methods you are teaching. If they have some cognitive impairments and cannot follow directions, they might not be a good candidate for autogenic drainage. So not a lot of disadvantages to something that you can teach someone to do.
Autogenic Drainage Rationale
Autogenic drainage aims to reach the highest possible expiratory airflow in different generations of the bronchi simultaneously with an active but not forced expiration. We are going to say that again. Autogenic drainage aims to reach the highest possible expiratory flow rate. Breathing out in different generations of the bronchi. It can be from the large bronchi all the way down to the terminal bronchi in three phases, starting in the smaller areas and working our way up. Chevaillier previously described these three phases as ‘unstick,’ ‘collect,’ and ‘evacuate.’ Nowadays, these phases are not looked at as separate, yet rather that they blend into one another.
The different levels of the lungs we call zones. Autogenic drainage is a technique that requires commitment from the individual. Autogenic drainage is a controlled technique of breathing that uses different depths and speeds of exhaled breath to move mucus up the airways resulting in a spontaneous or voluntary cough. It can be used without help but requires training, concentration, and effort. The rationale for the technique is the generation of shearing forces induced by airflow. The speed of the expiratory flow may mobilize secretions by shearing them from the bronchial walls and transporting them to the central airways. The main objective is to transport secretions to the upper airways by using the principle of shearing and flow. Autogenic drainage aims to move the secretions to a different area.
We are going to start low, at the lower generations of the lungs, and we are going to work up by using this technique. We talk about the different areas of the lungs, which are called drainage zones. In Figure 1, you have three drainage zones. We will use our technique to move secretions from zone one, your smaller peripheral airways, which are deeper into your lungs. Then from zone two, we call that your middle airway. Finally, zone three is going to be your large central airways. Our goal is to use the zones from one to three, moving those secretions from the peripheral airways, middle lobes, and then to your larger central airways in order to be able to cough up the secretions. When we talk to the patients about that, they sometimes do not understand the technique.
In zone one, we are going to try to unstick the mucus. The smaller airways are where your zone one is, and it does not take much to decrease the radius in that area. It is where your mucus gets stuck, and we have to unstick them with autogenic drainage therapy. When we move to zone two, we can start getting ready to collect the mucus. When we go to zone three, that is what we call excavating or coughing it up at that point.
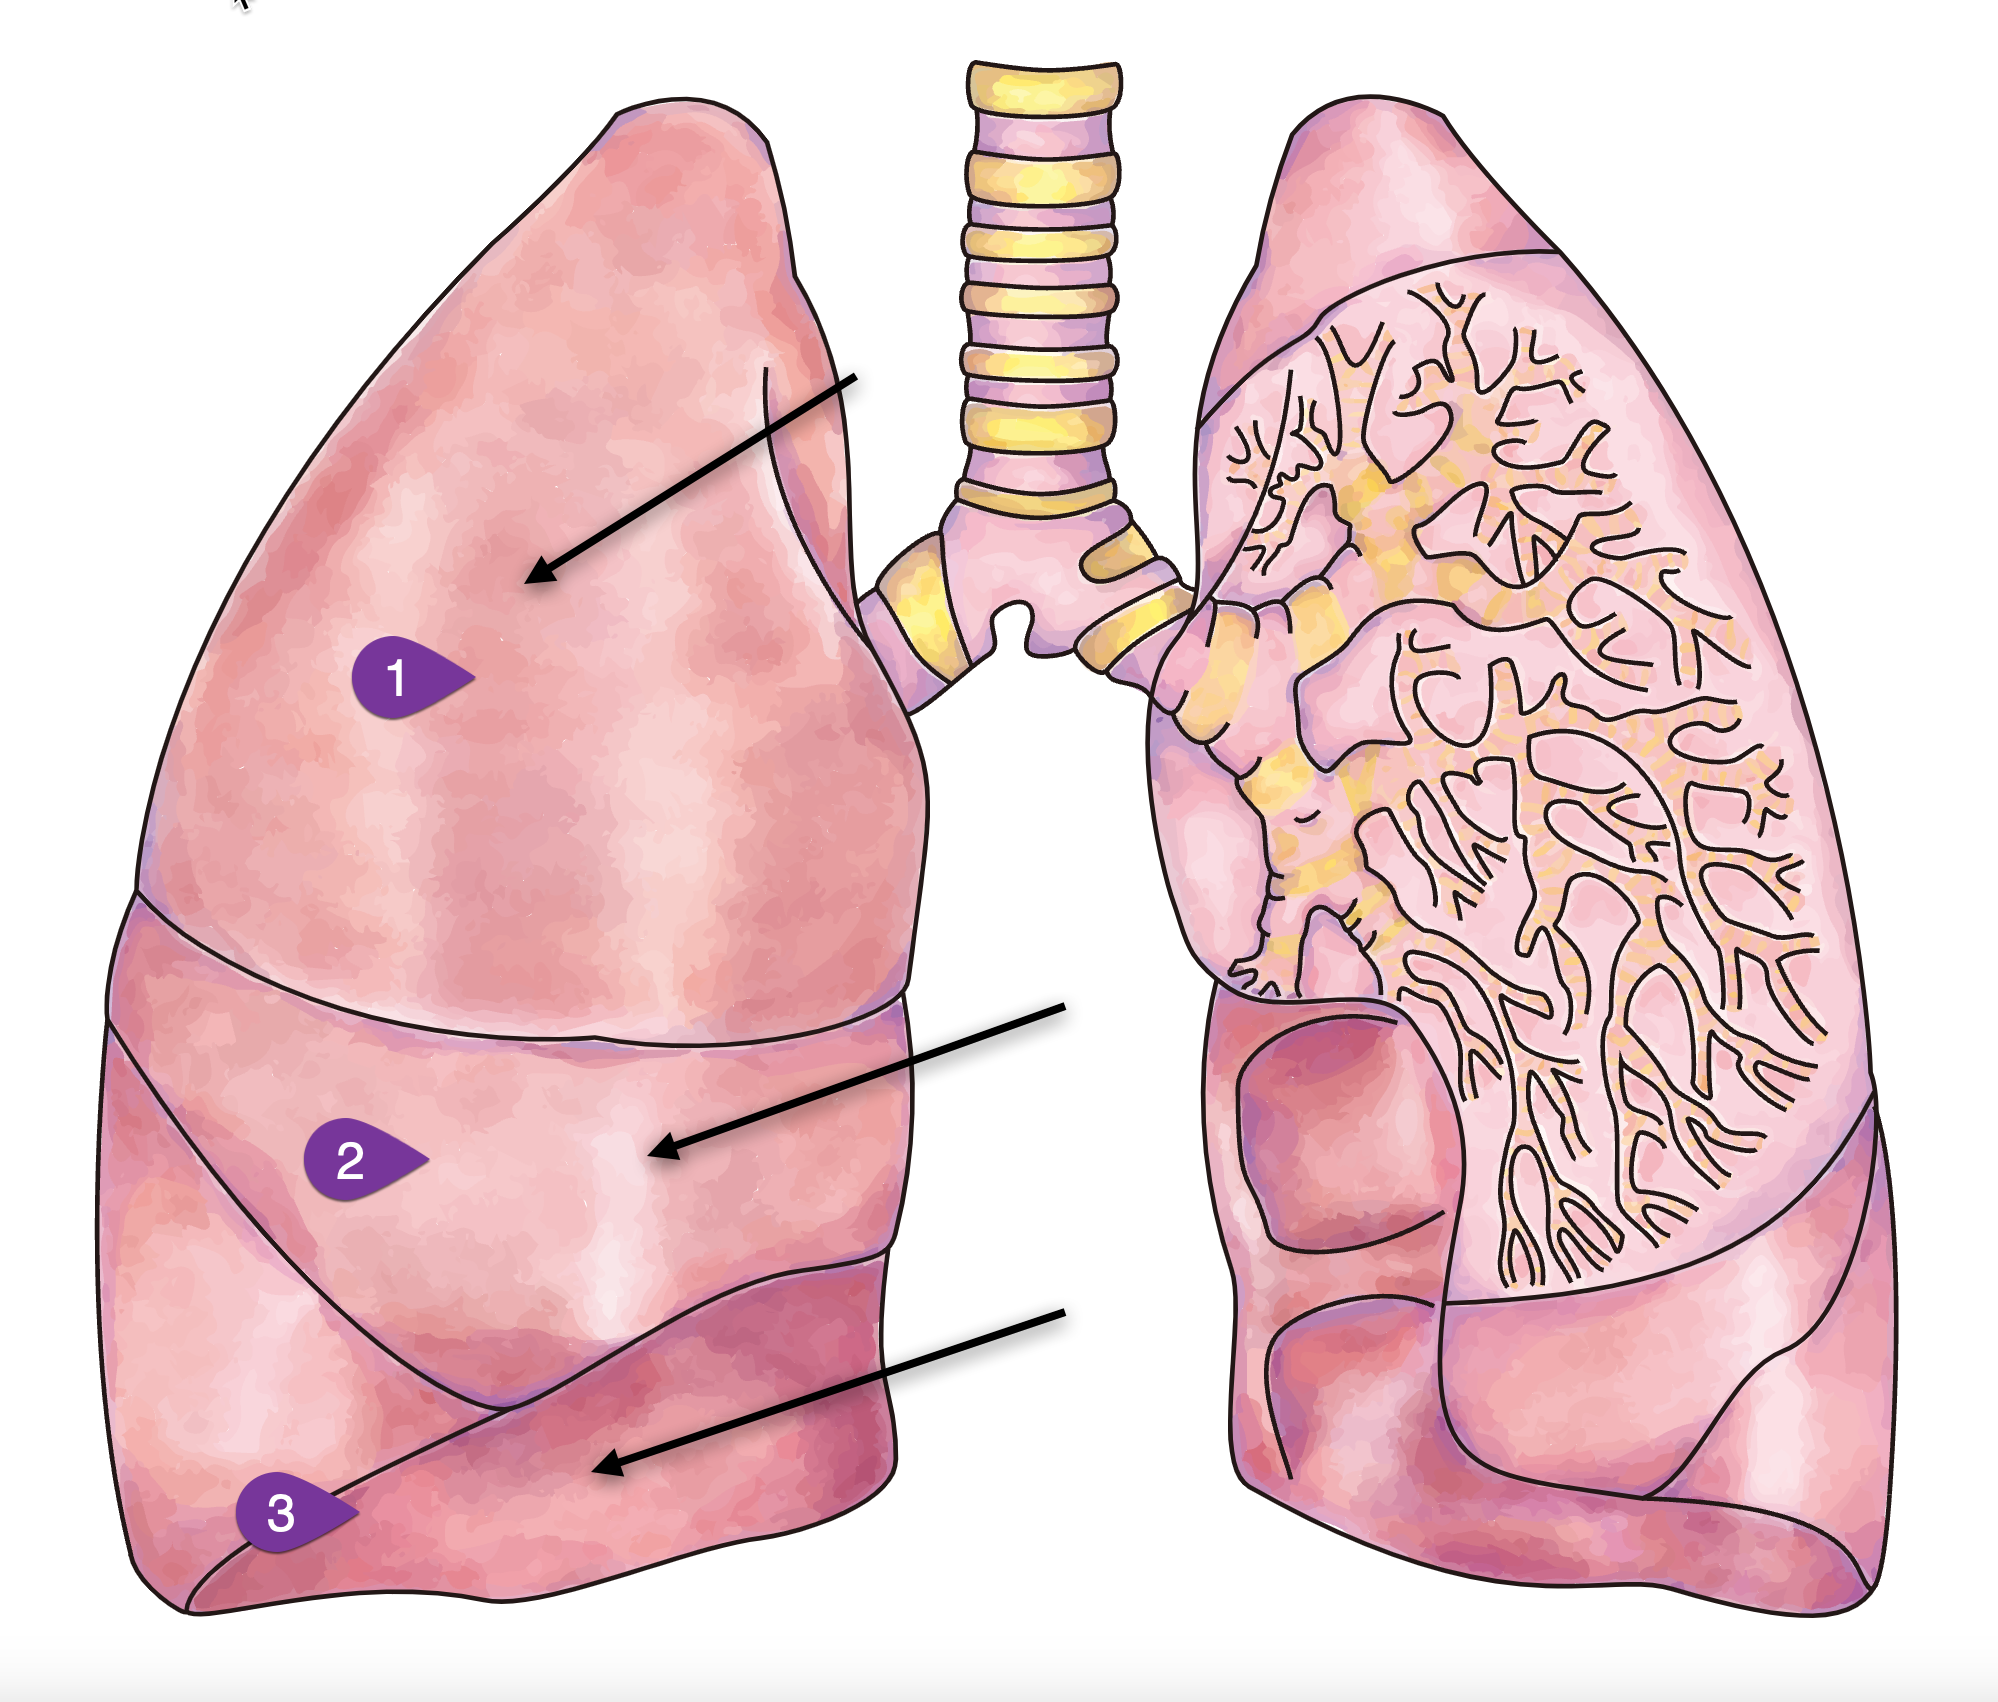
Figure 1. Illustration of lung drainage zones.
What Is the Goal of Autogenic Drainage?
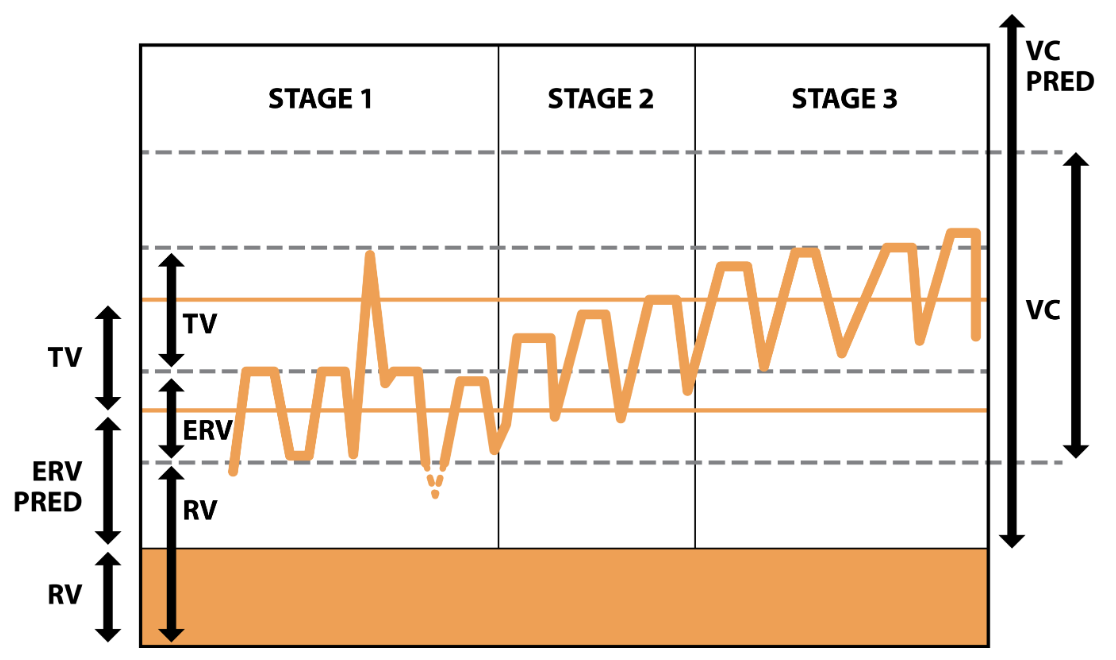
Figure 2. The 3 phases of autogenic drainage (Image source: physiopedia.com).
- Stage 1: Low lung breaths to mobilize secretions from the peripheral airways
- Stage 2: Medium (tidal) volume breaths to collect mucus from the middle airways
- Stage 3: Large volume breaths enabling expectoration from the central airways
Now we are talking about the secretions systematically transported from the peripheral airway to the more central airways by breathing at lower lung volumes. From the expiratory reserve volume (ERV) to progressively higher lung volumes in the inspiratory reserve volume (IRV). We call these stages (Figure 2). The expiratory reserve volume is below your tidal volume. We will start low and then go higher to your inspiratory reserve volume. Your inspiratory reserve volume sits on top of your tidal volume, and it is closer to stage three, where we are trying to cough it all out. It helps to know a little about your pulmonary function tests (PFT), which, if you are a respiratory therapist, you understand what ERV and IRV are. If you look at the graph in Figure 2, you see Stage one, Stage two, and Stage three. Stage one is where the low-volume breaths mobilize secretions from the peripheral airways. Stage two is the medium tidal volume breath to collect mucus from the middle airways. Stage three, the large volume breaths would enable expectoration or coughing up from the central airway. If you take a snapshot of your lungs or do a PFT simultaneously performing autogenic drainage it would look similar to Figure 2. Starting low, remember the ERV is below the tidal volume, then you would go up to your inspiratory reserve, above the tidal volume. If you can visualize how your lungs are moving secretions from the lower to the upper part of your airways, then you can cough it out. A lot of times, when we look at the PFT graphs, we do not think about it simplistically enough.
Autogenic Drainage Frequency and Length of the Sessions
The autogenic procedure sounds more difficult than it is, but I have to admit you have to do this a few times before you get the hang of it. Do not let it discourage you when you are trying, and your patient does not feel the mucus, or you do not see it but feel it. If you keep doing the procedure, it is very successful but takes some work. Once a patient understands how a procedure works and are asked to do the procedure themselves, they usually will continue to do the procedure.
- The length and frequency of a session is dependent on the disease severity, knowledge of the technique, quantity of secretions, etc.
- The goal is to clear the most secretions possible by the last of the treatment so that previously obstructed areas of the lung re-expand.
- The more retained secretions, the more frequency times and/or sessions per day are recommended
Stage 1
Phase 1: Moving the mucus from the small airways (unsticking)
- Start with breathing control: air in, air out
- Relax
- Take in a deep breath and blow all of the air out of your lungs until you feel like the lungs are empty of air
- Once the lungs are empty take in a small breath of air through your nose.
- Hold the breath for three seconds then exhale all of the air out
- Repeat this two to three times (cff.org)
Stage one is located in the lower peripheral airways, and in this stage, it is basically used to what we call "unstick secretions." First, the patient breathes in as much air out of their lungs as they can. Second, they take a small breath, feeling their stomach, and breathe at the bottom of the chest using their hands. If you demonstrate it to yourself, you can see what the patient is doing when the patient is trying to unstick their secretions. You breathe as much air out of your lung and then start taking smaller breaths while holding the bottom of your stomach and abdomen area. During Stage one, you may hear, or they may hear secretions, and it starts to crackle. At this stage, we are in the lower peripheral airway. The patient resists any desire to cough during this stage.
By using slow deep air movement, the patient will loosen the peripheral secretions by breathing at low lung volumes. You start taking big, deep breaths, which will probably force you to cough. Even though you might hear secretions start to crackle, this is not the time for the patient to cough, and you must tell them that. As we go through the procedure, secretions are not ready to come up because they are still deep in the airways, but it is a good technique to loosen them up. We are "unsticking" the secretions. All we are trying to do is to unstick the airways during this stage.
Stage 2
Phase 2: Moving mucus from the small airways to the medium-sized airways (collecting)
- Take in a normal sized breath
- Hold the breath for three seconds
- With some gentle force exhale all of the air out of your lungs. This may make you feel like you want to cough but hold the cough to the very end
- Repeat three times (cff.org)
Stage two is used to collect secretions as the crackles of the secretions start to get louder, and why you want the patient to resist coughing in stage one. When you start to hear a lot of crackles during this time. As the crackles get louder, you tell the patient to take medium breaths. As the secretions move upward we can breathe in a little more, but we will continue the small breaths out. You have to remember that when you are teaching the patient how to do autogenic drainage, remind them not to exhale forcefully. You tell the patient to continue to take the small breaths out but to have them breathe in more.
Once you finish stage two, you need to repeat it. Do not jump to stage three. You will repeat stage two for at least three breaths. Continue collecting secretions to the central airways by breathing at low to middle lung volumes. Remember when you were in stage one, you were breathing only low lung volumes, but now you are increasing from low to middle lung volumes, and the breaths are slow mid-range air movements. We are not to the point where we are ready to start telling the patient to cough, but we are getting there, and the patient can feel the secretions in the mid-central area of the lungs. You have to make sure when teaching it will take some time to learn. The breathing pattern is going to be big when it comes to being successful in teaching someone autogenic drainage.
Stage 3
Phase 3: Moving mucus from the medium-sized airways to the large airways to be coughed out (evacuation)
- Take in a deep breath
- Hold for three seconds
- With gentle force, exhale all of the air out of your lungs
- Repeat three times
- Do not cough until after the third breath
- Each phase should take two to three minutes to complete. Completing all three phases (one cycle) should take about six to nine minutes to complete
- Repeat the cycle until you have cleared your lungs as much as possible, which should take between 20 and 45 minutes (cff.org)
We have moved the secretions up midway, and now we are ready for stage three to excavate the secretions. Stage three is used to move the secretions when the crackles are louder. The patient will take long, slow, full breaths into maximum inspiration while continuing to take small breaths out. Remember, the expiratory phase is going to remain small. The patient will repeat stage three for at least three breaths. The patient will expel secretions from the central airways by breathing at mid to high lung volumes (shallow air movements). This is the stage where you will start to get rid of the secretions. Here we can have the patient do the huff cough that can cause the patient to want to cough up as well. The patient inhales a deep breath which is to be followed by the huff cough maneuver. The patient should never huff cough to the point of exhaustion.
The huff cough is a gentle way of coughing, which speeds up airflow while you keep the throat open. To save energy and oxygen, you must practice and master the method of controlled huff cough.
- Begin in a sitting position with your chin slightly upward
- Use your diaphragm (stomach muscle) for breathing in slowly
- Hold your breath for 2 to 3 seconds
- Force the breath out your mouth in one quick burst of air
- Make sure the back of your throat is kept open
- Perform 2 or 3 huff breaths
- Cough when you feel the mucus collected in your breathing tubes
- Repeat the huffs until you feel you have cleared mucus or you become tired
The patient will repeat stage three for at least three breaths. Then you allow the patient to expel the secretion, and the velocity of the force or the expiratory flow will help.
- Stage 1 - low volume breaths to mobilize secretions from peripheral airways
- Stage 2 - medium (tidal volume) breaths to collect mucus from the middle airways
- Stage 3 - large volume breaths enabling evacuation from central airways
Stage one, you are in the peripheral airways, and you tell the patient to have low-volume breaths to mobilize secretions. When trying to "unstick," remember the term unstick the secretion. Then stage two is when the patient can breathe in more. In this phase, you want them to exhale with not a lot of great force. In stage two, when they can breathe in medium breaths, we are "collecting the mucus" from the middle airways. When the patient gets ready to cough up, we want him to be able to cough up by having those secretions up go up to the middle and loosen those up in the middle and have that collected there. We can get ready to bring it up to the larger airway, which is stage three. The large volume of breaths, when they take deep breaths on inspiration, enables them to eliminate the secretions from the central airways. Those are the stages that you are going to have to go through, and a lot of people when who get ready to do autogenic drainage may not understand the concept behind it. If you do not do it correctly, it will not work.
Autogenic Drainage
Now the actual procedure. When the doctor writes an order for autogenic drainage, what are you going to do? The first thing you need to do is choose a breathing-stimulating position like sitting or reclining. The patient can be lying down or sitting up, and they should be relaxed with the next neck slightly extended. It is better, I think if they are sitting upward, but they do not have to be. Make sure they are sitting straight up, as shown in Figure 3.
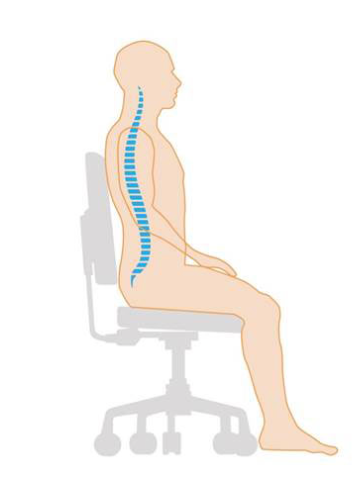
Figure 3. Illustration of sitting position.
First, have the patient clear their throat by blowing their nose and using the huff maneuver. Remember the huff maneuver that you may have seen in positive expiratory pressure devices, and there are different brands. We are getting the same result without any particular thing or device. Huffing is a technique that helps move mucus from the lungs. It involves taking a breath in, holding it, and actively exhaling. Breathing in and holding it enables air to get behind the mucus and separates it from the lung wall so it can be coughed out. Huffing is not as forceful as a cough, but it can work better and be less tiring.
Huff coughing technique:
- Sit up straight with chin tilted slightly up and mouth open
- Take a slow deep breath to fill lungs about three-quarters full
- Hold breath for two or three seconds
- Exhale forcefully, but slowly, in a continuous exhalation to move mucus from the smaller to the larger airways
- Repeat this maneuver two to three times and then follow with one strong cough to clear mucus from the larger airways (cff.org)
When breathing in, slowly have the patient breathe in through the nose to keep the upper airways open. Place hands on the diaphragm and /or abdomen if possible. Second, have the patient inhale a large breath and hold it momentarily. The patient will then breathe all the way out for as long as possible (this is low lung volume). Then the patient will take a small to normal breath in and pause. They will then hold their breath for about 3 seconds.
When breathing out, the patient will breathe out through the mouth to keep the airways open. At the low lung level, the patient will breathe using their abdominal muscles to squeeze all the air out. If you can depict or use your abdominal muscles to squeeze all the air out, that is what you will tell a patient to do. You will hear mucus when this is done correctly. You can have the patient feel the mucus vibrating. During this procedure, the patient may better understand if you let them feel. High frequencies mean that the mucus is in the small airways. Low frequencies mean that the mucus is in the large airways. Repeat the cycle and perform a huff cough to remove mucus. An example video demonstrating autogenic drainage can be viewed by clicking here.
Summary
What I want to do now is summarize what we talked about because we did talk about a lot of stuff and procedures. It is not a hard procedure, and it is not a long procedure. It is one of those procedures that you have to do correctly. We are trying to teach the patient how to move his secretions—bottom line. We talked about some indications for autogenic drainage, mainly patients that have retained secretions. Then we talked about patients who are asthmatics who also can benefit from autogenic drainage. Originally this technique was designed for cystic fibrosis patients over eight.
Some of the benefits include no equipment. The patient does not have to buy anything. All you have to do is teach them how to do it. They can use it for their self-care, which is a good tool to have as well. The hardest thing I had to do was resist, get them to resist the cough when it wasn't time. The autogenic sessions can last up to 30 minutes or longer. You continue until the patient has cleared all the secretion. If the patient cannot continue the procedure, do not wear them out, they have to stop. Do not think you are just going to go in there for a few minutes and your autogenic drainage procedure is done. No, it will take a while, and it might take some days before you say this patient has it. The patient can do this at home. You might want to explain this to the family, as it is always good to do that. When describing the technique to them, do not be in a rush.
Your main job when you working with autogenic drainage is coaching. If you ever wanted to be a coach, this will be one of those procedures where that is what you will be doing. Challenges can arise if you have some patients who may not understand and have low mental capacity, you might have difficulty trying to teach them autogenic drainage. They might be better off buying or getting devices to help them move secretions. I wanted to make sure that you are familiar with the procedure, and if you get a chance, you can try it because it does not cost anything. You want the patient can help themselves. Home care and rehab that is what it is all about having a patient become sufficient. When they call you, and they need you, you have to go and do what you need to do. The first goal of home care is to help the patient become independent. The autogenic procedure allows the patient to become independent and move their secretion independently without help.
Poll and Audience Questions & Answers
Poll 1: During phase 1 of autogenic drainage, the RT instructs the patient to breathe:
A. At low lung volumes
B. At regular tidal volumes
C. Out using large-volume breaths
D. Normally using short breaths and holding every 3 seconds
We have results from our first poll question, 88% chose answer A (at low lung volumes). We had a few that chose answer D (normally using short breaths and holding every three seconds). Let's take a look and see what the correct answer was. The correct answer is A. Remember that it is phase one. The patient takes a deep breath in and blows all his air out, and once he blows all his air out, that is at the low lung volume area. Then the patient can inhale some smaller breaths.
Poll 2: The RT explains to the patient that the reason for using autogenic drainage is to move secretions from:
A. From the larger airways to the smaller airways
B. From the smaller airways to the larger airways
C. To the midsize airways to larger airways only
D. From the large airways, only
We will give everyone a chance to answer the question, and then we will return and look at the poll results. From the audience, 18% chose Answer A (from the larger airways to the smaller airways), and 82% chose answer B (from the smaller airways to the larger airways). The correct answer is B (from the smaller airways to the larger airways). Most of you got that one, which is excellent. We do have a couple of questions that were in the question and
[Audience]: Is there a difference between autogenic drainage and ACBT?
ACB is an active cycle breathing technique. There is really not too much difference between those two. Mainly the terminology has changed a little bit, but both are basically trying to allow the patient to manage their secretions.
[Audience]: Can this technique be used for tracheostomy patients with thicker secretions who may tolerate capping for longer durations?
Yes, this can be used for anyone with retained secretions, whether they have a tracheostomy.
References
Bokov, P., Gerardin, M., Brialix, G., Da Costa Noble, E., Juif, R., Foucher, A. V., Le Clainche, L., Houdouin, V., Mauroy, B., & Delclaux, C. (2022). Beneficial short-term effect of autogenic drainage on peripheral resistance in childhood cystic fibrosis disease. BMC pulmonary medicine, 22(1), 241.
McCormack, P., Burnham, P., & Southern, K. W. (2017). Autogenic drainage for airway clearance in cystic fibrosis. The Cochrane database of systematic reviews, 10(10), CD009595.
Burnham, P., Stanford, G., & Stewart, R. (2021). Autogenic drainage for airway clearance in cystic fibrosis. The Cochrane database of systematic reviews, 12(12), CD009595.
Citation
Reed, D. (2022). Autogenic Drainage: Technique for Airway Clearance. Continued.com - Respiratory Therapy, Article 176. Available at www.continued.com/respiratory-therapy