MD Flavor of the Month…High Frequency Jet versus Oscillatory Ventilation
Published on 2024-07-22 17:19:48
Learning Outcomes
After this course, readers will be able to:
- After this course, participants will be able to discuss HFOV and HFJV, including the mechanism of action, description of settings, and review of initial settings.
- After this course, participants will be able to explain the major differences between HFOV and HFJV.
- After this course, participants will be able to describe how to choose which high-frequency ventilator.
MD Flavor of the Month…High Frequency Jet versus Oscillatory Ventilation
Editor’s note: This text-based course is an edited transcript of the webinar, MD Flavor of the Month…High Frequency Jet versus Oscillatory Ventilation, presented by Kelly Massa BHS, RRT-NPS.
It is recommended to download the course handout to supplement this text format.
Learning Outcomes
After this course, participants will be able to:
- Discuss HFOV and HFJV, including the mechanism of action, description of settings, and review of initial settings
- Explain the major differences between HFOV and HFJV
- Describe how to choose which high-frequency ventilator
Introduction
Let's start with a brief definition of high-frequency ventilation. High-frequency ventilation is a mechanical ventilation strategy that uses very small tidal volumes, typically between one to four milliliters per kilogram of dead space, coupled with very high respiratory rates. High-frequency ventilation minimizes alveolar damage caused by positive pressure. Large positive pressure swings and subsequent collapse during exhalation can cause significant harm. By reducing this stretch and recoil, high-frequency ventilation provides a safer alternative, particularly when conventional ventilation has failed.
Many institutions use two different types of high-frequency ventilators that operate uniquely. Let’s explore these differences. If you have worked in a NICU, you might be familiar with the scenario where, during your morning shift, a physician approaches you and says, "I think this patient needs to go on an oscillator."
As a dedicated respiratory therapist, you might respond, "Okay, sounds great. Conventional ventilation is failing, so we need to consider a high-frequency option. You are the physician; let's use the oscillator." However, when the shift changes, another physician might come in and say, "Actually, I believe this patient would be much better off on the jet." This scenario often leads to confusion in the NICU, as the choice of ventilator can vary depending on the physician on duty. It highlights the inconsistency driven by individual preferences and comfort levels with different machines. However, there is a well-defined mechanism of action for each type of ventilator that we will break down. As a respiratory therapist and ventilation specialist, you can offer valuable suggestions to physicians about the best choice for the patient.
When to Consider High Frequency
- Excessive conventional ventilator settings
- Plateau pressure ≥ 30-35cmH2O, large VT, pH < 7.1
- Avoid further VILI
- Lung recruitment
- Prophylactic treatment for ELBW neonates
- Infants less than 26 weeks
- Air leak syndrome
- Meconium aspiration, PPHN
- ARDS
- Available data comparing HFOV and HFJV has not shown a true superiority of either modality!
When should you consider high-frequency ventilation in general, without delving into the differences between oscillatory and jet? It is typically when conventional ventilator settings have become excessive. At this point, the settings may be causing more harm than benefit. It becomes a Catch-22: we need to use high pressures to deliver adequate tidal volumes and ventilate the patient, but these high pressures can also cause damage.
To achieve effective ventilation, very high peak inspiratory pressures and plateau pressures, often greater than or equal to 30 centimeters of water pressure, are required. Additionally, large tidal volumes of 10 to 12 milliliters per kilogram are used. If a patient's pH remains significantly acidotic, below 7.1, despite these measures, it indicates the need for an alternative approach.
In these instances, conventional settings can cause irreversible damage. While some lung tissue can regenerate up to the age of eight, we want to avoid causing damage that leads to long-term issues. Particularly in the neonatal population, where high-frequency ventilators are frequently used, we risk causing bronchopulmonary dysplasia (BPD). Therefore, it is crucial to consider high-frequency ventilation to mitigate these risks and provide safer respiratory support.
The main goal is to avoid further ventilator-induced lung injury. We should consider high-frequency ventilation when facing issues with lung recruitment. In our PICU and CICU settings, we frequently use this approach for pediatric ARDS patients. It can also be used prophylactically for extremely low birth weight neonates or infants born before 26 weeks gestation. We are seeing younger and younger babies being born and surviving past birth, making this consideration even more critical.
Patients with air leak syndrome, meconium aspiration, or persistent pulmonary hypertension are also candidates for high-frequency ventilation. These conditions often involve high blood pressure in the lung capillary beds, requiring careful management to prevent further complications. Patients with conditions like ARDS or pediatric ARDS can present significant challenges in ventilation.
When examining available data comparing the oscillator and the jet, you will find no clear evidence that one modality is superior to the other. This can be surprising, given how strongly some physicians advocate for one over the other. The reality is that neither is inherently better; they simply operate on fundamentally different principles. One machine may be more suitable for a particular patient due to its mechanism of action rather than any inherent superiority.
High Frequency Jet Ventilation (HFJV)
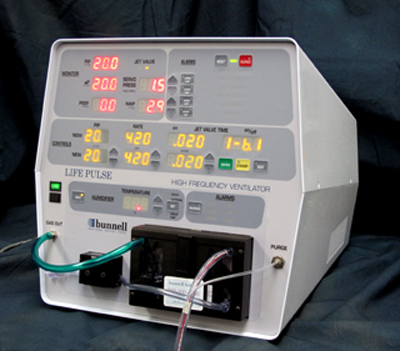
Figure 1. Example of High Frequency Jet Ventilation (IMEwee, CC BY-SA 3.0 via Wikimedia Commons).
What Is HFJV?
Let’s start with a basic overview of the high-frequency jet ventilation (HFJV) device itself, as shown in Figure 1. In the top left corner is the monitoring screen, which displays vital information. In the top right corner, you will find all the alarms, crucial for patient safety. The controls are centrally located, allowing us to set various parameters on the jet ventilator. Below the controls are the humidifier controls, essential for humidifying the jet propulsion gas. This is where the humidifier cassette is inserted.
Additionally, we have the primary buttons, including the alarm silence button, the power button, and the enter/reset button, all of which are important for operating the device efficiently.
Next, let's review the connection to the whisper jet, also known as the patient box. Visit bunl.com-"see HFJV" for more information. This component is essential for creating the jet propulsion we discuss in this lecture. The patient box has several key features:
- Cable Connector: This connects to the front interface of the jet ventilator.
- Purge Port: Keeps the lines clear.
- Pressure Monitoring Port: This connects to the life port adapter
- Push Button: Used to load the circuitry beneath the pinch valve.
The pinch valve is crucial as it controls the transitional flow of the jet ventilator, creating the jet propulsion needed for effective ventilation. The pinch valve literally shuts at the rate and speed set on the jet ventilator, creating the jet propulsion necessary for ventilation. This patient box is crucial to the jet ventilator's function. What is the jet ventilator overall? A jet ventilator is essentially a pressure-limited, time-cycled ventilator with an adjustable rate.
Key settings include:
- Rate: The frequency of breaths.
- Peak Inspiratory Pressure (PIP): This can be set on the ventilator for jet PIP.
- Inspiratory Time (iTime): Also known as valve time, this determines how long the valve remains open during inhalation.
- Passive Exhalation: The jet ventilator relies on passive exhalation, which is important when comparing it to the oscillator.
When delivering tidal volumes, the jet ventilator uses very small tidal volumes at rapid rates via a special ET tube adapter called the life port adapter. This adapter is crucial for high-frequency jet ventilation. Without it, the jet ventilator cannot function. Jet ventilation is always used in tandem with another conventional ventilator. At our institution, we use the Drager, but other institutions may use different ventilators, such as the Servos or Puritan Bennett models.
The choice of ventilator is not about superiority; it is about compatibility and institutional preference. The jet ventilator itself has settings for PIP, rate, and iTime. We will delve deeper into the life port adapter. Without it, we cannot use high-frequency jet ventilation. The jet ventilator does not have a PIP setting, which means we need a conventional ventilator to provide positive end-expiratory pressure (PEEP). This is crucial for creating the mean airway pressure, which we discuss further.
How Does the Jet Ventilator Work?
The life port adapter is also known as the jet nozzle. Here's an overview:
- Life Port Adapter: The jet adapter or life port adapter replaces the standard ET tube connection. Typically, an ET tube has an adapter with a 15-millimeter connector at the end. To use the jet ventilator, we remove this standard ET tube adapter and replace it with the life port adapter.
- Adapter Sizes: The life port adapter comes in various sizes to match ET tubes, ranging from 2.5 to 3.5 millimeters, 4.5 millimeters, and 5.5 millimeters. Ensuring the correct adapter size is essential for the therapy's effectiveness.
- Connection: The life port adapter fits snugly onto the ET tube, maintaining the 15-millimeter connector for attachment to conventional vent circuitry.
By replacing the standard ET tube adapter with the life port adapter, the jet ventilator can deliver the necessary rapid, small tidal volumes through the specialized nozzle. This setup allows for precise control and effective ventilation in tandem with a conventional ventilator. Next, let’s talk about the components and functionality of the life port adapter.
- Pressure Monitor Tube
- This tube connects to the patient box, providing feedback to the ventilator about what is being delivered to the patient in terms of PIPs and other parameters.
- Jet Port
- The jet port is equipped with a removable cap. If you are not using the jet but want to keep the life port adapter in place, you can cap off both the jet port and the pressure line, using it as a standard ET tube adapter. This allows you to avoid constantly switching adapters. When the jet ventilator is in use, the pinch valve circuitry connects to the jet port. This connection facilitates the delivery of fresh gas, creating jet propulsion.
- Transitional Flow
- The life port adapter is designed to deliver fresh gas that pierces through dead space, avoiding the creation of turbulent flow. Turbulent flow acts like a bulldozer, pushing through the entire airway width, which can move dead space and secretions further into the lungs—an undesirable outcome.
Benefits of Transitional Flow
- Reduces Turbulence: By creating transitional flow, the adapter minimizes turbulent flow.
- Pierces Dead Space: Fresh gas pierces through dead space more effectively.
- Prevents Secretions Build-Up: Helps prevent secretions from being pushed further into the lungs.
This transitional flow is essential for the effectiveness of high-frequency jet ventilation, making the life port adapter a critical component in delivering this advanced respiratory therapy. Here is a detailed review of how the jet ventilator operates and the benefits of its design. The jet ventilator’s life port adapter works by piercing through the center of the airway, effectively cutting through dead space. This design ensures that much smaller tidal volumes are just as effective as larger ones because they bypass the rebreathing of dead space gas.
Benefits
- Secretion Removal: Helps with secretion removal.
- CO2 Elimination: Enhances the elimination of CO2.
- Passive Exhalation: Facilitates passive exhalation, which we discuss further.
Comparison to Oscillator
- While both the jet ventilator and the oscillator utilize transitional flow, the oscillator's flow is more rounded and closer to laminar flow. This difference in flow dynamics is due to the design of the life port adapter.
Jet stream advantage allows injured lungs to rest and heal. The jet ventilator may be preferred if the patient has a diagnosis of air leak syndrome. The very short inspiratory times (iTime) and tiny tidal volumes (about one milliliter per kilogram) set on the jet ventilator can avoid areas of increased resistance, such as air leaks or severely damaged lung tissue.
This targeted approach prevents further damage to already compromised areas by avoiding unnecessary alveolar stretch and strain. The jet ventilator’s design and function make it a powerful tool for managing specific respiratory conditions, offering a targeted and effective approach to ventilation that minimizes further lung injury.
The beauty of the jet ventilator is that it avoids areas of damage, allowing them to rest and heal. However, it is crucial to note that the life port adapter is size-dependent. If a patient has an ET tube size outside the available options, we cannot utilize the jet ventilator.
Passive Exhalation
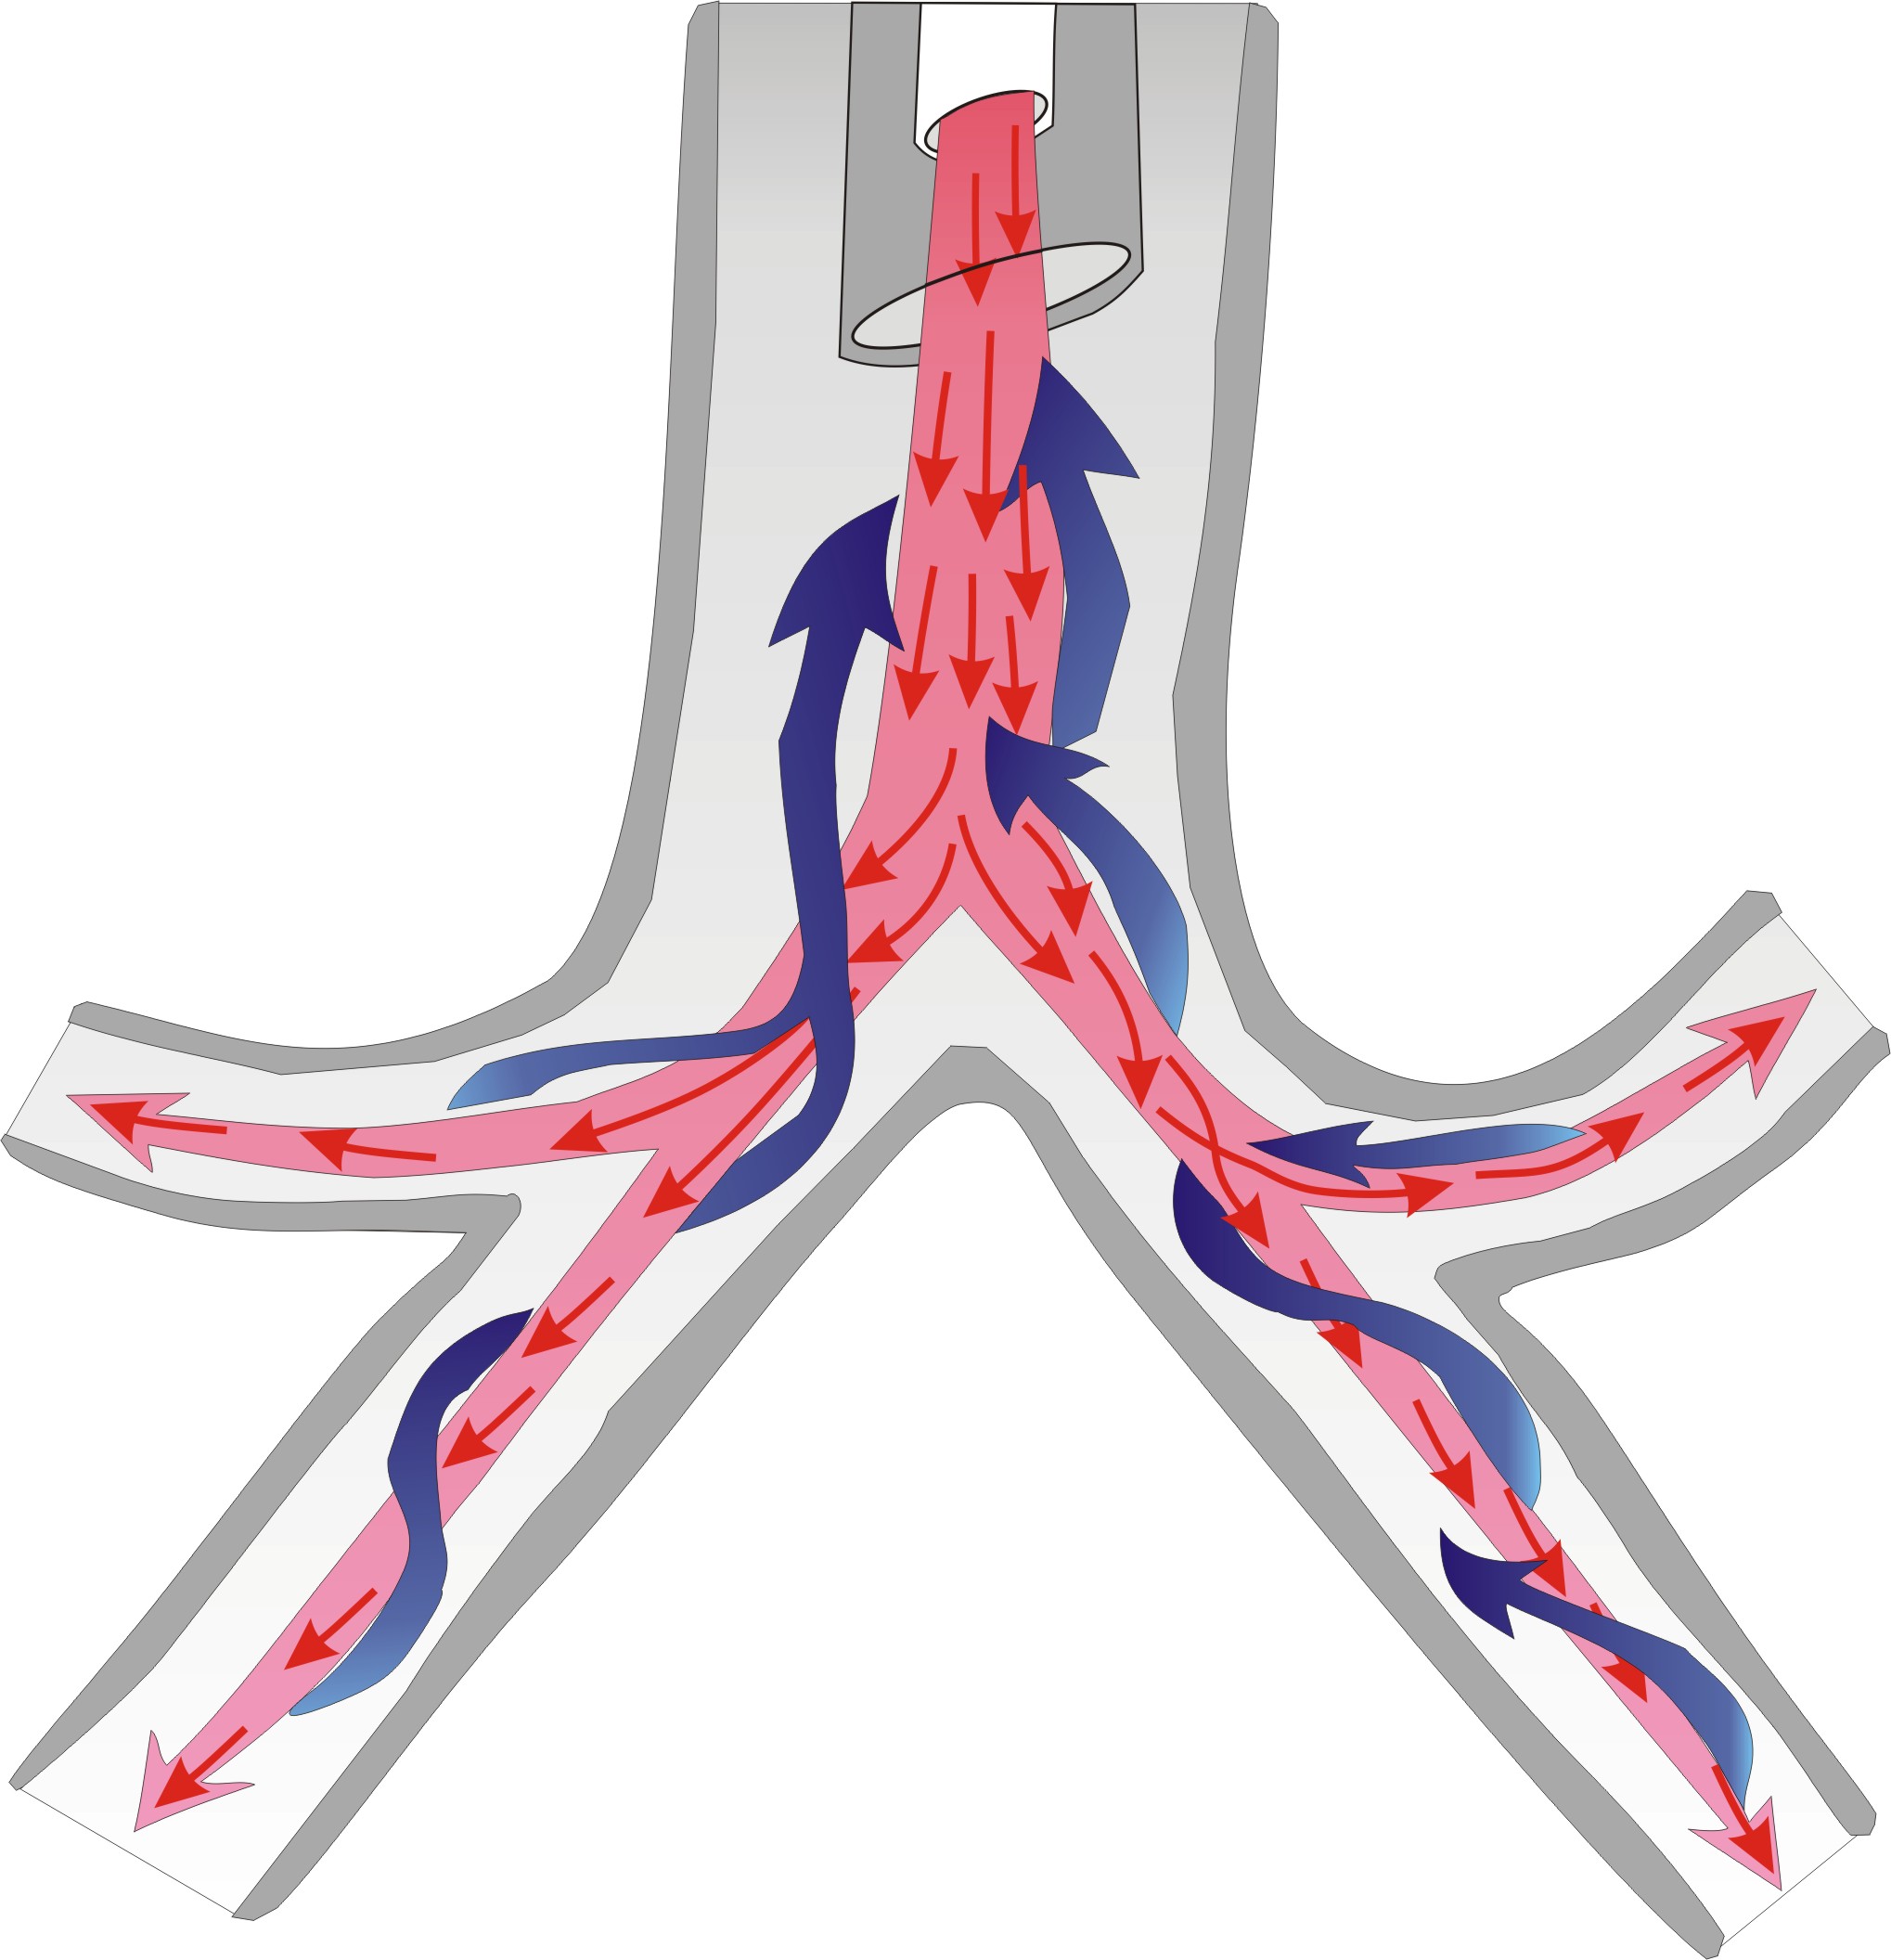
Figure 2. HFJV Passive Exhaltion (IMEwee, CC BY-SA 3.0, via Wikimedia Commons).
Let’s expand a bit more on passive exhalation with the jet ventilator seen in Figure 2. We have already discussed laminar flow, but it is crucial to understand how this flow impacts exhalation. With passive exhalation, the laminar flow moves down the center of the airways. When the patient exhales, there is a helix-like spiral around the outer areas of the airways. This spiral flow allows the patient to exhale passively.
This design helps to clear secretions and reduce the work of breathing by allowing air to flow smoothly and naturally out of the lungs. Passive exhalation is particularly beneficial because it minimizes the need for forced exhalation, which can be more taxing for the patient and potentially harmful to delicate lung tissues. Understanding this mechanism underscores why the jet ventilator can be a better choice for patients who need gentle ventilation support, such as those with fragile lung conditions or significant secretions that need to be managed effectively.
- Allows Jet to run at lower MAP compared to HFOV to achieve adequate oxygenation.
- Not competing with negative pressure from an active exhalation
- Enhances airway clearance
- Inspired gas shoots down the middle of the airway, leaving the path of least resistance for exhalation and secretions against airway walls.
- Can create gas trapping if not enough eT
The theory behind this flow is that secretions can be carried out of the airways rather than getting caked down lower. This transitional flow creates a really beneficial phenomenon for our patients. It is more comfortable because we are not sucking the air back out; instead, we are piercing it in, allowing patients to passively exhale on their own. Because of this mechanism, we can set the jet ventilator to run at a slightly lower mean airway pressure compared to the oscillator to achieve the same level of oxygenation.
This is significant because it means we can be gentler on the lungs while still providing effective ventilation. When we talk more about the oscillator, we review how it uses active exhalation. For now, it is important to understand that the jet's passive exhalation is a big advantage, allowing for lower mean airway pressures and, therefore, potentially less stress on the lungs.
The oscillator's mechanism involves the bellows swinging forward to push air in and then swinging back to suck the air out. This dynamic means the mean airway pressure (MAP) competes with the backswing of the bellows or piston. As a result, we need to set a slightly higher MAP to compensate for the negative pressure during active exhalation. In contrast, the jet ventilator avoids this issue since it does not involve fighting against negative pressure from active exhalation. This means we do not need to set the MAP as high.
The jet ventilator likewise enhances airway clearance due to its unique transitional flow. This flow pierces through the middle of the airway, allowing for a more effective exhalation path along the airway walls. As a result, secretions can spiral out naturally, making the ventilation process more efficient and less taxing on the patient.
The main takeaway is that the jet ventilator's use of passive exhalation and lower MAP settings offers a gentler and potentially more effective option for patients, especially those with delicate or damaged lung tissues. In contrast, the oscillator requires higher MAP due to the active exhalation process, which can be more demanding on the patient's respiratory system. This fundamental difference highlights why the jet ventilator can be preferable in certain clinical scenarios.
One important consideration with jet ventilation is ensuring adequate exhalation time to prevent gas trapping. Similar to conventional ventilation, where we carefully set iTime and rate to achieve a good I:E ratio, we need to be mindful of the expiratory time with jet ventilation. Since exhalation is passive, it is crucial to set an appropriate expiratory time.
Inspiratory Time
When we discuss the settings on the jet ventilator, the first one to address is the inspiratory time, also known as the valve time. Typically, we start with a default minimum of 0.02 seconds. To put that in perspective, it is about 25 times shorter than a conventional iTime of 0.5 seconds. This incredibly short inspiratory time is key to delivering those tiny tidal volumes rapidly, but it also means we need to be extra careful to ensure that there is enough time for exhalation to avoid gas trapping and associated complications.
While the jet ventilator offers many advantages, such as lower mean airway pressures and enhanced secretion clearance, we must remain vigilant about setting appropriate expiratory times, avoiding gas trapping, and maintaining effective and safe ventilation for our patients.
When we talk about the inspiratory time (iTime) on the jet ventilator, we typically start at a minimum of 0.02 seconds. This is about 25 times shorter than the 0.5-second iTime often used in conventional ventilation. This extremely short iTime is particularly useful in our smaller babies in the PICU versus the NICU. The main advantage of this very short inspiratory time is that it minimizes ventilation of the injured areas of the lungs.
For example, a short iTime of 0.02 seconds on the jet ventilator allows us to deliver significantly smaller tidal volumes, around one milliliter per kilogram, because it pierces through the dead space quickly.
These smaller tidal volumes allow for the safe utilization of much higher levels of PEEP. Moreover, the combination of small tidal volumes and a short iTime ensures that the peak inspiratory pressures (PIPs) used on the jet ventilator do not transmit to the alveoli, reducing the risk of further lung injury. The jet ventilator's settings, especially the short inspiratory time, enable it to provide effective ventilation while protecting the lungs from additional damage. This is particularly beneficial for patients with fragile lung tissues, ensuring they receive the necessary support without exacerbating their condition.
It is important to address a common concern about increasing jet PEEP. People often worry that a PEEP of 35 means the alveoli are seeing that exact pressure, but that is not the case. Due to the very small tidal volumes and short inspiratory times, the pressure tapers off significantly as it travels down the airways. While the PEEP at the end of the ET tube might be 35, the actual pressure reaching the alveoli is much lower, reducing the risk of damage.
Some physicians find this misconception challenging to understand. They might see a high PEEP number and assume It is what is reaching the patient's lower airways. However, with the jet ventilator, the fixed inspiratory time means that adjustments to the rate primarily affect the expiratory time, not the tidal volume.
Longer expiratory times are beneficial for patients with obstructive disease processes or for managing larger patients. We have used the jet ventilator in our PICU, which is not super typical but might be more common in other institutions. An important point to emphasize with our team, especially since our NICU team, accustomed to NICU settings, had to adapt to PICU settings.
Understanding these nuances helps ensure that the jet ventilator is used effectively and safely, providing the best possible care for our patients while mitigating potential risks. To manage larger patients effectively, we need to ensure longer expiratory times by adjusting either the iTime or the rates.
A shorter expiratory time, on the other hand, will increase minute ventilation, which is beneficial for restrictive disease processes. There are various theories about maintaining a fixed inspiratory time and its effects on expiratory time, as well as the patient populations that benefit from these settings.
HFJV PIP
Now, let's talk about the jet peak inspiratory pressure (PIP). The visual here helps illustrate that while the PIP might be set high on the jet ventilator, the actual pressure that reaches the distal airways and alveoli is significantly lower. This means that even if you set a higher jet PIP, it does not translate directly to the alveolar pressure, reducing the risk of lung damage.
Typically, we set the jet PIP higher or slightly higher than what was used during conventional mechanical ventilation. Due to the rapid inspirations, the PIP decreases quickly as the jet breaths travel down the airway. The peak alveolar pressure ends up being much lower than the peak airway pressure. By understanding and appropriately setting the iTime and PIP on the jet ventilator, we can tailor the ventilation to meet the needs of different patient populations, ensuring effective and safe respiratory support.
You do not need to be overly concerned about safety when increasing the jet PIP. In fact, increasing the jet PIP is the safest way to decrease PCO2 levels. More peak inspiratory pressure means more pressure and volumes are generated in the distal areas of the lungs. To effectively decrease CO2, you should increase your jet peak inspiratory pressure.
Servo Pressure
The jet ventilator also has a unique feature called servo pressure, which you will not find on the oscillator. If you understand it correctly, servo pressure can provide valuable information. Think of servo pressure as your driving pressure. Any changes in lung mechanics or volumes will affect the servo pressure.
Servo pressure is a generalized number specific to your patient at a given time, and it is important to note its trends. If the servo pressure is increasing, it typically indicates improved compliance and decreased resistance. This might mean better lung function or possibly a significant air leak around the ET tube or in the tubing. Monitoring this trend gives you insights into the patient's condition. Increasing the jet PIP safely reduces CO2 levels while monitoring servo pressure helps track lung mechanics and compliance, providing crucial information for managing patient care effectively.
Conversely, if our servo pressure decreases, it may indicate worsening compliance and increased resistance. This could be due to several issues, such as an obstructed ET tube that needs suctioning or a tension pneumothorax. It might also signal a misplaced intubation, like a right mainstem intubation. These conditions increase resistance, which in turn decreases servo pressure. Essentially, servo pressure going up is a positive sign, while a decrease suggests potential problems that need addressing.
Since servo pressure is specific to each patient's lung mechanics, it is important to monitor its trends rather than rely on a specific number. When you put a patient on the jet ventilator, observe their initial servo pressure and note its trajectory. Is it trending up or down? Is there an acute spike or drop, or is the change gradual over time? These observations provide valuable insights into the patient's condition.
Conventional Ventilation
Using a conventional ventilator in conjunction with the jet is crucial for two main reasons. Firstly, it controls the PEEP, which is not set on the jet ventilator. Secondly, the PEEP on the conventional ventilator becomes the main determinant of mean airway pressure. This setup ensures that we can manage and monitor the patient effectively, leveraging the strengths of both ventilation methods.
Mean airway pressure (MAP) is essentially a byproduct created by the PEEP and jet PIP settings, along with any sigh breaths or similar interventions. When facing issues with oxygenation, increasing the PEEP on your conventional ventilator will provide the most significant improvement.
Regarding the mode of the conventional ventilator, the choice depends on the patient's condition. For instance, if a patient has hyperinflation or an air leak, CPAP (Continuous Positive Airway Pressure) is preferable. CPAP maintains a steady pressure and avoids large breaths that could worsen the condition. We do not want big sigh breaths in these cases, as they could exacerbate the air leaks.
On the other hand, if recruitment is the goal, assist control or pressure control modes are more appropriate. For example, when the ventilator is set to deliver occasional large breaths at a low rate (anywhere from zero to five breaths per minute), then these larger breaths, or sigh breaths, help re-expand collapsed areas of the lung. However, it is crucial to ensure these sigh breaths are not larger than the jet PIP to avoid interrupting the jet propulsion.
If hyperinflation or air leaks are present, we want to avoid these large stretches and sighs because the lungs are already fragile and prone to leaking. Instead, maintaining a steady pressure with CPAP can help stabilize the lungs without causing additional damage. Choosing the appropriate mode on the conventional ventilator—whether CPAP for stability in hyperinflated or leaking lungs or assist control for lung recruitment—depends on the specific needs and condition of the patient. This strategic use of ventilation settings ensures optimal care and minimizes the risk of further lung injury.
Often, we start with a CPAP mode to monitor and allow the air leak to dissipate. Once the air leak has improved, we can gradually transition to assist control/pressure control (AC/PC) to slowly recruit the lungs. We might start by setting the rate to one, then increase it to three, and gradually continue to see if the air leak reappears or if we observe lung recruitment and improvement.
Conventional Ventilation with HFJV
When comparing conventional ventilation with jet ventilation, the differences in how PEEP and sigh breaths affect mean airway pressure (MAP) become evident. On a conventional ventilator, if we set a PEEP of 6, the MAP is at a baseline level. Increasing the PEEP to 8 results in a significant increase in MAP. Further increasing the PEEP to 10 leads to another noticeable rise in MAP. This demonstrates that PEEP is the primary factor in raising MAP because it increases expiratory pressure.
When using sigh breaths to recruit the lungs, we start with a PEEP of 6. As we increase the PEEP, the MAP goes up significantly. However, introducing sigh breaths changes the dynamic. With a very low rate on the conventional ventilator, these sigh breaths involve larger volumes and longer inspiratory times, which temporarily increase the MAP more dramatically.
Managing ventilation effectively requires understanding how adjustments in PEEP and the use of sigh breaths can influence MAP. Starting with CPAP to stabilize air leaks and then transitioning to AC/PC for gradual lung recruitment helps optimize patient care.
HFJV Management
Even without adjusting the PEEP, introducing sigh breaths increases the mean airway pressure. This happens because the sigh breaths open and stretch the collapsed airways, which helps with lung recruitment. Sigh breaths can be used to re-recruit lung areas, while adjustments to PEEP are primarily for increasing mean airway pressure and improving oxygenation. For management, here are some suggestions based on what we use institutionally:
- Jet Valve Time: Start at 0.02 seconds. Always consider the I:E ratio and be cautious about increasing iTime without accounting for eTime to avoid air trapping.
- Jet Rate: For neonates, typically start at around 420 breaths per minute. For pediatrics, a bit lower at 300 breaths per minute to ensure sufficient eTime.
It is critical to balance these settings to optimize patient care and avoid complications like air trapping. By carefully adjusting the jet valve time and rate, we can provide effective ventilation tailored to each patient's needs. If you need to decrease CO2, you can increase the jet rate. Conversely, if you are concerned about air trapping or hyperinflation or if the expiratory time (eTime) is not long enough, you can decrease the jet rate.
The jet PIP is critical for adjusting ventilation. Typically, we start with a jet PIP that provides desirable CO2 levels. To blow off more CO2, you can increase the jet PIP, and if you have reduced CO2 too much, you can decrease the jet PIP to let CO2 levels rise a bit. For the conventional ventilator, if you are using a recruitment maneuver with assist control, pressure control style ventilation, set the rate between zero to five breaths per minute.
This helps recruit more alveoli and minimizes volume trauma or hemodynamic compromise. The conventional PEEP should be just high enough to achieve chest rise without interrupting the jet breaths. You do not want the jet propulsions to pause when a sigh breath is given, so it should be continuous.
By setting the PEEP appropriately, you can improve atelectasis and minimize volume trauma or hemodynamic compromise. PEEP can be adjusted as needed, though it can be a bit daunting, especially in the NICU world, depending on physician comfort levels.
- Jet Rate: Increase to decrease CO2; decrease to avoid air trapping or hyperinflation.
- Jet PIP: Adjust based on CO2 levels; increase to reduce CO2, decrease to allow CO2 to rise.
- Conventional Ventilator: Use assist control, pressure control with a rate of zero to five breaths per minute for recruitment.
- PEEP: Set high enough for chest rise without interrupting jet breaths, adjusting as necessary to manage atelectasis and minimize trauma.
PEEP is your main determinant of oxygenation. To improve oxygenation, you can increase PEEP. For weaning or if there is a hemodynamic compromise, you might need to decrease it, especially if you have generated too much mean airway pressure.
The conventional ventilator inspiratory time (iTime) should be set anywhere from 0.35 to one whole second. A longer iTime elongates the sigh breath, generates more mean airway pressure, and improves atelectasis. However, if there is volume trauma or hemodynamic compromise, you might need to decrease the iTime, just as you would adjust the conventional rate.
High Frequency Oscillatory Ventilation
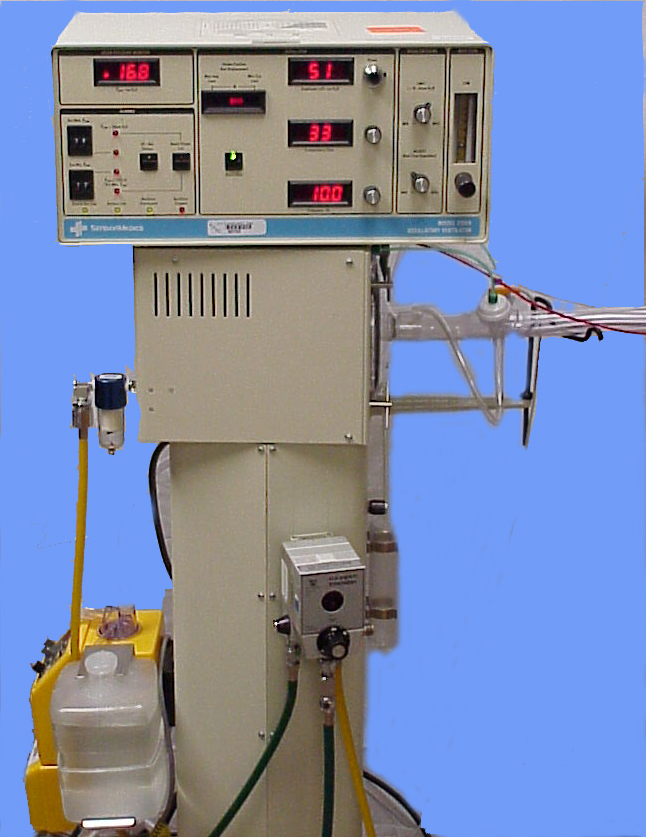
Figure 3. Example of High Frequency Oscillatory Ventilation (Brian Hall, Public domain, via Wikimedia Commons).
What is HFOV?
Now, let’s discuss oscillatory ventilation seen in Figure 3. The oscillator might look old-fashioned, but it is effective—“if it isn’t broken, don’t fix it,” right? Here's an overview of the key components of the oscillator:
- Mean Airway Pressure (MAP): Located in the top left corner, this is created by adjusting the combination of the adjust knob and the bias flow.
- Alarm Settings: These are small but efficient and located conveniently for quick access.
- Piston Position: This is an essential part of the oscillator, which we will delve into shortly.
The oscillator’s setup includes various dials and knobs, which might seem complex at first glance, but each serves a critical function in managing ventilation effectively. The mean airway pressure, for instance, is crucial for maintaining adequate oxygenation and ventilation in patients, and it is controlled through specific settings and adjustments.
- PEEP: Increase for better oxygenation, decrease for weaning, or if there is hemodynamic compromise.
- iTime: Longer for better atelectasis management, shorter if there are issues with volume trauma or hemodynamic stability.
- Oscillator: Effective, with important controls like the mean airway pressure and piston position, providing precise ventilation management.
How does HFOV work?
Understanding and utilizing these settings appropriately can significantly enhance patient care and outcomes in both conventional and oscillatory ventilation scenarios. The oscillator, another type of mechanical ventilation, uses very small tidal volumes at very high frequencies, similar to the jet ventilator. However, it operates at a constant descending airway pressure, allowing you to set the mean airway pressure (MAP) directly. This is different from the jet ventilator, where MAP is secondarily created by PEEP, sigh breaths, and jet PIP.
Key Components of the Oscillator:
- Amplitude or Delta P: Controlled by the power knob, it affects the volume of oscillation.
- Percentage of iTime: This is set as a percentage, unlike the time settings on other ventilators.
- Frequency: Located below the iTime setting, it determines the rate of oscillation.
Advantages of the Oscillator:
- Lung Recruitment: By setting the MAP, you can maintain consistent lung recruitment.
- Avoiding Overdistension: Helps in avoiding overdistension of lung tissue.
- Decreasing Vent-Induced Lung Injury: Overall, it reduces the risk of lung injury caused by the ventilator.
There are two models of the oscillator:
- Oscillator A: HFOV A ≤35kg
- Oscillator B: HFOV B >35k
The FDA has a weight cutoff of 35 kilos for these devices. While It is sometimes necessary to exceed this limit based on patient needs, it should always be done with team approval and careful consideration of the patient's condition.
Diaphragm/Piston
The oscillator features a diaphragm piston, which plays a crucial role in its operation. This piston moves to create the oscillations needed for ventilation. By setting the MAP directly on the oscillator, you can maintain the desired pressure and lung recruitment without relying on secondary factors like PEEP or sigh breaths.
The oscillator provides precise control over mean airway pressure, making it effective for maintaining lung recruitment and minimizing lung injury. By understanding its components and operation, healthcare providers can use it to optimize patient care in critical situations.
Within the oscillator, there is a piston driven by an electromagnetic coil. This mechanism pushes a flexible diaphragm made of black canvas material. When the diaphragm moves forward, it creates active inspiration by pushing flow and pressure into the patient. When it swings backward, it creates active exhalation by sucking the air back out. This bidirectional movement generates the oscillation and pressure needed for ventilation.
Key Features of the Oscillator:
- Active Inspiration and Exhalation: The diaphragm's forward movement forces air into the patient, while its backward movement sucks air out. This active process differentiates the oscillator from other ventilators.
- Tidal Volumes: The oscillator can deliver tidal volumes that are less than or equal to the dead space volume, making it highly effective for delicate ventilation needs.
The oscillator delivers tidal volumes of about one to four milliliters per kilogram, which is slightly higher than what the jet ventilator provides. It also employs a more laminar flow compared to the jet's transitional flow. This difference means the oscillator is not as effective at piercing through dead space.
For patients with conditions like RSV bronchiolitis, the jet might be a better option because it can pierce through secretions and potentially help clear them from the airway. In contrast, the oscillator could push these secretions further down, potentially causing complications.
Mean Airway Pressure (MAP)
Mean airway pressure (MAP) is the primary determinant of oxygenation for the jet ventilator. If oxygenation issues occur, increasing the MAP is necessary. This adjustment helps ensure adequate oxygenation by improving overall lung recruitment and gas exchange efficiency.
- Oscillator Tidal Volumes: Slightly higher (1-4 mL/kg) with more laminar flow.
- Jet Tidal Volumes: Better at handling secretions due to transitional flow.
- Mean Airway Pressure (MAP): The primary determinant of oxygenation in
When adjusting the MAP on the jet ventilator, It is necessary to do so very slowly. Specifically, adjusting PEEP, it can take several hours to see the effects of the change, especially when weaning. If you encounter an eager attending who wants immediate results, it is important to be the voice of reason and remind them that patience is necessary. Adjusting the MAP should be done incrementally and then monitored over a few hours to ensure that it does not cause any complications.
Each patient has a different threshold or tolerance for high MAPs, largely influenced by their venous return. High MAPs can impact venous return and cardiac output, so close monitoring and gradual adjustments are essential to avoid hemodynamic instability.
- Slow Adjustments: Make changes to MAP slowly and wait several hours to observe the effects.
- Patient-Specific Tolerance: Each patient’s tolerance for high MAPs varies, influenced by their venous return.
- Monitor Gradually: Be cautious and monitor the patient closely after any adjustments to avoid complications.
While adjusting MAP is critical for managing oxygenation, it must be done with caution and patience. Ensuring a gradual approach and closely monitoring the patient’s response will help avoid potential issues and provide the best care. Depending on the state of their disease process, some patients can tolerate mean airway pressures in the 30s or 40s, while others may experience significant drops in blood pressure at much lower settings, such as 23. This variation occurs because the lungs and heart share the confined space within the thoracic cavity. When the lungs expand and take up more room, the heart has less space to function properly.
Effects of High Mean Airway Pressure:
- Reduced Cardiac Space: As the lungs expand with higher mean airway pressures, they can compress the heart.
- Impaired Cardiac Function: Compression of the heart can prevent it from contracting and relaxing properly.
- Inadequate Filling: If the heart cannot fill properly due to compression, it can lead to reduced cardiac output and potentially plummeting blood pressure.
Considerations:
- Individual Tolerance: Each patient’s tolerance to high MAPs varies widely, influenced by their specific condition and overall thoracic compliance.
- Monitoring: Close monitoring of blood pressure and cardiac function is essential when adjusting MAP to avoid adverse effects.
When adjusting MAP, It is vital to consider the unique tolerance levels of each patient. Monitoring and adjusting slowly can help prevent complications related to the confined space of the thoracic cavity and ensure optimal patient care. If the heart does not fill appropriately, it cannot pump blood effectively, leading to an acute drop in blood pressure. Each patient has a different threshold for mean airway pressure (MAP). A simple guideline we teach our respiratory therapists is if increasing the MAP from 24 to 25 causes the blood pressure to plummet, return to 24, and the blood pressure should stabilize.
Practical Tips:
- Threshold Awareness: Each patient has a unique MAP threshold.
- Immediate Response: If an increase in MAP causes a significant drop in blood pressure, revert to the previous setting.
- Team Discussion: Communicate with the healthcare team about the need for higher MAP and consider supportive measures.
When discussing with your team, consider the following:
- Fluid Bolus: Administering fluids can help support blood pressure.
- Vasopressors: If not already in use, adding vasopressors may be necessary to maintain adequate blood pressure.
By understanding and managing these nuances, you can ensure that adjustments to MAP are made safely and effectively, maintaining optimal patient care and avoiding complications. Having an arterial (art) line can be very beneficial for these patients. I understand that at our institution, we are trying to minimize the use of additional lines due to infection risks, only using them when absolutely necessary. However, if you do not have an art line, it is crucial to continuously monitor blood pressure, especially when making adjustments and initially setting up the oscillator.
One way to determine if you have set the mean airway pressure (MAP) correctly or if you have gone too high or have more room to increase it is by using a chest X-ray. For example, if the chest X-ray shows that the lungs are only expanded to eight ribs, this could indicate that the MAP might need to be adjusted. While minimizing infection risks is important, ensuring accurate and continuous monitoring of blood pressure is crucial when adjusting MAP. Utilizing chest X-rays can also provide valuable information to guide these adjustments and ensure optimal lung expansion and patient care.
When evaluating mean airway pressure (MAP), a chest X-ray can be extremely informative. For instance, if the X-ray shows lung expansion up to only eight ribs, you know there is room to increase the MAP to expand the lungs further. On the other hand, if the X-ray reveals that the lungs are expanded to 12 ribs, you should stop increasing the MAP to avoid the risk of causing a pneumothorax, even if the patient is hemodynamically stable.
- Chest X-Ray Monitoring: Use X-rays to gauge lung expansion.
- Under-Expansion: If only expanded to eight ribs, consider increasing MAP.
- Over-Expansion: If expanded to 12 ribs, avoid further increases to prevent pneumothorax.
In standard mechanical conventional ventilation, the pressures swing between inspiratory peaks and drops during exhalation. This pattern shows how pressure changes during the breathing cycle and how adjustments to mean airway pressure (MAP) can influence lung expansion. With conventional ventilation, the MAP is typically around 25. The oscillator, on the other hand, maintains a fixed MAP of 30. The piston in the oscillator swings back and forth, creating small, rapid oscillations. This process involves a Delta P, which we discuss in more detail, contributing to the consistent maintenance of the MAP.
Key Differences Between Conventional Ventilation and Oscillator:
- Conventional Ventilation:
- MAP: Around 25
- Pressure Swings: Large swings between inspiratory and expiratory pressures
- Lung Impact: Higher potential for lung damage due to larger pressure swings
- Oscillator:
- MAP: Fixed at 30
- Piston Movement: Small, rapid swings (Delta P)
- Frequency: Set frequency determines the rate of oscillation
- Lung Impact:
- Less lung damage due to smaller, quicker oscillations, maintaining higher MAP without large pressure swings
The oscillator achieves a higher MAP with much smaller swings, reducing lung damage. This method avoids the significant stretches of inspiratory pressure and the drops during the expiratory phase, providing a gentler and more consistent approach to ventilation.
Amplitude (∆ P)
When it comes to amplitude, also known as Delta P, this is what actually drives the size of our tidal volume. Amplitude is a secondary effect based on where we set the power knob next to our Delta P. Adjusting the power controls the piston's movement, determining the size of the swings and, consequently, the tidal volume. Manipulating the amplitude is crucial for ventilation management.
- Amplitude/Delta P: Determines the size of the tidal volume.
- Power Knob: Adjusts the piston's movement to set the amplitude.
- Ventilation Impact:
- Increasing Amplitude: Increases Delta P, which in turn increases tidal volume.
- Decreasing Amplitude: Reduces Delta P, thus reducing tidal volume.
By increasing the amplitude, you inadvertently increase the tidal volume, which helps to decrease carbon dioxide (CO2) levels. This is because larger tidal volumes enhance CO2 removal from the lungs, improving overall ventilation.
Practical Application:
- To Decrease CO2: Increase the amplitude (Delta P) to raise the tidal volume.
- To Increase CO2: Decrease the amplitude to lower the tidal volume.
Adjusting the amplitude is a vital tool for effectively managing a patient's ventilation needs. Understanding this relationship allows for precise control over CO2 levels and overall respiratory function. Conventional ventilation creates large pressure swings, with the tidal volume represented by the difference between the peak inspiratory and expiratory pressures. In the case of the oscillator, the Delta P represents the amplitude. The width of this Delta P determines the generated tidal volume.
Key Concepts:
- Conventional Ventilation: Features large pressure swings to achieve tidal volume.
- Oscillator: Uses Delta P (amplitude) to generate tidal volume.
- Delta P: The distance between the two dotted lines; a wider Delta P means a larger tidal volume.
One crucial aspect of Delta P or amplitude is that it controls the chest wiggle. This wiggle is a visible indicator that the amplitude is set correctly. For initial settings, ensuring that the amplitude is sufficient to create a noticeable chest wiggle is vital.
Practical Application:
- Delta P (Amplitude): Controls the size of the tidal volume and the chest wiggle.
- Chest Wiggle: A visual cue indicating proper amplitude settings.
By setting the amplitude appropriately, you can ensure effective ventilation and monitor the patient's chest wiggle as an immediate indicator of correct settings. When manually ventilating someone, you want to apply enough pressure to get the chest to move. With the oscillator, you want to set the amplitude high enough to get a noticeable chest wiggle. For children and adults, the wiggle should be visible from the chest down to the mid-thigh.
In neonates, it typically extends from the chest to the umbilicus. Neonates often have more pronounced wiggles, sometimes even extending to their toes, but ideally, you want to see it reach their umbilicus to ensure you have set a good initial amplitude.
When you are setting the oscillator, keep an eye on that chest wiggle. For adults and kids, look for movement down to the mid-thigh. For neonates, aim for movement up to the umbilicus, even if it sometimes goes further. This visible chest wiggle is your immediate cue that you have set the amplitude correctly, ensuring proper ventilation for the patient.
Frequency
When it comes to the oscillator's frequency, it is important to remember that it is different from the respiratory rate we are used to. Frequency controls the time allowed for the piston to move back and forth. Essentially, it determines how quickly the piston oscillates within a given time frame. To put it into perspective, the oscillator can operate anywhere from 3 to 15 hertz. Remember, 1 hertz equals about 60 breaths per minute. With the oscillator you are looking at frequencies ranging from 180 to 900 breaths per minute. It moves incredibly fast!
Key Points about Frequency:
- Frequency vs. Respiratory Rate: Unlike the traditional respiratory rate, the frequency on an oscillator determines the piston’s oscillation speed.
- Range: The oscillator operates between 3 to 15 hertz.
- Conversion: 1 hertz is roughly equal to 60 breaths per minute, translating to 180 to 900 breaths per minute on the oscillator.
Understanding this helps you set the oscillator correctly and ensure It is providing the rapid, small-volume breaths necessary for effective ventilation. Absolutely, the frequency of an oscillator has a big impact on tidal volume. When you lower the frequency, say to 4 Hz, you get a greater tidal volume. Essentially, when the frequency is lower, the piston has more time to move back and forth, which increases the tidal volume.
Now, this is where it gets interesting: at a cellular level, the slower the movement, the more time CO2 and O2 have to exchange and diffuse. This means that by moving slower, you allow for better gas exchange. Contrary to what we might initially think as respiratory therapists, decreasing the frequency actually helps blow off more CO2. Lower frequency means larger tidal volumes. Slower frequencies allow more time for gas exchange. Decreasing frequency helps blow off more CO2, which is a bit counterintuitive for us.
This is an important concept for effectively setting and managing the oscillator to ensure proper ventilation and CO2 removal. If you have blown off too much CO2, you will want to increase the hertz. We typically adjust this by about one hertz at a time since changing the rate by 60 breaths per minute is quite significant, and we prefer not to make overly dramatic adjustments.
Bias Flow
When it comes to the bias flow on the oscillator, it is important to set it correctly, as it controls the flow rate of the humidified fresh gas. You need to ensure It is neither too high nor too low, as this helps in generating the desired mean airway pressure. On Oscillator A, the maximum bias flow you can set is 40 liters per minute, while on Oscillator B, it can go up to 60 liters per minute.
If you need to fine-tune your settings:
- Increase the hertz in small increments to manage CO2 levels.
- Adjust the bias flow carefully to regulate the flow rate and support proper mean airway pressure.
By making these adjustments thoughtfully, you can effectively manage ventilation and ensure the patient is receiving the appropriate support. The bias flow, in conjunction with the adjust knob, is crucial for creating your mean airway pressure. You use the bias flow and the adjust knob to balance each other. The adjust knob has a specific range for optimal performance. If you imagine the knob as the hand of a clock, you want it to be between the 10 o'clock and 2 o'clock positions.
If the adjust knob is before the 10 o'clock position, it indicates too much bias flow, and you need to reduce it to bring the knob back within the desired range. Conversely, if the knob is at the 2 o'clock position, it means there is not enough bias flow, so you will need to increase it. Keeping the adjust knob and bias flow within this "happy" range ensures the ventilator functions optimally.
When I first started at Nemours, we did not have an ECMO team, and we relied heavily on the oscillator for very sick kids in our PICU. Often, we had to max out the settings, with the bias flow up to 60 and the adjust knob turned all the way to maximum. However, the ventilator does not operate efficiently when pushed to its limits like that. It is always better to keep the settings within their optimal ranges to maintain the ventilator's performance and avoid overworking it.
If you push the ventilator too hard, it can overheat and shut down. Maintaining the balance between the adjust knob and the bias flow is crucial to prevent overheating and excessive bias flow, which could potentially cause a pneumothorax. Keeping these settings in check ensures the ventilator operates smoothly and safely.
Inspiratory Time
We typically set the inspiratory time at 33%, which gives a 1:2 ratio. This setting is a result of the rate and a set percentage of the respiratory cycle. Although 33% is common, it is not fixed and can be adjusted. The diaphragm excursion can be asymmetrical, spending more time in the inspiratory phase. This can help create more mean airway pressure if needed.
While we usually stick to 33%, you can increase it up to 50% in certain situations. This can be a last-ditch effort to help with ventilation and generate larger tidal volumes, aiding in lung recruitment and potentially improving oxygenation. However, the literature supporting this is not robust, so it should be considered only when all other options are exhausted.
HFOV Management
Initial Settings at Nemours:
- FiO2: Start at 100% for these patients, then quickly wean down to less than 60% as soon as possible to maintain safe oxygen saturation levels.
- Mean Airway Pressure (MAP): Begin with the conventional MAP, then increase by about 3 to 5 centimeters above the conventional ventilator MAP. In the NICU, we usually go 2 to 3 centimeters above, while in the PICU, It is closer to 5 centimeters above.
- Inspiratory Time: Typically set at 33%, providing a 1:2 I:E ratio.
- Bias Flow: For Oscillator A, start at 15 liters per minute, and for Oscillator B, start at 20 liters per minute. Adjust quickly to maintain the adjust knob in the optimal position and achieve the desired MAP.
- Amplitude: Rather than setting the amplitude directly, adjust the power to achieve the desired chest wiggle. The power setting will dictate the amplitude, ensuring effective ventilation.
By following these initial settings and making necessary adjustments based on the patient's response, we can effectively manage ventilation with the oscillator. This approach helps ensure adequate oxygenation and ventilation while minimizing the risk of complications. Starting with the power settings on the oscillator, Vyaire's recommendations are a good guide. For Oscillator A, you can set the power to 2.0, place it on the patient, and adjust based on the initial amplitude you observe. From there, you adjust the power up until you see an adequate chest wiggle. For Oscillator B, start with a power of 4.0 and follow the same process.
I often joke with new therapists about how doctors sometimes "order" an amplitude, like 50, without a specific rationale. It is more of an estimation when initially setting up a patient. Using the power method takes the guesswork out of it and provides a reliable starting point. Frequency Settings Based on Patient Size and Disease Process:
- Premature Babies: Typically need a very high frequency, around 12 to 15 Hz, due to their delicate and small lung volumes.
- Neonates: A slightly lower frequency, about 10 to 12 Hz.
- Children: Frequencies are adjusted down further as the size increases, usually around 8 to 10 Hz.
- Adolescents/Teenagers: Frequencies are set lower still, around 6 to 8 Hz, to accommodate larger lung volumes.
By setting the frequency based on patient size and their specific disease process, you can ensure effective ventilation. This gradual adjustment aligns with the patient's needs and helps maintain optimal respiratory function. For adults, the frequency on the oscillator is typically set between 4 to 6 Hz. As the patient size increases, the frequency decreases accordingly. In pediatric care, seeing an oscillator moving slowly, with a low frequency, usually signals serious ventilation issues. For instance, if you see a child on a frequency of 4 Hz, It is not ideal and often means we are facing significant challenges with ventilation.
When it comes to medical management with an oscillator, improving oxygenation involves increasing the FiO2 and mean airway pressure. You achieve this by adjusting the bias flow and the adjust knob. If we are focusing on ventilation, increasing the amplitude is key. Since we cannot set the amplitude directly, we increase the power to generate a higher amplitude. Additionally, lowering the frequency helps, as does increasing the inspiratory time percentage—though that's more of a last-resort tactic.
There is also a technique called creating a controlled ET tube cuff leak. This helps with ventilation by allowing some pressure to escape. However, it must be done carefully to avoid losing the mean airway pressure you have worked so hard to maintain. If you just drop the cuff haphazardly, you could lose all that pressure, which could lead to problems with oxygenation.
To sum it up, when you are trying to improve oxygenation, you look at increasing the FiO2 and mean airway pressure by tweaking the bias flow and adjust knob. For better ventilation, you boost the amplitude by increasing the power, lowering the frequency, and maybe even extending the inspiratory time if necessary. If things are really tough, you might consider a controlled ET tube cuff leak to help with ventilation without losing your precious mean airway pressure. This kind of careful management ensures that we address the patient’s specific needs effectively.
A tactical way to create a controlled ET tube cuff leak is by first increasing your mean airway pressure (MAP) by five. For example, if your current MAP is 25, increase it to 30. Then, use a syringe to slowly deflate the cuff until the MAP returns to the original setting of 25. This method allows you to create a purposeful leak in a controlled manner, minimizing the risk of large swings in MAP that might occur with an uncontrolled leak. By doing this, you enable CO2 to exhale around the ET tube, mimicking passive exhalation. Since oscillators do not have passive exhalation, this technique helps improve ventilation by allowing some of the exhaled gases to escape around the ET tube cuff.
HFOV vs HFJV
When comparing the jet ventilator and the oscillator side by side, you will notice that both deliver tidal volumes of about one to four milliliters per kilogram. The iTime on the oscillator is a result of the rate and set percentage. For the jet ventilator, the iTime is set directly and results in a similar tidal volume range. To recap this method: increase your MAP by five units, then slowly deflate the ET tube cuff with a syringe until the MAP returns to its original value.
This controlled approach helps facilitate CO2 exhalation and can improve ventilation. The jet and oscillator ventilators both deliver small tidal volumes, but their mechanisms and control settings differ, with the jet having a direct iTime setting and the oscillator relying on rate and percentage for iTime.
The inspiratory time (iTime) on an oscillator is a result of the rate and a set percentage of the respiratory cycle, not measured in seconds but as a percentage. The oscillator features active exhalation, which is different from other ventilators. However, one drawback is the potential loss of mean airway pressure (MAP) during suctioning. When you first put a patient on an oscillator, suctioning is usually avoided.
Inline suctioning while the oscillator is running is often ineffective because secretions tend to be caked down. Effective suctioning would require disconnecting the patient from the oscillator and performing vigorous manual ventilation and suctioning. However, physically disconnecting the patient can cause a significant loss of MAP.
Key Points on Oscillator Use:
- Indications: The oscillator is particularly useful for conditions like RDS (Respiratory Distress Syndrome) and pulmonary hyperplasia. It is ideal for managing oxygenation issues because you can directly set the MAP.
- Contraindications: Hemodynamic instability is a potential issue because adjusting the MAP has a direct and powerful effect. High MAP settings can increase intracranial pressure (ICP). Additionally, air leak syndrome is not ideally managed with oscillators.
The oscillator’s ability to set MAP directly makes it excellent for oxygenation issues. However, caution is needed due to the potential for hemodynamic instability and increased ICP. For patients with air leak syndrome, other ventilatory strategies might be more appropriate. The jet ventilator delivers tidal volumes closer to one milliliter per kilogram, which is slightly smaller than what the oscillator delivers.
Unlike the oscillator, the iTime on the jet is physically set, and it operates with passive exhalation. This difference is crucial, as the jet’s passive exhalation makes it easier to suction patients. The helix flow of expiratory gases helps move secretions up around the ET tube, reducing concerns about MAP drops during suctioning.
Key Points:
- Jet Ventilator:
- Tidal Volume: Approximately one ml per kilo.
- iTime: Physically set.
- Exhalation: Passive, unlike the oscillator's active exhalation.
- Suctioning: Easier due to passive exhalation and helix flow, which assists in moving secretions.
Indications for the Jet:
- Pulmonary Interstitial Emphysema (PIE): The jet is effective for patients with air leak syndromes.
- Airway Clearance: Ideal for patients with many secretions, as it can facilitate better clearance.
- Ventilation Issues: More suitable for addressing ventilation problems due to its passive exhalation.
Contraindications for the Jet:
- Asthmatics: This is not ideal for patients with severe air trapping, as passive exhalation might not be sufficient to manage their condition.
Comparisons with the Oscillator:
- Flow Characteristics: The oscillator’s smoother, less transitional flow can lead to spikes in tidal volume and pressure in damaged lung areas, potentially hindering the healing process.
- Exhalation: The jet's passive exhalation contrasts with the oscillator's active exhalation, making the jet more suitable for conditions requiring gentle ventilation.
- MAP and Suctioning: The jet allows for easier suctioning without significant MAP loss, unlike the oscillator, which can lose MAP during suctioning.
The jet ventilator is preferable for conditions like PIE, significant secretion clearance, and ventilation issues due to its smaller tidal volumes, passive exhalation, and ease of suctioning. Conversely, it is not ideal for patients with severe air trapping, such as asthmatics. The oscillator, with its ability to set MAP directly, is better for managing oxygenation issues but requires careful handling to avoid complications from its active exhalation and potential for increased intracranial pressure.
Essentially, adding air trapping on top of existing air trapping is definitely not good. Let’s talk about how air is delivered to patients using different ventilators. When you look at the jet ventilator, you will notice the jet PEEP starts high but drops significantly from the trachea to the alveoli. This drop means you should not be too worried about the initial high jet PEEP setting.
However, you will also see the mean airway pressure (MAP) drops a bit as well, making the jet ventilator less ideal for patients struggling with oxygenation issues. On the other hand, the oscillator shows big swings in pressure. Although the pressure dissipates as it does in the jet, the oscillator maintains a more consistent MAP throughout the airway. This consistency makes it a better choice for tackling oxygenation problems.
Comparing the Two:
- The jet ventilator is great for patients with ventilation issues or those needing better secretion clearance. The drop in jet PEEP and MAP makes it less suitable for severe oxygenation problems.
- The oscillator, with its consistent MAP, is better for patients with oxygenation issues. However, it is not the best for those with air trapping or significant secretion clearance needs.
Next time you are in the NICU and a doctor suggests putting a patient on the oscillator, you can take a moment to evaluate the situation. If you think the patient might benefit more from the jet ventilator, you can speak up and explain why, based on the patient’s specific needs and the strengths of each ventilator. Understanding these differences allows you to make informed decisions.
Whether it is advocating for the jet for better secretion management and ventilation or the oscillator for consistent oxygenation, you will be able to confidently suggest the best option for your patient. The jet ventilator offers passive exhalation and transitional flow, which can be advantageous in many situations. Understanding these details helps solidify your expertise as RTs at the bedside.
Questions and Answers:
The ET tube size is greater than the jet ventilator adapter. What are some options?
It kind of depends. You just have to take into consideration that if you are trying to use a jet ventilator adapter or a life port adapter that is not the appropriate size for the ET tube; you are going to get leaks. I know we have all been MacGyvers in our units and gotten creative to eliminate those leaks. You could, although I do not really recommend this, put tape around the adapter to make it a little thicker, but just know it is not going to be the same quality. If you are looking for true jet ventilation, you really should be using the correct adapter size. So keep in mind, if it is not working effectively, it might not be that the jet ventilation failed your patient. I would say that we do not have the proper equipment to appropriately provide this care to this patient.
Is there an upper limit where increasing power further provides no added benefit or even becomes detrimental?
When you think about a conventional ventilator, there comes a point where, as we turn it higher and higher, we have to consider what we are really doing to those airways over time. When it comes to a patient being on the oscillator, you have to weigh your options. An oscillator is generally more gentle than pressure-control-style ventilation or anything like that. When you increase the power on an oscillator, it increases the amplitude, which then increases the tidal volume. You have to do what is best for the patient, making sure you are providing appropriate chest wiggle and ventilation. Unfortunately, it comes down to doing what is best for the patient. I do not believe there are any studies that show if you went up to a power of six and it gave you an amplitude of 120, that you are definitely causing damage. It is more about doing what is necessary to move the patient's chest at that point.
Regarding maximum bias flows on both oscillator models, are there any humidity or temperature considerations at those higher flow rates?
The oscillator uses a single-limb humidified circuit, so the inspiratory limb is humidified. As long as you maintain your heater, ensure it is filled with water, and everything is working correctly, you should not have to worry about humidity or temperature. However, one thing to consider is that the expiratory line of the oscillator is not heated. This can lead to condensation buildup, especially in areas with dependent loops. When the heated, humidified gas cools, it creates droplets that form puddles in the circuit. you will see these sloshing around, which can cause your mean airway pressure (MAP) to fluctuate. To manage this, try to keep the circuit as parallel as possible to the patient's bed. This helps prevent condensation buildup. But overall, at higher flows, the humidity should still be maintained as set by your heater.
Are there certain disease states or conditions where accurately judging the appropriate chest wiggle becomes more challenging?
100%. You have to consider patients who are experiencing a really bad surge response or severe anasarca. These patients have very fluid-overloaded tissue, making their skin very taut and puffy. Their skin can be so tight that you cannot really see the chest wiggle. In these cases, you might have to put your hand on their chest to feel the intensity of their wiggle. Getting close and observing at eye level can also help you see the subtle movement. For these patients, it is more about detecting any wiggle rather than the intensity of it. You may need to get a little creative in finding the best way to visualize the chest wiggle, especially in patients with anasarca or systemic inflammatory response syndrome where it can be very difficult to see.
References
Bunnell Incorporated. (2022). Bunnell Ventilator User Guide. Retrieved from https://bunl.com/bunnell-guides-manuals/
Vyaire Medical. (n.d.). Clinical Education. Retrieved from https://www.vyaire.com/clinical-education
Young, D., Lamb, S. E., Shah, S., MacKenzie, I., Tunnicliffe, W., Lall, R., Rowan, K., Cuthbertson, B. H., & OSCAR Study Group (2013). High-frequency oscillation for acute respiratory distress syndrome. The New England journal of medicine, 368(9), 806–813.
Vyaire Medical. (2020). 3100A High Frequency Oscillatory Ventilator Operator’s Manual. https://www.vyaire.com/sites/us/files/2020-05/33437-001-a-operators-manual-3100a-hfov.pdf
Miller, A. G., Bartle, R. M., & Rehder, K. J. (2021). High-Frequency Jet Ventilation in Neonatal and Pediatric Subjects: A Narrative Review. Respiratory care, 66(5), 845–856.
Citation
Massa, K. (2024). MD flavor of the month…high frequency jet versus oscillatory ventilation. Continued.com - Respiratory Therapy, Article 233. Available at www.continued.com/respiratory-therapy

Kelly Massa
BHS, RRT-NPS
Related Courses
Mechanical Ventilation Weaning in Pediatric Patients
Children can be safely and efficiently weaned from mechanical ventilation and then successfully extubated. This introductory course reviews weaning guidelines and methods during the various phases of mechanical ventilation.High Frequency Oscillatory Ventilation (HFOV) and High Frequency Jet Ventilation (HFJV): Strategies for Success
The course discusses indications and management strategies for neonates who require HFOV and HFJV modes of ventilation. A description of key parameters in lung recruitment and weaning is discussed, as well as the role of conventional ventilation.The Golden Hour and Beyond: NICU and Respiratory Care
The presentation provides up to date information on resuscitation of the preterm infant at the limits of viability. The course provides information on surfactant use and respiratory support for preterm infants.