Course Articles
MAP vs. NAP: The Impact of Mechanical Ventilation on Hemodynamics
Evan Richards, Advanced Practice Clinical Consultant, BSc, RT
Editor’s note: This text-based course is an edited transcript of the webinar, MAP vs. NAP: The Impact of Mechanical Ventilation on Hemodynamics, presented by Evan Richards, Advanced Practice Clinical Consultant, BSc, RT.
It is recommended that you download the course handout to supplement this text format.
Learning Outcomes
After this course, participants will be able to:
- Describe areas of potential physiological interaction with positive pressure ventilation
- Identify the safest of the five techniques for increasing MAP
- Describe the impact of non-invasive ventilation on hemodynamics
- List ventilator strategies that may reduce the negative impact of positive pressure
The Impact of Ventilation on Hemodynamics
I always look forward to these sessions. I have done this for 35 years, and not once have I taken for granted the fact that people take time out of their day to learn. I really respect the fact that you are here, and I am going to try to pay you back with something that might be immediately relevant to your clinical practice. The effect of mean airway pressure (MAP) on pulmonary blood flow and systemic blood flow can be observed in various ways. In this discussion, I will address the consequences of MAP, focusing on both its impact and the strategies to mitigate its negative effects. Additionally, I will briefly explore what I consider the most effective approaches to recruiting and stabilizing lungs. Finally, I will share an anecdote about how a trip to the produce section with my wife provided unexpected insights into pulmonary mechanics, and that is how I will conclude today's presentation.
Areas of Potential Physiological Interaction with MEAN Airway Pressure
- Define MAP and NAP
- Methods of increasing MAP
- MAP and pulmonary blood flow
- Address the consequences of MAP
- Best way to recruit and stabilize lungs
- Learning pulmonary mechanics from the produce section of the grocery store
The 60/90 Rule
Before I end, I want to remind you of the 60/90 rule, which I first learned about on NPR. Hearing it was a sobering moment, as I realized I am often the biggest culprit. According to the rule, 60 minutes after a lecture, people forget 90% of what was said—just like that, it is gone. This isn't about placing blame; it is simply human nature. I empathize because I, too, struggle to retain everything shared during a presentation. After each section, I will summarize the key take-home message. That way, you'll have the 10% of what I said that truly matters. This presentation covers a lot of information, and my goal is to ensure you leave with the most important insights.
Updated Definitions
First, let's begin with MAP versus NAP. I will introduce you to these updated definitions, which I coined myself—they may be entirely new to you. MAP emphasizes the word "mean," referring to any potentially counterproductive pressure applied to the airways. I call it "mean" airway pressure because, quite frankly, it is not very nice. In contrast, NAP stands for Nice Airway Pressure. NAP is the lowest amount of pressure possible, tailored to the patient’s specific pathophysiology.
This distinction may seem like a playful alliteration—with all those P's—but it is also a serious concept. Our goal is to apply just the right amount of airway pressure to avoid harm while still effectively ventilating the patient. As we proceed, we will aim to identify the optimal Nice Airway Pressure (NAP) and steer clear of the counterproductive Mean Airway Pressure (MAP).
What Is the Most Dangerous Component of Mechanical Ventilation?
As I prepared for this talk, I asked myself: What is the most dangerous component of mechanical ventilation? Initially, I was convinced the answer had to be volume. After all, volume trauma is a well-documented risk, and its dangers are emphasized frequently. I also recognized the peril of inspiratory time (or "I-time") for patients with air leaks, where prolonged pressures can exacerbate the damage.
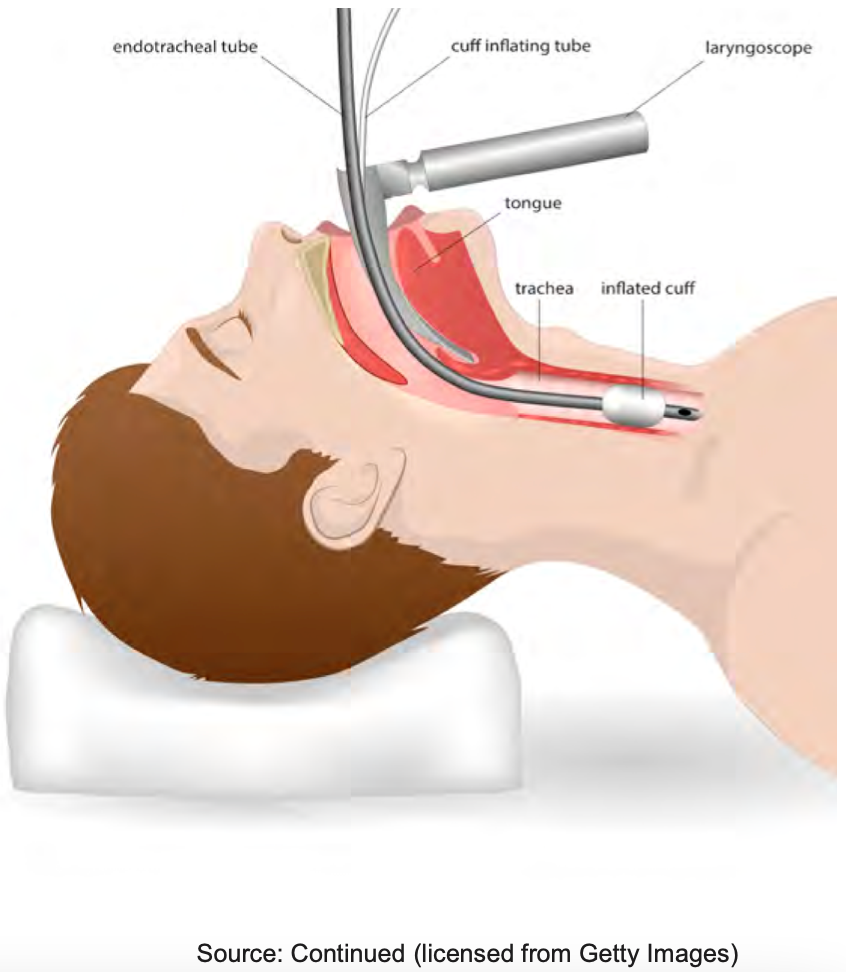
Despite my assumptions, my research revealed a surprising consensus: the most dangerous component of mechanical ventilation is not volume, pressure, or time—it is the act of intubation itself. This realization reframed my perspective on ventilator-induced lung injury (VILI). If we aim to prevent such injury, the best strategy is often to avoid intubation altogether. A patient cannot experience ventilator-induced harm without a ventilator in the first place.
Of course, non-invasive ventilation has its own complexities, but the damage associated with mechanical ventilation begins with the endotracheal tube. The moment that the tube is placed, the dynamics between the patient and the ventilator fundamentally change. Intubation inherently increases mean airway pressure and, with it, the risk of elevated intrathoracic pressure. These pressures, regardless of how carefully they are managed, alter the physiology of the lungs.
The most challenging aspect of mechanical ventilation, however, is not just mitigating pressure or volume—it’s achieving effective gas distribution within the alveoli. Positive pressure ventilation can unevenly inflate the lungs, leading to regions of overdistension while others remain under-ventilated. This uneven distribution not only complicates oxygenation but also increases the risk of lung injury over time.
In summary, mechanical ventilation is a powerful tool, but it comes with inherent risks. While volume, pressure, and timing are all critical considerations, the act of intubation itself sets the stage for potential harm. As clinicians, we must remain vigilant in balancing these factors, seeking opportunities to minimize invasive interventions whenever possible.
This is why so many patients sustain harm during mechanical ventilation. In an attempt to ventilate the poorly compliant or collapsed alveoli—the “bad guys”—we often overventilate the healthy ones. This uneven volume distribution increases the risk of stretch injury to the functional alveoli, compounding the damage.
Stretch injury occurs when the alveoli are forced to expand beyond their physiological limits. This can lead to stress fractures in the delicate capillary-alveolar interface, disrupting the integrity of the lung’s microarchitecture. For example, stress fractures in the capillaries allow red blood cells to leak into the air spaces, triggering an inflammatory cascade. This process can progress to conditions like interstitial emphysema, where air infiltrates tissue spaces, exacerbating inflammation and further impairing lung function.
Overinflation can also compress the pulmonary capillary beds, reducing blood flow and impairing gas exchange. Conversely, underinflation may cause capillaries to become extravascular, disrupting the balance needed for effective ventilation and perfusion. Either scenario—overinflation or underinflation—disrupts pulmonary capillary blood flow, further complicating patient management.
In my experience working in an animal lab with Dr. Kurt Albertine at the University of Utah, I observed how sensitive the lungs are to ventilation-perfusion (V/Q) mismatches. The body has mechanisms to detect and respond to suboptimal V/Q matching, but when mechanical ventilation exacerbates these mismatches, the result is often detrimental. It is a delicate balance, and achieving proper ventilation without causing harm remains one of the greatest challenges in respiratory care.
When alveoli are not in contact with open, compliant neighbors, the body naturally redirects blood flow to areas with greater potential for gas exchange, optimizing ventilation-perfusion (V/Q) matching. However, both overinflation and underinflation can disrupt this delicate balance, impairing pulmonary capillary blood flow and creating further complications.
This phenomenon has been vividly demonstrated in research labs, such as Gary Neiman’s lab in Syracuse, New York. Using advanced imaging techniques, they have shown how a conventional ventilator breath can disrupt pulmonary capillary blood flow. These disruptions, visible as interruptions in the "sparkling" patterns of blood flow around the alveoli, illustrate how even a single ventilator breath can interfere with microcirculation. This effect, though unavoidable to some extent, should be minimized to reduce harm.
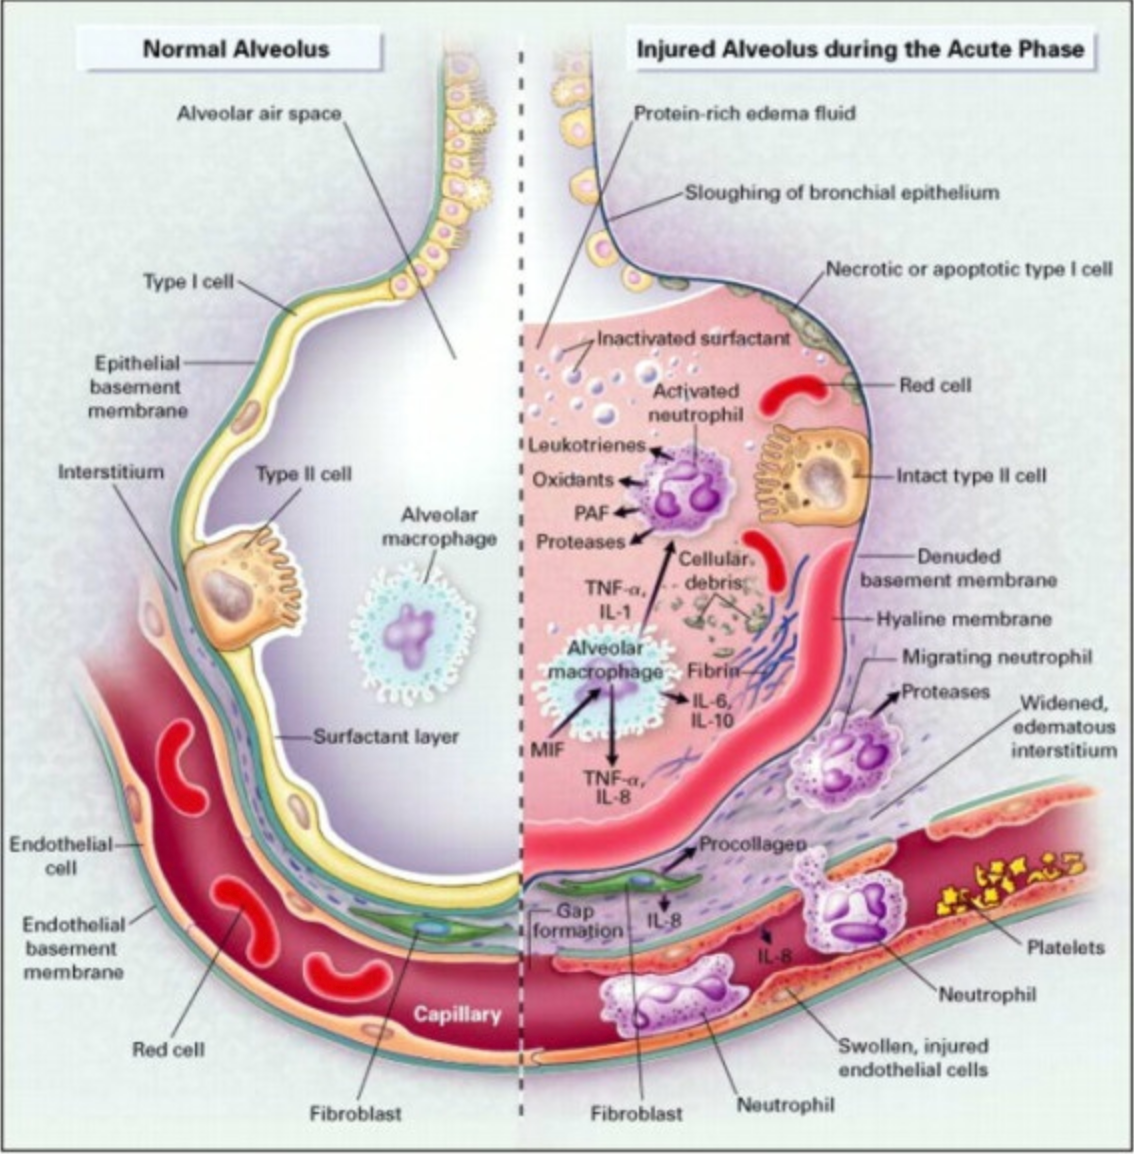
One critical component of lung function affected by ventilation is surfactant, a substance essential for reducing alveolar surface tension. When ventilation damages the alveolar walls, or when protein-rich edema fluid accumulates, surfactant becomes inactivated. This breakdown in surfactant function leads to further alveolar instability and exacerbates lung injury. In neonates and infants, who often produce surfactant in limited quantities, this disruption can be particularly catastrophic.
Beyond the lungs, mechanical ventilation can have systemic effects. Excessive mean airway pressure compresses the heart, reducing venous return and impairing cardiac output. The relationship is simple: the heart can only pump as much blood as it receives. Elevated pressures can also impact other organs, including the liver, kidneys, and brain, underscoring the far-reaching consequences of improper ventilator management.
The take-home message is clear: ventilation is an incredibly powerful tool, but it must be used judiciously. While it can save lives, mechanical ventilation has the potential to cause significant harm if not carefully managed. By understanding and addressing these risks, we can improve outcomes and minimize injury to our patients.
Least Invasive Method of Ventilating
When placing a patient on a mechanical ventilator, it is important to remember that this is not how we were naturally designed to breathe. This realization led me to reflect: if mechanical ventilation is not natural, how are we meant to breathe? The answer lies in negative pressure ventilation.
Unlike mechanical ventilation, which uses positive pressure to force air into the lungs, our bodies are designed to breathe by creating negative pressure. When we inhale, the diaphragm contracts and drops, while other respiratory muscles activate. This action expands the chest cavity, creating a pressure gradient that draws air into the lungs to equalize thoracic pressure. It is an elegant, efficient system.
Historically, negative-pressure ventilators like the iron lung mimicked this natural process. One well-known example is the iron lung, which was developed in the mid-20th century at Sick Children’s Hospital in Toronto, Canada. These devices encased the patient’s body and created a vacuum that allowed the chest to expand and air to flow into the lungs. They were remarkably effective and far less invasive than modern positive-pressure ventilation.
So why don’t we still use iron lungs if they align more closely with our natural physiology? The simple answer is practicality. Iron lungs are cumbersome, require specialized environments, and lack the versatility of modern ventilators. While they were lifesaving during their time—especially during the polio epidemics—they have been largely replaced by more portable and adaptable technologies.
Still, the principle behind the iron lung serves as a reminder of how our bodies are designed to function. Understanding the natural mechanics of breathing can inform how we approach mechanical ventilation, helping us to minimize harm and support patients in the safest way possible.
A Brief Tribute to the Iron Lung
Managing patients in an iron lung was notoriously challenging, but I want to take a moment to acknowledge the remarkable legacy of Paul Alexander, a man who lived most of his life in an iron lung. Paul passed away on March 11, 2024, at the age of 78. His life was nothing short of extraordinary.
Despite the limitations of living in an iron lung, Paul taught himself to breathe outside the device for up to three hours at a time. His determination and resilience were unmatched. He earned two master’s degrees, authored three books, and became an inspiration to many. Paul often expressed his appreciation for the iron lung, noting that it breathed the way humans are naturally meant to—with negative pressure.
For those unfamiliar with the iron lung, it is a fascinating device. The patient's body is encased inside the cylindrical chamber, with only their head protruding. The design includes portholes for caregivers to access and manipulate the patient as needed, as well as a window to visually monitor the patient. At its core, the iron lung uses a motor-driven piston to create alternating pressure within the chamber. This shift between negative and positive pressure allows the diaphragm to move, mimicking the natural mechanics of breathing.
The Iron Lung and Negative Pressure
Paul’s story is a powerful reminder of the iron lung’s significance in medical history. While it is no longer practical for modern use, the device served as a lifeline for many, enabling a natural form of breathing that aligns with our physiology. It also stands as a testament to human ingenuity and the resilience of the human spirit.
The iron lung even included a mirror so patients could see themselves, a small but meaningful touch for those who spent much of their lives inside the device. For those who relied on it, the iron lung was remarkable—it allowed them to breathe the way nature intended, with negative pressure. While it may seem unimaginable to live in such a device, patients often expressed gratitude for its ability to sustain their lives in a way that mimicked natural respiration.
I once encountered an unexpected illustration of this principle while working in a lab. An engineer had modified a standard laboratory flask by cutting off the bottom, inserting a tube through a cork, and attaching a Y-connector with two balloons. Curious, I commented, “You have reinvented the iron lung.”
The engineer looked puzzled and asked what I meant. I explained that his setup was essentially a negative-pressure breathing model. The rubber glove stretched across the open end of the flask represented a diaphragm. When the glove was pulled downward, the balloons inside inflated, just as the lungs do when the diaphragm contracts to create negative pressure.
When the rubber glove at the base of the flask is pulled downward, it simulates the diaphragm contracting, creating negative pressure inside the flask. This causes air to rush through the tube and inflate the attached balloons, mimicking how the lungs expand during natural breathing. When the glove is pushed back up, the pressure inside the flask increases, forcing air out of the tube, much like the process of exhalation.
Spontaneous vs. Mechanical Breathing
This mechanism mirrors how human beings breathe. Fortunately, our lungs maintain enough functional residual capacity (FRC) to prevent collapse at the end of exhalation, unlike the simulated system. If you have ever experienced having "the wind knocked out of you," you understand how crucial this reserve air is for maintaining breathing stability.
Negative pressure breathing offers significant physiological benefits. During inspiration, it assists venous return by reducing intrathoracic pressure, which facilitates blood flow back to the heart. It also reduces pressure on the pulmonary capillaries, promoting better circulation and gas exchange.
In contrast, positive pressure ventilation increases intrathoracic pressure during inspiration. This has the opposite effect: it restricts venous return, decreases right ventricular output, and makes it more challenging for blood to flow through the lungs. By effectively compressing the heart and pulmonary vessels, positive pressure ventilation can impair pulmonary blood flow and place additional strain on the cardiovascular system.
Despite these physiological drawbacks, positive pressure ventilation is widely used because it is far more practical and adaptable than negative pressure systems like the iron lung. Understanding these differences allows us to better manage ventilation and minimize potential harm to patients.
This simple experiment highlighted the elegance of natural respiration and served as a hands-on demonstration of the principles behind devices like the iron lung. it is fascinating how even the most basic tools can mirror complex physiological processes and remind us of the ingenuity of early medical devices.
Ventilation and Hemodynamics
- In normal breathing, the negative pressure phase of inspiration:
- Assists venous return
- Alleviates pressure on the pulmonary capillaries
- Encourages good blood flow
- In PPV, the intrathoracic pressure increases during inspiration, causing:
- Decreased venous return
- Decreased right ventricular output
- Restricted pulmonary blood flow
Let’s take a moment to discuss ventilation and hemodynamics. Hemodynamics, as we know, is the study of blood flow and its properties. Maintaining stable hemodynamics is critical because any disruption can compromise blood flow and, ultimately, organ function. Two key components of hemodynamics are venous return and cardiac output. Venous return refers to the amount of blood returning to the heart, while cardiac output is the volume of blood the heart pumps out. Both of these processes depend on two critical factors: preload and afterload.
Preload
- The amount of blood in the heart just before it contracts
- Depends on how much is coming back (Venous Return)
- Decreased pressure on the heart from MAP
- Reduced preload will tend to decrease cardiac output
- Increased preload is good
When I first started exploring this topic, I realized I needed a better understanding of preload. Like many, I found it a challenging concept at first, so I did some research. Preload is the volume of blood in the heart at the end of diastole, just before the heart contracts. It is directly influenced by venous return—how much blood is flowing back to the heart—and can be reduced by factors that apply pressure to the heart, such as excessive mean airway pressure from mechanical ventilation.
Interestingly, managing preload can significantly impact cardiac output. By optimizing preload—ensuring the heart is not overloaded or underloaded with blood before contraction—you can improve cardiac output. However, cardiac output may suffer when preload is decreased by external pressures, such as those caused by positive pressure ventilation.
When preload is reduced, cardiac output decreases because the heart simply doesnot have enough blood to pump effectively. Factors like excessive mean airway pressure from mechanical ventilation can compress the heart, reducing venous return and subsequently decreasing preload. This disruption impairs the heart’s ability to maintain adequate cardiac output.
Conversely, increased preload is beneficial. It ensures the heart receives more blood, allowing it to send more oxygenated blood to the body. The key takeaway is that reduced preload is generally detrimental, as it leads to reduced cardiac output, while increased preload supports efficient circulation.
For example, turning up the mean airway pressure too high can "squeeze" the heart, particularly the right side, making it harder for blood to return to the heart. Since cardiac output is directly dependent on venous return—essentially, the heart can only pump out as much blood as it receives—disrupting venous return disrupts the entire system.
Preload plays a vital role in maintaining cardiac output. Managing ventilatory pressures to avoid excessive compression of the heart and ensuring adequate venous return are key strategies for optimizing preload and supporting overall cardiovascular function.
Understanding Increased Afterload
- The pressure the heart must overcome to eject blood to the rest of the body
- Increases when blood vessels are compressed or restricted (e.g., excessive MAP)
- Reducing afterload will tend to improve cardiac output
- Increased afterload is bad
Afterload, unlike preload, refers to the resistance the heart must overcome to pump blood into circulation. It is the pressure against which the heart works to eject blood. Increased afterload occurs when blood vessels are compressed or restricted, which can happen with excessive mean airway pressure.
Reducing afterload generally improves cardiac output because it decreases the resistance the heart has to overcome. Here's a simple rule to keep in mind: increased preload is beneficial, but increased afterload is detrimental. Increased preload ensures more blood returns to the heart for pumping, while increased afterload creates more resistance to blood flow out of the heart, reducing efficiency.
Increased afterload can manifest in different ways. On the left side of the heart, it might result from high resistance in the systemic circulation, such as compression of the aorta or other vessels due to elevated mean airway pressure. While a cardiologist might point out that squeezing the heart can improve ejection fraction, the heart still struggles to push blood against narrowed or restricted vessels, which increases afterload.
On the right side of the heart, increased afterload often results from elevated pulmonary vascular resistance. This can happen when alveoli are overinflated, compressing pulmonary capillaries and creating resistance to blood flow. Conversely, underinflation of alveoli can also increase pulmonary vascular resistance, as the body may shut down blood flow to vessels that aren’t in contact with adequately inflated alveoli.
Balancing Pulmonary Vascular Resistance
Both overinflation and underinflation of alveoli can disrupt pulmonary vascular blood flow. Overinflation compresses pulmonary vessels, while underinflation fails to provide adequate contact between blood vessels and open alveoli. As a respiratory therapist, your job is to find the “sweet spot” in ventilation—a balance where alveoli are optimally inflated without overdistension or collapse. This balance ensures maximum surface area for gas exchange, with the greatest number of vessels in contact with open alveoli.
The Goldilocks Approach
The take-home message is that hemodynamics can be compromised by either too much or too little mean airway pressure. As respiratory therapists, we excel at finding this balance because we are attentive and meticulous. Think of it as the "Goldilocks principle": too much or too little of something is not ideal, but when it is just right, the lungs function optimally. By carefully optimizing mean airway pressure, we ensure the best outcomes for our patients, providing stable hemodynamics and efficient gas exchange.
How Is MAP Increased?
To effectively manage mean airway pressure (MAP) during mechanical ventilation, it is essential to understand the various strategies available and their physiological implications. Here are five key methods to increase MAP:
- Shortening the Rise Time: By accelerating the time it takes to reach peak inspiratory pressure, you can enhance MAP. This rapid attainment of pressure allows for more immediate recruitment of alveoli, improving oxygenation. However, caution is necessary, as overly aggressive rise times may lead to patient discomfort or barotrauma.
- Increasing Peak Inspiratory Pressure (PIP): Elevating PIP directly raises the pressure delivered to the lungs, thereby increasing MAP. While this can improve oxygenation, it is crucial to monitor for potential lung injury due to higher pressures, especially in patients with compromised lung compliance.
- Extending Inspiratory Time (I-time): Prolonging the duration of inspiration maintains the lungs at a higher pressure for a longer period, which increases MAP. This strategy can enhance gas exchange but may also reduce the time available for exhalation, potentially leading to air trapping or hyperinflation if not carefully managed.
- Increasing Respiratory Rate: Raising the number of breaths per minute reduces the time allocated for exhalation. This can elevate MAP by maintaining higher average pressures. However, an excessive respiratory rate may cause incomplete exhalation, resulting in air trapping and increased intrathoracic pressure, which could adversely affect hemodynamics.
- Raising Positive End-Expiratory Pressure (PEEP): Elevating PEEP prevents alveolar collapse at the end of expiration, thereby increasing MAP. This method is often considered the most effective and safest way to enhance oxygenation, as it promotes alveolar recruitment and improves functional residual capacity. Nonetheless, excessive PEEP can lead to overdistension and impede venous return, so it must be titrated carefully.
A pivotal study by Dr. Marcelo Amato and colleagues (2014) examined the impact of ventilator management strategies on patient outcomes. The study introduced the concept of relative risk of death associated with different ventilatory approaches:
- Raising PIP without Increasing PEEP: This approach was associated with a significant increase in the relative risk of death. Elevating PIP alone can lead to overdistension and ventilator-induced lung injury, especially when PEEP is not adjusted to maintain alveolar stability.
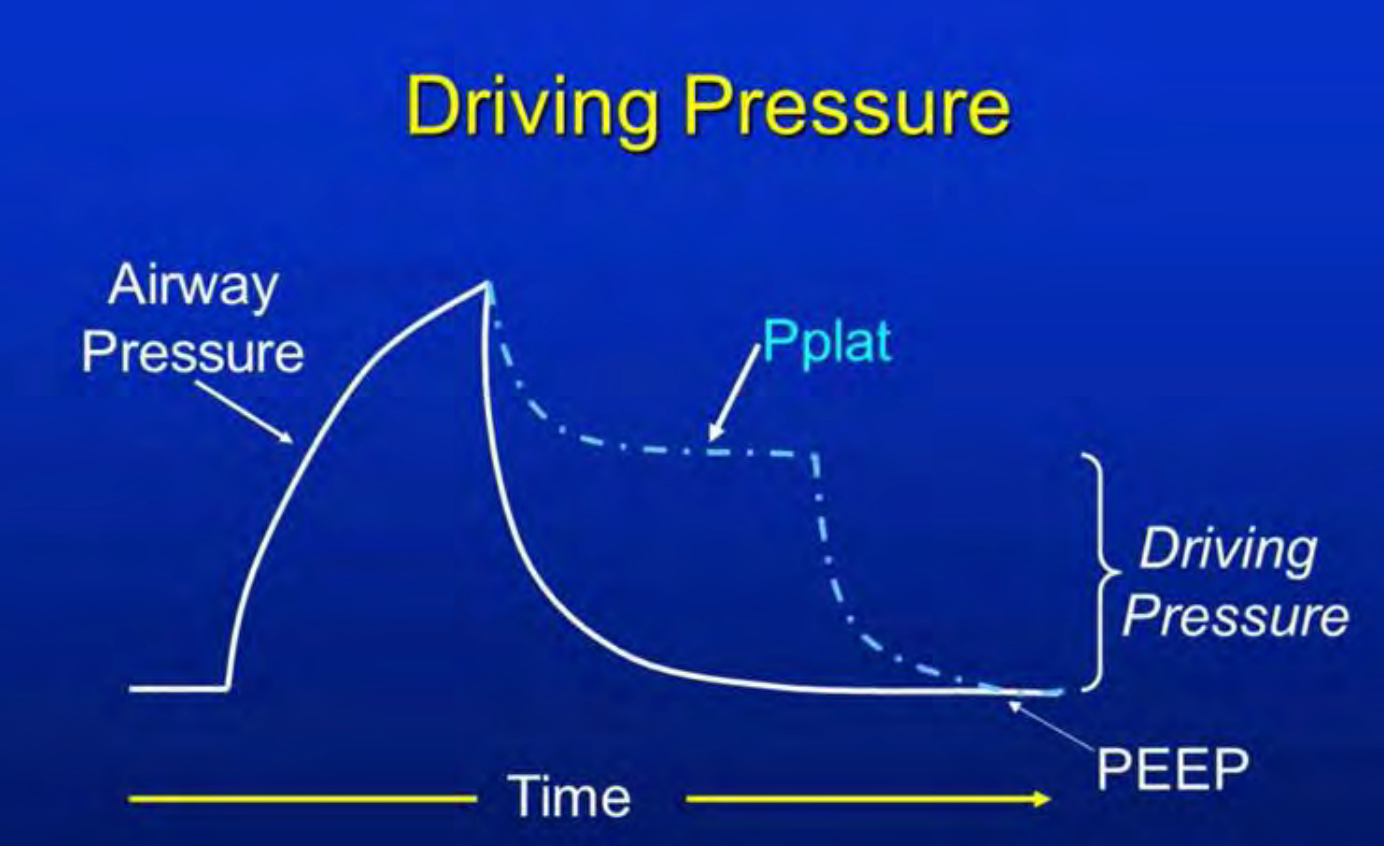
- Raising Both PIP and PEEP: Combining increases in PIP and PEEP showed a moderate improvement in outcomes compared to raising PIP alone. However, in patients with severe illness, this strategy still poses substantial risks. Maintaining an appropriate driving pressure (the difference between PIP and PEEP) was crucial in mitigating potential harm.
- Raising PEEP Alone: This method resulted in the most significant reduction in the relative risk of death. Elevating PEEP alone provided a stable and protective pressure, enhancing alveolar recruitment without the detrimental effects associated with high PIP.
The study underscores the importance of driving pressure as a critical determinant of patient outcomes. Driving pressure, calculated as the difference between PIP and PEEP, reflects the cyclic stress applied to the lungs during ventilation. Maintaining a lower driving pressure has been associated with improved survival in patients with acute respiratory distress syndrome (Amato et al, 2014).
In clinical practice, the goal is to optimize MAP to improve oxygenation while minimizing the risk of ventilator-induced lung injury. Among the strategies discussed, adjusting PEEP is often the most effective and safest method. However, individual patient factors must be considered, and ventilator settings should be tailored to achieve the best possible outcomes.
In summary, while several methods exist to increase MAP, careful consideration of their physiological impacts is essential. Elevating PEEP stands out as a particularly effective strategy, but it should be implemented judiciously within the context of a comprehensive ventilatory management plan.
Impact of MAP on Cerebral Circulation
Positive end-expiratory pressure (PEEP) is a critical component in mechanical ventilation, particularly for patients with acute respiratory distress syndrome (ARDS). By maintaining alveolar recruitment and improving oxygenation, PEEP plays a vital role in patient care. However, its application requires careful consideration due to potential systemic effects, especially concerning cerebral circulation.
Impact on Cerebral Circulation
Elevated PEEP levels can increase intrathoracic pressure, which may impede venous return from the brain, leading to elevated intracranial pressure (ICP). This rise in ICP can reduce cerebral perfusion pressure (CPP), potentially compromising cerebral blood flow and increasing the risk of hypoxic or ischemic injuries. Studies have shown that while moderate PEEP levels may have minimal impact, higher levels can significantly affect ICP and CPP.
Clinical Considerations
In patients with brain injuries or compromised cerebral autoregulation, the application of PEEP necessitates meticulous monitoring. The balance between optimizing oxygenation and maintaining stable cerebral hemodynamics is delicate. Adjustments to PEEP should be individualized, taking into account the patient's respiratory mechanics, intracranial dynamics, and overall clinical status. Continuous monitoring of ICP and CPP is advisable when applying higher levels of PEEP in such patients.
Recommendations for Practice
- Individualized PEEP Titration: Tailor PEEP levels to the patient's specific needs, considering both pulmonary and cerebral parameters.
- Monitoring: Employ invasive monitoring techniques to assess ICP and CPP in patients at risk of cerebral complications.
- Interdisciplinary Approach: Collaborate with neurology and critical care specialists to optimize ventilatory strategies for patients with concurrent respiratory and neurological concerns.
Understanding the nuances between hypoxic and ischemic brain injuries is crucial for accurate diagnosis and treatment.
Hypoxic Brain Injury
This occurs when the brain receives blood that is inadequately oxygenated. Despite sufficient blood flow, the reduced oxygen content leads to cellular dysfunction and damage. Common causes include respiratory failure, carbon monoxide poisoning, and high altitudes. Depending on the duration and severity of oxygen deprivation, symptoms can range from mild cognitive impairments to severe neurological deficits.
Ischemic Brain Injury
In contrast, ischemic injury arises when there is an obstruction or reduction in blood flow to the brain despite the blood being oxygen-rich. This deprivation prevents brain tissues from receiving necessary oxygen and nutrients, leading to cell death. Causes often include blood clots, strokes, or cardiac arrest. The resulting damage can lead to motor deficits, speech difficulties, and other neurological impairments. Both types of injuries can result in significant neurological impairments, and their management requires precise monitoring of both oxygenation and perfusion.
Near-Infrared Spectroscopy (NIRS)
NIRS is a non-invasive monitoring technique that offers real-time insights into tissue oxygenation and perfusion. By emitting near-infrared light into tissues and measuring the absorption spectra, NIRS can determine the balance between oxygenated and deoxygenated hemoglobin. This provides continuous data on both oxygen delivery and utilization in specific regions, making it invaluable in settings like cardiac surgery and critical care.
The NIRS device operates by placing sensors on the skin's surface. A light source emits near-infrared light, which penetrates tissues and is absorbed by hemoglobin. Two detectors measure the intensity of light after it has traversed the tissue:
- Shallow Detector: Captures light that has traveled a shorter path, providing information about superficial tissue layers.
- Deep Detector: Measures light that has penetrated deeper, offering data on underlying tissues and organs.
By analyzing the differential absorption at these depths, NIRS calculates regional oxygen saturation and assesses tissue perfusion. This dual capability distinguishes it from standard pulse oximetry, which primarily measures arterial oxygen saturation without providing direct information on tissue perfusion.
In clinical practice, NIRS has proven beneficial in various scenarios:
- Cardiac Surgery: Monitoring cerebral oxygenation to prevent neurological complications.
- Neonatal Care: Assessing brain oxygenation in preterm infants to detect and prevent hypoxic-ischemic injuries.
- Critical Care: Evaluating tissue perfusion in patients with circulatory shock or traumatic brain injuries.
By providing continuous, real-time data, NIRS aids clinicians in making informed decisions to optimize patient outcomes. In summary, distinguishing between hypoxic and ischemic brain injuries is essential for targeted therapeutic interventions. Utilizing advanced monitoring tools like NIRS enhances the ability to assess and manage these conditions effectively, ultimately improving patient care.
This device is remarkable because it monitors both oxygen delivery and perfusion simultaneously, providing critical real-time insights into a patient’s condition. Its utility lies not just in what it measures but in how it empowers clinicians to act proactively. Unlike many diagnostic tools—such as X-rays, CT scans, MRIs, or ultrasounds—this device doesn’t simply confirm whether harm has occurred. While these technologies are invaluable for diagnosing existing issues, they are typically reactive, informing clinicians only after an injury or complication has already taken place.
What sets this device apart is its ability to alert clinicians to potential harm before it happens. Rather than waiting for signs of an adverse event to appear, it provides early warnings, enabling timely interventions that can prevent injury altogether. This proactive functionality represents a significant shift in how we approach patient care, moving us closer to truly preventive medicine. By identifying and addressing risks in real-time, clinicians can reduce complications, improve outcomes, and potentially save lives.
The device monitors critical metrics related to organ saturation, such as how well oxygen is reaching the kidneys and brain—two organs particularly vulnerable to oxygen deprivation. These metrics are essential because they reflect how effectively the body is maintaining vital functions. A decline in saturation values signals potential organ dysfunction, allowing clinicians to act immediately, whether by adjusting oxygen delivery, optimizing perfusion, or addressing other underlying issues.
In one instance, a drop in both cerebral and renal saturation levels was identified within a few hours. The clinical team traced the issue to excessive mean airway pressure. They responded by suctioning the patient and switching from a device that utilized higher mean airway pressure to one that used less. This change led to a rapid improvement in oxygenation, preventing brain injury before it occurred. The ability to detect and address such problems early highlights the profound impact of this technology.
What’s remarkable is how this device facilitates real-time monitoring of both cerebral and renal saturations. By providing continuous feedback, it bridges the gap between reactive diagnostics and preventive care, offering precision and foresight that redefine patient safety standards. This capability ensures that clinicians can make informed, timely decisions in critical care settings, where even slight delays can have serious consequences.
The key takeaway here is that mean airway pressure can significantly impact cerebral circulation, making its careful management critical. Another takeaway is more general but equally important: attention to detail matters, whether you’re managing a clinical device or inflating a raft. Small adjustments can have big impacts, and proactive care can make all the difference in patient outcomes.
Consequences of MAP
I have personally experienced lightheadedness when blowing up something for my grandkids, which serves as a reminder to be cautious. Overexertion, even in seemingly simple tasks, can have consequences—similar to the clinical risks associated with excessive mean airway pressure. Understanding this concept is critical because the implications can be significant, as highlighted in a fascinating study.
This study, titled Cardiovascular Effects of HFOV with Optimal Lung Volume Strategy in Term Neonates with ARDS (Acherman, R.J., Siassi, B., deLemos, R., Lewis, A.B., & Ramanathan, R.), examined the cardiovascular effects of high-frequency oscillatory ventilation (HFOV) using optimal lung volume strategies. The collaboration included notable figures in the field: Dr. Reuben Acherman, a cardiologist; Dr. Ramanathan, the inventor of the RAM cannula; and the late Dr. deLemos, known as the "grandfather" of the SensorMedics oscillator. This team was based at LA Children’s Hospital, a hub for groundbreaking pediatric care.
Dr. Acherman, intrigued by the team's approach, visited Dr. deLemos to discuss their use of high mean airway pressures during oscillation. Dr. deLemos explained that using HFOV allowed for higher mean airway pressures with improved safety compared to conventional ventilation methods. The reduced risk of overdistension, as confirmed by X-ray imaging, supported their strategy.
However, Dr. Acherman, ever cautious, expressed concerns about the potential effects of mean airway pressure on the cardiovascular system. He proposed using his ultrasound machine to investigate further. The team welcomed his input, as they had not observed evidence of overdistension on imaging but were open to additional insights.
The primary challenge with oscillation and jet ventilation lies in their mechanics. Both devices essentially function as CPAP systems with added oscillatory movement, often referred to as “CPAP with a wiggle.” They operate at higher mean airway pressures while maintaining lower peak inspiratory pressures, which can obscure traditional signs of overdistension. For example, on a conventional ventilator, overinflation often causes visible changes like diaphragm flattening or rib expansion on X-rays. These indicators are typically absent in oscillatory ventilation, making it harder to detect underlying issues.
Dr. Acherman became concerned when he observed that patients on these devices, particularly at higher mean airway pressures, were showing signs of systemic cardiovascular stress. Despite interventions to maintain blood pressure and cardiac output, these patients continued to exhibit troubling symptoms. Using his ultrasound machine, Dr. Acherman investigated further and made a critical discovery: many of these patients had a significantly dilated inferior vena cava (IVC), elevated central venous pressure (CVP), and widespread edema.
His findings were striking. While the heart and lungs initially appeared normal on imaging, the inferior vena cava below the diaphragm was dilated, in some cases up to three times its normal size. This indicated that venous return to the heart was being obstructed. Both the superior and inferior vena cava were affected, contributing to increased intracranial pressure, which can have severe neurological consequences. Additionally, the hepatic veins, which drain blood from the liver, were also significantly dilated—approximately three times their normal size. This systemic venous congestion confirmed that elevated mean airway pressure was creating significant hemodynamic strain.
Dr. Acherman concluded that the elevated mean airway pressures were not just ventilating the lungs but also exerting pressure on the heart and pulmonary vasculature. This compression impaired venous return and increased resistance within the pulmonary and systemic circulations. These findings were critical because they highlighted a hidden risk of oscillatory ventilation that could not be readily detected with traditional methods like X-rays.
The study conducted at LA Children’s Hospital brought together several pioneers in neonatal and pediatric care, including Dr. Acherman, Dr. Ramanathan (inventor of the RAM cannula), and the late Dr. deLemos, known as the "grandfather" of the SensorMedics oscillator. Their work illustrated the complex interplay between ventilation strategies and cardiovascular physiology. While HFOV was deemed safer than conventional ventilation in certain cases, Dr. Ackerman’s findings underscored the importance of monitoring not just pulmonary parameters but also cardiovascular effects.
One of the most illustrative demonstrations of HFOV mechanics involved placing a pig or sheep lung inside a sealed bottle. When high mean airway pressures were applied, the lung inflated while maintaining low internal pressures, a feature often touted as an advantage of HFOV. However, Dr. Acherman noted a critical limitation of this model: it did not account for the constraints of an intact thoracic cavity. In a living patient, the rib cage, diaphragm, and surrounding structures limit lung expansion. This restriction is especially pronounced in adults but can also affect pediatric patients. Consequently, the pressures that seemed safe in an isolated lung model could, in practice, result in significant hemodynamic consequences when applied in vivo.
At LA Children’s Hospital, the clinical team observed that patients with high mean airway pressures did not exhibit traditional signs of overdistension, such as diaphragm flattening or rib spacing changes, commonly seen on X-rays. However, the elevated pressures were compressing the heart and pulmonary vasculature, leading to increased CVP, venous congestion, and impaired cardiac function. These effects were subtle yet profound, illustrating the need for advanced diagnostic tools like ultrasound to detect and address such complications.
This study demonstrated the importance of interdisciplinary collaboration in improving patient care. By combining the expertise of cardiologists, neonatologists, and pulmonary specialists, the team was able to identify and mitigate risks associated with HFOV. It also highlighted the need for careful consideration of mean airway pressures, even when using “safer” ventilation strategies. The findings emphasize that while advanced technologies can offer significant benefits, they also require a thorough understanding of their potential systemic impacts.
In clinical practice, this case serves as a reminder to monitor not just respiratory parameters but also the broader physiological effects of ventilation strategies. The insights gained from this study continue to inform how we approach high-frequency ventilation, emphasizing the importance of vigilance, comprehensive assessment, and early intervention to prevent complications.
Consequences of Too Much MAP
Managing mean airway pressure is critical, whether using a conventional ventilator or a high-frequency ventilator because elevated pressures can have serious consequences. The question then becomes: what can be done to address the problem? At Children’s Hospital Los Angeles, under the guidance of Dr. Philippe Friedlich, an experienced neonatologist, the team approached this challenge with innovation and collaboration. Dr. Friedlich and his team worked closely with biomedical technicians to design practical solutions that address real clinical needs, not just theoretical ones.
During a visit to speak with his group, I discussed the process of developing medical devices, emphasizing that they must solve real problems in the ICU, NICU, or PICU. Before my talk, Dr. Friedlich and I discussed a pivotal study conducted at his hospital (Marked Reduction in MAP and OI Using HFJV in Neonates with Severe Refractory Hypoxemic Respiratory Failure). This study focused on addressing mean airway pressure and overdistension in neonates, particularly those who had failed conventional ventilation and were deteriorating on oscillators after missing their ECMO window.
The Problem: Overdistension and Gas Trapping
In these cases, the neonates were experiencing gas trapping and hyperinflation, which contributed to elevated mean airway pressures. These pressures, in turn, exacerbated issues like barotrauma—or as Dr. Friedlich coined it, "mapotrauma." The team hypothesized that gas trapping was the primary cause of the elevated pressures, leading to poor oxygenation and ventilation. They realized that conventional ventilators with a 1:2 inspiratory-to-expiratory (I:E) ratio were not sufficient to alleviate this problem. This led them to revisit high-frequency jet ventilation (HFJV) to explore its potential in these critical cases.
The Solution: Extending Expiratory Time
Using HFJV, the team was able to adjust the I:E ratio to as much as 1:6 or 1:12, significantly increasing the time available for exhalation. This approach helped to minimize gas trapping and, subsequently, reduce mean airway pressure. The goal was to resolve hyperinflation, improve oxygenation, and ultimately stabilize these fragile patients.
The Results: Rapid Improvement
The first ten patients in the study had failed conventional ventilators and oscillators. These neonates were critically ill, with oxygen indexes (OI) averaging 30, indicating severe respiratory failure. Over 50 days, they had been stuck on oscillation without significant improvement. Once switched to HFJV, the results were striking:
- Reduction in Mean Airway Pressure: Within four to five hours of starting HFJV, the mean airway pressure dropped from 14 to below 10 cm H₂O
- Improved Oxygenation: As mean airway pressure decreased, the fraction of inspired oxygen (FiO₂) could be weaned from nearly 90% to below 50%
- Improved Oxygen Index: The OI, which reflects the severity of respiratory failure, fell from 30 to 10 within hours and remained low over the next several days
This rapid improvement allowed the team to extubate the patients and eventually send them home. Of the ten initial patients, nine survived and were discharged. Tragically, one patient suffering from sepsis did not survive. However, the surviving neonates—all with chronic lung disease at the time of intervention—were able to leave the NICU and go home on oxygen.
The Impact: Better Outcomes and Reduced Costs
While some neonates required supplemental oxygen at discharge, Dr. Friedlich emphasized that sending them home was a success. Each day a patient spends in the NICU costs $10,000 to $20,000. By reducing the time spent on mechanical ventilation and in the NICU, the team not only improved patient outcomes but also reduced financial burdens for families and healthcare systems. On average, after the intervention, patients were on mechanical ventilation for just seven more days before being weaned.
Lessons Learned
Dr. Friedlich and his team concluded that lowering mean airway pressure was the key to success. By resolving hyperinflation and gas trapping, they achieved better oxygenation and reduced the risk of complications. The study also highlighted the importance of avoiding hyperinflation in the first place. Prolonged expiratory times, achieved through HFJV, proved to be a critical strategy for minimizing barotrauma and reducing mean airway pressures.
MAP During Noninvasive (NIV)
Mean airway pressure has long been a focus of discussion in mechanical ventilation, but I had initially thought it wasn’t an issue during noninvasive ventilation (NIV). My reasoning was simple: during NIV, patients typically breathe in a way that mimics natural physiology. Humans are designed to breathe with negative pressure, not positive pressure. Unlike invasive ventilation, which requires mechanical assistance, NIV generally relies on the patient’s normal breathing mechanisms unless supplemental breaths are delivered. Because of this, I assumed mean airway pressure wouldn’t play a significant role in NIV. I was wrong.
Over time, I began to question what might be better for patients: delivering breaths through the nose using noninvasive positive pressure ventilation (NIPPV) or maintaining continuous positive airway pressure (CPAP) through the nose. Which approach was more effective? Was one safer than the other? To answer this question, I turned to a pivotal study by Dr. Haresh Kirpalani, a Canadian physician who researched this topic during his time in Washington, D.C. The study, published in The New England Journal of Medicine in 2013 (A Trial Comparing Noninvasive Ventilation Strategies in Preterm Infants), sought to compare these two strategies in preterm infants.
Key Findings of the Study
Dr. Kirpalani’s study explored whether NIPPV—delivering breaths through the nose—or CPAP—maintaining a continuous positive pressure—offered better outcomes for preterm infants. The findings were intriguing. There was no substantial difference between the two strategies in terms of preventing complications. There was a slight advantage for avoiding breaths through the nose, but the difference was minimal, just a few percentage points. Importantly, the rates of bronchopulmonary dysplasia (BPD) were nearly the same in both groups.
This was surprising to me. BPD, a chronic lung condition, is commonly associated with invasive mechanical ventilation and prolonged exposure to high oxygen concentrations. These preterm infants, however, had never been intubated. How could they develop BPD? This challenged my understanding of the condition and highlighted the complexity of its underlying mechanisms.
Rethinking Assumptions
Dr. Marty Kessler once made a thought-provoking observation about our attachment to terminology in respiratory care. He said, “I think we’re misled by these terms.” Terms like continuous positive airway pressure, high-flow nasal cannula, and noninvasive ventilation create an impression of minimal intervention. They suggest that these methods are inherently safer or less likely to cause harm compared to invasive approaches. Yet, as this study demonstrated, even noninvasive techniques can contribute to conditions like BPD.
The Implications
The findings of this study—and my reflections on it—serve as an important reminder of the nuanced nature of respiratory support. While NIV strategies like NIPPV and CPAP are invaluable tools, they are not without risks. Mean airway pressure, even during noninvasive support, can play a critical role in patient outcomes. it is not just about delivering the right therapy; it is about understanding the potential consequences of each approach and tailoring care to the individual needs of the patient.
Dr. Marty Kessler made an important observation during a conference we attended together. He pointed out that regardless of the terminology we use—whether it is CPAP, high-flow nasal cannula, or noninvasive ventilation—all these techniques share three critical components: pressure, flow, and ventilation. Even in noninvasive strategies, maintaining sufficient pressure and flow is essential to adequately ventilate the patient. Without these, complications can arise.
The Challenge of Maintaining Pressure
Dr. Kessler emphasized that a CPAP level must be sufficient to keep the lung open, even when the patient is not intubated. This principle ties into the concept of lung protection. If the lung collapses, particularly in a surfactant-deficient state, reopening it becomes more challenging and can cause injury. Dr. Jack Emerson, an early pioneer of the iron lung, referred to this phenomenon as “sticky lung syndrome.” He described how surfactant-deficient alveoli tend to stick together when they collapse. Reopening these collapsed alveoli can result in shear stress and lung injury, even with noninvasive techniques.
Dr. Emerson’s insight underscores an important reality: just as patients can experience ventilator-induced lung injury (VILI) with invasive strategies, they can also suffer lung injury from noninvasive methods if pressure and flow are inadequate. Persistent attempts to maintain noninvasive support in a struggling patient can sometimes do more harm than good.
When to Transition to Intubation
One of the key lessons from these discussions is knowing when to transition from noninvasive to invasive ventilation. Dr. Kessler explained that while noninvasive strategies are often preferable, there are cases where intubation and low-pressure, low-volume lung-protective ventilation may be the safer and more effective option. Administering a dose of surfactant in such scenarios can help stabilize the lung, making it easier to extubate the patient later.
A colleague in Canada shared a compelling example of this principle in action. They had a 24-week-old preterm infant who was started on nasal prongs immediately after birth. Initially, the infant responded well and defied the odds, maintaining stability on noninvasive support. However, over time, the team struggled to maintain adequate ventilation. Despite their best efforts—repositioning the prongs, switching systems, and adjusting the patient—they couldn’t achieve stability. After 24 days of noninvasive ventilation, they decided to intubate the infant.
What was striking was the infant’s first chest X-ray post-intubation, which revealed chronic lung disease (CLD). This was surprising, as the patient had never been intubated prior to that point. The cause? Insufficient or unstable mean airway pressure during noninvasive support. The lesson was clear: sufficient mean airway pressure is critical to maintaining functional residual capacity (FRC) and alveolar inflation. Without it, the lung remains unstable, even in a noninvasive strategy.
Noninvasive Ventilation: Not Always "Noninvasive"
Dr. Kessler’s reflections challenge the notion that noninvasive ventilation is entirely “noninvasive.” While it avoids the physical invasiveness of endotracheal intubation, it can still cause harm if mean airway pressure is insufficient to maintain stable lung function. In this way, “noninvasive” can be a misnomer. The absence of an endotracheal tube doesn’t negate the physiological invasiveness of inadequate support.
The take-home message is this: noninvasive strategies are highly effective when applied correctly, but they require careful attention to mean airway pressure. If mean airway pressure is too low or unstable, noninvasive ventilation can fail, leading to lung injury and complications like CLD. Achieving therapeutic outcomes hinges on delivering adequate pressure, flow, and ventilation. Noninvasive may be better in many cases, but it is only truly noninvasive if it provides sufficient support to maintain stable lung function.
Recruitment Maneuvers and Optimal MAP
Ventilating patients effectively requires an open lung strategy. For noninvasive ventilation to work, the lungs must remain open, which often involves recruitment maneuvers. However, if mean airway pressure is critical and too much or too little can be problematic, the question becomes: how do you optimize it? What is the best way to recruit and stabilize the lungs while avoiding injury?
Learning from a New Perspective
I recently discussed this topic with Dr. Molly, a physician I admire greatly who works at a hospital in Winnipeg, Manitoba. She is not only a colleague but also a friend, and I had the pleasure of having dinner with her during a visit to her hospital. Our conversation drifted to a pivotal moment we shared years earlier at the PAS conference in Washington, D.C., where Molly attended a lecture that left a lasting impression on both of us.
At that conference, Molly was intrigued by an anesthesiologist’s perspective on lung recruitment strategies. She recalled how she had initially planned to challenge the presenter, confident in her own NICU experience. Yet, after hearing his approach, she found herself rethinking some deeply held beliefs. The anesthesiologist argued that many ICU and NICU patients, particularly babies, are recruited improperly. He explained that high-pressure, short-duration breaths, often used in the ICU, can push the lungs into the injury zone, increasing the risk of barotrauma and other complications.
A Different Recruitment Strategy
The anesthesiologist described his approach to recruiting patients during surgery when their lungs had collapsed. Instead of giving a short, high-pressure breath, he advocated for a longer-duration, lower-pressure breath. For example, he would hold a breath 5 to 8 cm above PEEP (and no more than 15 cm in extreme cases) for 20 to 30 seconds. After releasing the pressure for four to five seconds, he would repeat the maneuver two or three times. In nearly all cases, this method restored lung function without causing injury.
Molly relayed this to me with a big smile, admitting she had been skeptical at first. “We cannot give 20- or 30-second breaths in the ICU,” I said. She agreed but suggested we could modify the strategy with one- to three-second breaths at lower pressures. “It’s safer than it sounds,” she explained. “The anesthesiologist emphasized that longer inspiratory times are far less dangerous when pressures are kept low. it is the combination of high pressure and long inspiratory time that increases the risk of injury.”
Optimizing Mean Airway Pressure Safely
Molly explained how her team applies these principles in their unit. After optimizing PEEP to ensure the lungs remain open, they often transition to high-frequency ventilation. This approach allows them to maintain higher mean airway pressures safely, as the oscillatory nature of high-frequency ventilation (CPAP with a wiggle) minimizes the risk of overdistension and injury.
She emphasized the importance of keeping the lungs open while using the gentlest means possible. “The take-home message,” she said, “is to optimize mean airway pressure to open the lungs and keep them open, but to do so gently. Recruitment maneuvers should be tailored to the patient, using lower pressures and longer durations to avoid harm.”
The Future of Recruitment Research
Inspired by these discussions, Molly’s team and others have begun exploring the best ways to recruit and stabilize lungs effectively. Preliminary studies suggest that a longer inspiratory time with lower pressures is more effective and less injurious than shorter, high-pressure recruitment strategies. Additional research is underway to examine whether simply raising PEEP or mean airway pressure alone can achieve the same results or whether recruitment breaths are necessary for optimal outcomes.
The hope is that these studies will provide clear evidence for the safest and most effective recruitment methods, ensuring better outcomes for patients in the ICU, NICU, and PICU. As Molly put it, “We need to find the balance—enough pressure to open the lungs but not so much that we cause harm. And we need to use every tool and strategy at our disposal to get it right.”
This ongoing research represents an exciting opportunity to refine our understanding of lung recruitment and improve how we manage mean airway pressure. I look forward to sharing more about these findings as they develop, but for now, the key takeaway is clear: recruitment and stabilization must be done with care, precision, and a focus on gentle, patient-centered strategies.
MAP vs NAP in the Produce Section
Ventilation, like grocery shopping, requires balance, observation, and attention to detail—at least that is how I see it. My wife, who’s far better at navigating grocery stores, loves to remind me how chaotic I find them. On Mother’s Day, she convinced me to join her on a grocery run. How could I refuse on her special day? Reluctantly, I agreed, thinking I could survive one trip. Little did either of us know how the produce section would ignite my respiratory therapist brain.
When we got to the produce section, I couldn’t help myself. Suddenly, I saw lung dynamics everywhere. “Look at these vegetables,” I exclaimed. “That is a great example of a good distribution of tidal volume. Over there, hyperinflation! And here, underinflation.” My wife, a fellow respiratory therapist, stared at me, baffled. “What are you talking about? We’re here to shop!” But I couldn’t stop. This was too exciting.
I pointed out the divine ripened tomatoes. “These are perfect! They represent optimal lung inflation. See how balanced they are?” Then I held up the heirloom tomatoes and explained how their irregular shapes resembled overinflated alveoli, with their stems acting like pulmonary capillaries. “And look at these habanero peppers,” I continued. “When insufficient PEEP lets the alveoli collapse, they look just like this—uneven and deflated.”
As we moved through the store, I found more metaphors. A broken bag of frozen peas scattered on the floor became pulmonary interstitial emphysema. Clumps of ruptured alveoli spilling into tissue spaces came vividly to life through the imagery of scattered peas. My wife rolled her eyes, begging me to move on. But I was having too much fun.
By the end of the trip, she was regretting bringing me along. “Never again,” she declared, assigning me errands elsewhere in the store whenever we shop together. Despite her exasperation, the trip reminded me of something profound: ventilation, like selecting produce, requires care. Too much pressure, and you risk damage; too little, and the lungs fail to function. Each lung, much like each tomato, has unique needs that must be respected.
The Take-Home Message: Individualized Care
This playful metaphor brings us back to a critical point about ventilation: no two patients are the same. As respiratory therapists, our job is to assess, adapt, and respond to each patient’s unique pathophysiology. My colleague, Marty Kessler, often says, “It is very important to tailor your strategy to the pathophysiology. Choose the right strategy for the right disease.” To that, I would add: “It is equally important to change the strategy as the pathophysiology evolves.”
This is what makes our profession so rewarding and vital. Our expertise lies in our ability to understand pulmonary dynamics and hemodynamics, identify what each patient needs, and continuously adapt. We don’t take a cookie-cutter approach because the same strategy that worked for one patient might fail for another. This adaptability is what makes us the experts in pulmonary care.
Critical Thinking: The Heart of Respiratory Therapy
Our role as RTs demands critical thinking—skills that grow with every shift, patient, and case. Bedside care is dynamic, requiring us to make real-time decisions and adjust as conditions change. Sessions like those offered by Continued are invaluable in honing our knowledge and keeping us at the forefront of respiratory care.
So, the next time you’re in the produce section, maybe you’ll think of tomatoes, peppers, and peas in a new light. More importantly, remember the delicate balance required to ventilate and protect the lungs. By optimizing mean airway pressure—finding that sweet spot between too much and too little—we ensure better outcomes for our patients. And if nothing else, let this story serve as a reminder: never take a respiratory therapist grocery shopping!
Thank you for allowing me to share my thoughts on mean airway pressure, its impact on pulmonary dynamics, and the parallels we can draw from everyday life. It is these connections and insights that make our profession both challenging and deeply rewarding. Now, let’s dive into the questions you have for me.
Questions and Answers
You mentioned in your talk about the importance of PEEP. Why do you think we don’t give enough PEEP, and why is that significant?
that is an excellent question. My colleagues and I use a term we jokingly call “PEEPophobia.” For some reason, many clinicians are more apprehensive about increasing PEEP than they are about mean airway pressure (MAP). I have seen this repeatedly, particularly with high-frequency ventilation. For example, on devices I worked with, we displayed both PEEP and MAP. Over time, we noticed people were much more hesitant to increase PEEP.
Why? It could be that MAP is calculated—it’s an average of several variables and doesn’t have a direct adjustment knob. On the other hand, PEEP is tangible; you turn a knob, and the change is immediate. This directness may make it feel riskier. I’ll admit, I was once “PEEPophobic” myself. But we must overcome that fear. Properly optimizing PEEP is critical for patient care and stability, especially when trying to prevent lung collapse and ensure proper oxygenation.
Regarding noninvasive ventilation (NIV), what adjustments or precautions would you recommend when NIV doesn’t seem to provide sufficient MAP for a patient with hemodynamic concerns?
that is a great question. One key thing to remember is not to assume the pressures displayed on the NIV device are entirely accurate at the patient’s airway. Resistance in the system, such as prongs or mask interfaces, can significantly affect delivered pressure. A doctor once told me about a case where they set a pressure of 6 cmH₂O on a patient, but when the prongs were laid on the bed, the device still displayed 4 cmH₂O—clearly inaccurate.
If a patient is not responding well to NIV, start by ensuring the prongs or mask are positioned correctly. Next, verify that you’re delivering enough pressure to keep the lungs open. I would err on the side of providing slightly more pressure rather than less. Remember, noninvasive systems are prone to under-delivering pressure compared to invasive systems. that is why careful monitoring and adjustments are crucial when managing patients on NIV.
You discussed near-infrared spectroscopy (NIRS) for monitoring cerebral and renal tissue oxygenation. Is this technology frequently used in practice, especially in the pulmonary and RT fields?
Unfortunately, no, it is not as widely used as it should be. Years ago, I worked at a hospital that was an early adopter of this technology, and I saw its benefits firsthand. However, in many newborn intensive care units (NICUs) and pediatric ICUs I visit, I don’t see it being implemented as often. NIRS has immense potential—not only for monitoring but also for preventing injuries by giving clinicians a real-time “heads up” before harm occurs.
Technologies like NIRS and electrical impedance tomography (EIT) could significantly improve decision-making in patient care, but they haven’t fully caught on yet. it is a great question, and I hope to see more widespread adoption of these tools in the future, as they align perfectly with our goal of proactive, rather than reactive, care.
To wrap things up, what’s the overarching takeaway from your presentation on MAP and its role in ventilation?
The key takeaway is this: get the lungs open and keep them open. Optimizing MAP is crucial in achieving this balance. Too much MAP can cause overdistension and injury, while too little leads to alveolar collapse and inadequate oxygenation. We must tailor ventilation strategies to each patient’s unique physiology and needs.
Critical thinking is essential, and we cannot use a one-size-fits-all approach. Every patient’s condition evolves, and we must adapt accordingly. As RTs, our role is to assess, identify the pathophysiology, and apply strategies that maximize outcomes while minimizing risks. With ongoing education and tools like NIRS, EIT, and careful PEEP adjustments, we can elevate our care standards.
References
Acherman, R. J., Siassi, B., deLemos, R., Lewis, A. B., & Ramanathan, R. (n.d.). Cardiovascular effects of HFOV with optimal lung volume strategy in term neonates with ARDS. USC School of Medicine, Division of Neonatology, and Children's Hospital of Los Angeles, Division of Cardiology, Los Angeles.
Amato, M. B. P., Meade, M. O., Slutsky, A. S., Brochard, L., Costa, E. L. V., Schoenfeld, D. A., Stewart, T. E., Briel, M., Talmor, D., Mercat, A., Richard, J. C. M., Carvalho, C. R. R., & Brower, R. G. (2014). Driving pressure and survival in the acute respiratory distress syndrome. New England Journal of Medicine, 372(8), 747-755. https://doi.org/10.1056/NEJMsa1410639.
Friedlich, P., Subramanian, N., & Garg, M. (n.d.). Marked reduction in MAP and OI using HFJV in neonates with severe refractory hypoxemic respiratory failure. Children’s Hospital Los Angeles, Division of Neonatology, Keck School of Medicine, University of Southern California, Los Angeles, CA.
Fu, Z., Costello, M. L., Tsukimoto, K., Prediletto, R., Elliott, A. R., Mathieu-Costello, O., & West, J. B. (1992). High lung volume increases stress failure in pulmonary capillaries. Journal of applied physiology (Bethesda, Md. : 1985), 73(1), 123–133.
Kirpalani, H., Millar, D., Lemyre, B., Yoder, B. A., Chiu, A., & Roberts, R. S., for the NIPPV Study Group. (2013). A trial comparing noninvasive ventilation strategies in preterm infants. New England Journal of Medicine, 369(7), 611-620.
Citation
Richards, E. (2024). MAP vs. NAP: the impact of mechanical ventilation on hemodynamics. Continued.com - Respiratory Therapy, Article 254. Available at www.continued.com/respiratory-therapy
Nov 11, 2024
1 CE HourMD Flavor of the Month…High Frequency Jet versus Oscillatory Ventilation
Kelly Massa, BHS, RRT-NPS
Editor’s note: This text-based course is an edited transcript of the webinar, MD Flavor of the Month…High Frequency Jet versus Oscillatory Ventilation, presented by Kelly Massa BHS, RRT-NPS.
It is recommended to download the course handout to supplement this text format.
Learning Outcomes
After this course, participants will be able to:
- Discuss HFOV and HFJV, including the mechanism of action, description of settings, and review of initial settings
- Explain the major differences between HFOV and HFJV
- Describe how to choose which high-frequency ventilator
Introduction
Let's start with a brief definition of high-frequency ventilation. High-frequency ventilation is a mechanical ventilation strategy that uses very small tidal volumes, typically between one to four milliliters per kilogram of dead space, coupled with very high respiratory rates. High-frequency ventilation minimizes alveolar damage caused by positive pressure. Large positive pressure swings and subsequent collapse during exhalation can cause significant harm. By reducing this stretch and recoil, high-frequency ventilation provides a safer alternative, particularly when conventional ventilation has failed.
Many institutions use two different types of high-frequency ventilators that operate uniquely. Let’s explore these differences. If you have worked in a NICU, you might be familiar with the scenario where, during your morning shift, a physician approaches you and says, "I think this patient needs to go on an oscillator."
As a dedicated respiratory therapist, you might respond, "Okay, sounds great. Conventional ventilation is failing, so we need to consider a high-frequency option. You are the physician; let's use the oscillator." However, when the shift changes, another physician might come in and say, "Actually, I believe this patient would be much better off on the jet." This scenario often leads to confusion in the NICU, as the choice of ventilator can vary depending on the physician on duty. It highlights the inconsistency driven by individual preferences and comfort levels with different machines. However, there is a well-defined mechanism of action for each type of ventilator that we will break down. As a respiratory therapist and ventilation specialist, you can offer valuable suggestions to physicians about the best choice for the patient.
When to Consider High Frequency
- Excessive conventional ventilator settings
- Plateau pressure ≥ 30-35cmH2O, large VT, pH < 7.1
- Avoid further VILI
- Lung recruitment
- Prophylactic treatment for ELBW neonates
- Infants less than 26 weeks
- Air leak syndrome
- Meconium aspiration, PPHN
- ARDS
- Available data comparing HFOV and HFJV has not shown a true superiority of either modality!
When should you consider high-frequency ventilation in general, without delving into the differences between oscillatory and jet? It is typically when conventional ventilator settings have become excessive. At this point, the settings may be causing more harm than benefit. It becomes a Catch-22: we need to use high pressures to deliver adequate tidal volumes and ventilate the patient, but these high pressures can also cause damage.
To achieve effective ventilation, very high peak inspiratory pressures and plateau pressures, often greater than or equal to 30 centimeters of water pressure, are required. Additionally, large tidal volumes of 10 to 12 milliliters per kilogram are used. If a patient's pH remains significantly acidotic, below 7.1, despite these measures, it indicates the need for an alternative approach.
In these instances, conventional settings can cause irreversible damage. While some lung tissue can regenerate up to the age of eight, we want to avoid causing damage that leads to long-term issues. Particularly in the neonatal population, where high-frequency ventilators are frequently used, we risk causing bronchopulmonary dysplasia (BPD). Therefore, it is crucial to consider high-frequency ventilation to mitigate these risks and provide safer respiratory support.
The main goal is to avoid further ventilator-induced lung injury. We should consider high-frequency ventilation when facing issues with lung recruitment. In our PICU and CICU settings, we frequently use this approach for pediatric ARDS patients. It can also be used prophylactically for extremely low birth weight neonates or infants born before 26 weeks gestation. We are seeing younger and younger babies being born and surviving past birth, making this consideration even more critical.
Patients with air leak syndrome, meconium aspiration, or persistent pulmonary hypertension are also candidates for high-frequency ventilation. These conditions often involve high blood pressure in the lung capillary beds, requiring careful management to prevent further complications. Patients with conditions like ARDS or pediatric ARDS can present significant challenges in ventilation.
When examining available data comparing the oscillator and the jet, you will find no clear evidence that one modality is superior to the other. This can be surprising, given how strongly some physicians advocate for one over the other. The reality is that neither is inherently better; they simply operate on fundamentally different principles. One machine may be more suitable for a particular patient due to its mechanism of action rather than any inherent superiority.
High Frequency Jet Ventilation (HFJV)
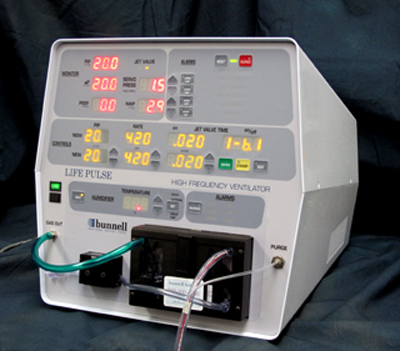
Figure 1. Example of High Frequency Jet Ventilation (IMEwee, CC BY-SA 3.0 via Wikimedia Commons).
What Is HFJV?
Let’s start with a basic overview of the high-frequency jet ventilation (HFJV) device itself, as shown in Figure 1. In the top left corner is the monitoring screen, which displays vital information. In the top right corner, you will find all the alarms, crucial for patient safety. The controls are centrally located, allowing us to set various parameters on the jet ventilator. Below the controls are the humidifier controls, essential for humidifying the jet propulsion gas. This is where the humidifier cassette is inserted.
Additionally, we have the primary buttons, including the alarm silence button, the power button, and the enter/reset button, all of which are important for operating the device efficiently.
Next, let's review the connection to the whisper jet, also known as the patient box. Visit bunl.com-"see HFJV" for more information. This component is essential for creating the jet propulsion we discuss in this lecture. The patient box has several key features:
- Cable Connector: This connects to the front interface of the jet ventilator.
- Purge Port: Keeps the lines clear.
- Pressure Monitoring Port: This connects to the life port adapter
- Push Button: Used to load the circuitry beneath the pinch valve.
The pinch valve is crucial as it controls the transitional flow of the jet ventilator, creating the jet propulsion needed for effective ventilation. The pinch valve literally shuts at the rate and speed set on the jet ventilator, creating the jet propulsion necessary for ventilation. This patient box is crucial to the jet ventilator's function. What is the jet ventilator overall? A jet ventilator is essentially a pressure-limited, time-cycled ventilator with an adjustable rate.
Key settings include:
- Rate: The frequency of breaths.
- Peak Inspiratory Pressure (PIP): This can be set on the ventilator for jet PIP.
- Inspiratory Time (iTime): Also known as valve time, this determines how long the valve remains open during inhalation.
- Passive Exhalation: The jet ventilator relies on passive exhalation, which is important when comparing it to the oscillator.
When delivering tidal volumes, the jet ventilator uses very small tidal volumes at rapid rates via a special ET tube adapter called the life port adapter. This adapter is crucial for high-frequency jet ventilation. Without it, the jet ventilator cannot function. Jet ventilation is always used in tandem with another conventional ventilator. At our institution, we use the Drager, but other institutions may use different ventilators, such as the Servos or Puritan Bennett models.
The choice of ventilator is not about superiority; it is about compatibility and institutional preference. The jet ventilator itself has settings for PIP, rate, and iTime. We will delve deeper into the life port adapter. Without it, we cannot use high-frequency jet ventilation. The jet ventilator does not have a PIP setting, which means we need a conventional ventilator to provide positive end-expiratory pressure (PEEP). This is crucial for creating the mean airway pressure, which we discuss further.
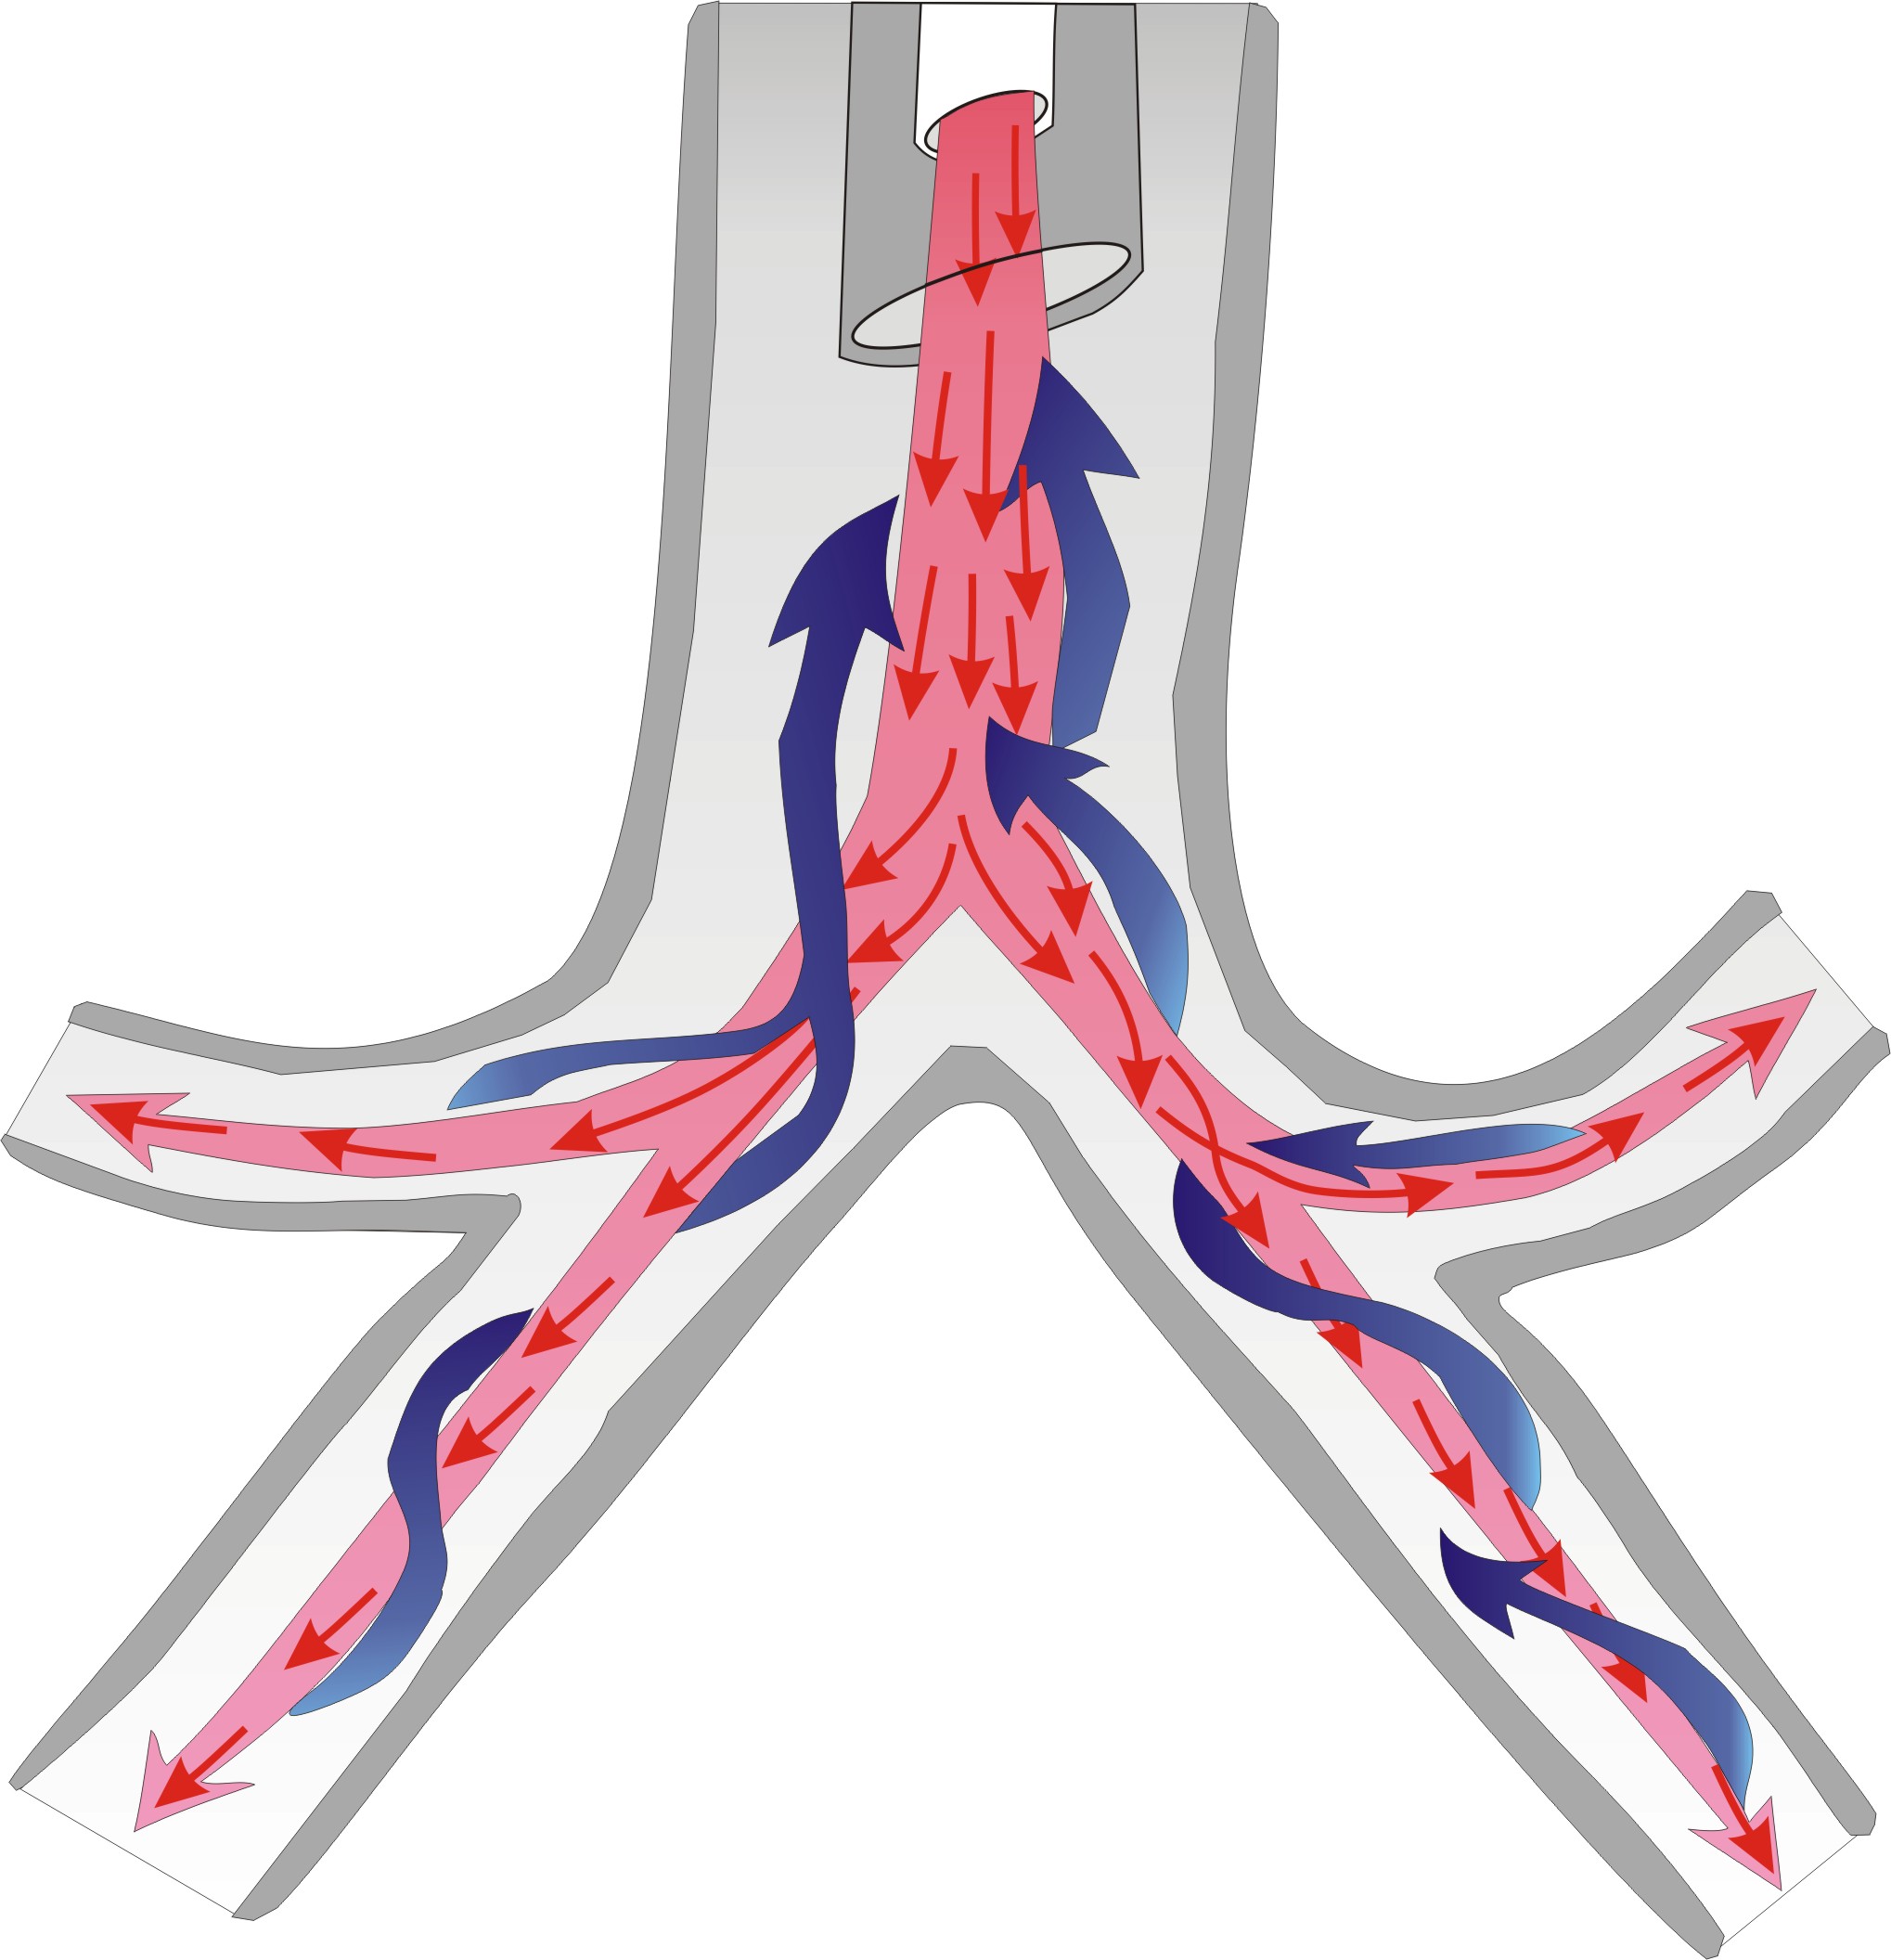
How Does the Jet Ventilator Work?
The life port adapter is also known as the jet nozzle. Here's an overview:
- Life Port Adapter: The jet adapter or life port adapter replaces the standard ET tube connection. Typically, an ET tube has an adapter with a 15-millimeter connector at the end. To use the jet ventilator, we remove this standard ET tube adapter and replace it with the life port adapter.
- Adapter Sizes: The life port adapter comes in various sizes to match ET tubes, ranging from 2.5 to 3.5 millimeters, 4.5 millimeters, and 5.5 millimeters. Ensuring the correct adapter size is essential for the therapy's effectiveness.
- Connection: The life port adapter fits snugly onto the ET tube, maintaining the 15-millimeter connector for attachment to conventional vent circuitry.
By replacing the standard ET tube adapter with the life port adapter, the jet ventilator can deliver the necessary rapid, small tidal volumes through the specialized nozzle. This setup allows for precise control and effective ventilation in tandem with a conventional ventilator. Next, let’s talk about the components and functionality of the life port adapter.
- Pressure Monitor Tube
- This tube connects to the patient box, providing feedback to the ventilator about what is being delivered to the patient in terms of PIPs and other parameters.
- Jet Port
- The jet port is equipped with a removable cap. If you are not using the jet but want to keep the life port adapter in place, you can cap off both the jet port and the pressure line, using it as a standard ET tube adapter. This allows you to avoid constantly switching adapters. When the jet ventilator is in use, the pinch valve circuitry connects to the jet port. This connection facilitates the delivery of fresh gas, creating jet propulsion.
- Transitional Flow
- The life port adapter is designed to deliver fresh gas that pierces through dead space, avoiding the creation of turbulent flow. Turbulent flow acts like a bulldozer, pushing through the entire airway width, which can move dead space and secretions further into the lungs—an undesirable outcome.
Benefits of Transitional Flow
- Reduces Turbulence: By creating transitional flow, the adapter minimizes turbulent flow.
- Pierces Dead Space: Fresh gas pierces through dead space more effectively.
- Prevents Secretions Build-Up: Helps prevent secretions from being pushed further into the lungs.
This transitional flow is essential for the effectiveness of high-frequency jet ventilation, making the life port adapter a critical component in delivering this advanced respiratory therapy. Here is a detailed review of how the jet ventilator operates and the benefits of its design. The jet ventilator’s life port adapter works by piercing through the center of the airway, effectively cutting through dead space. This design ensures that much smaller tidal volumes are just as effective as larger ones because they bypass the rebreathing of dead space gas.
Benefits
- Secretion Removal: Helps with secretion removal.
- CO2 Elimination: Enhances the elimination of CO2.
- Passive Exhalation: Facilitates passive exhalation, which we discuss further.
Comparison to Oscillator
- While both the jet ventilator and the oscillator utilize transitional flow, the oscillator's flow is more rounded and closer to laminar flow. This difference in flow dynamics is due to the design of the life port adapter.
Jet stream advantage allows injured lungs to rest and heal. The jet ventilator may be preferred if the patient has a diagnosis of air leak syndrome. The very short inspiratory times (iTime) and tiny tidal volumes (about one milliliter per kilogram) set on the jet ventilator can avoid areas of increased resistance, such as air leaks or severely damaged lung tissue.
This targeted approach prevents further damage to already compromised areas by avoiding unnecessary alveolar stretch and strain. The jet ventilator’s design and function make it a powerful tool for managing specific respiratory conditions, offering a targeted and effective approach to ventilation that minimizes further lung injury.
The beauty of the jet ventilator is that it avoids areas of damage, allowing them to rest and heal. However, it is crucial to note that the life port adapter is size-dependent. If a patient has an ET tube size outside the available options, we cannot utilize the jet ventilator.
Passive Exhalation
Figure 2. HFJV Passive Exhaltion (IMEwee, CC BY-SA 3.0, via Wikimedia Commons).
Let’s expand a bit more on passive exhalation with the jet ventilator seen in Figure 2. We have already discussed laminar flow, but it is crucial to understand how this flow impacts exhalation. With passive exhalation, the laminar flow moves down the center of the airways. When the patient exhales, there is a helix-like spiral around the outer areas of the airways. This spiral flow allows the patient to exhale passively.
This design helps to clear secretions and reduce the work of breathing by allowing air to flow smoothly and naturally out of the lungs. Passive exhalation is particularly beneficial because it minimizes the need for forced exhalation, which can be more taxing for the patient and potentially harmful to delicate lung tissues. Understanding this mechanism underscores why the jet ventilator can be a better choice for patients who need gentle ventilation support, such as those with fragile lung conditions or significant secretions that need to be managed effectively.
- Allows Jet to run at lower MAP compared to HFOV to achieve adequate oxygenation.
- Not competing with negative pressure from an active exhalation
- Enhances airway clearance
- Inspired gas shoots down the middle of the airway, leaving the path of least resistance for exhalation and secretions against airway walls.
- Can create gas trapping if not enough eT
The theory behind this flow is that secretions can be carried out of the airways rather than getting caked down lower. This transitional flow creates a really beneficial phenomenon for our patients. It is more comfortable because we are not sucking the air back out; instead, we are piercing it in, allowing patients to passively exhale on their own. Because of this mechanism, we can set the jet ventilator to run at a slightly lower mean airway pressure compared to the oscillator to achieve the same level of oxygenation.
This is significant because it means we can be gentler on the lungs while still providing effective ventilation. When we talk more about the oscillator, we review how it uses active exhalation. For now, it is important to understand that the jet's passive exhalation is a big advantage, allowing for lower mean airway pressures and, therefore, potentially less stress on the lungs.
The oscillator's mechanism involves the bellows swinging forward to push air in and then swinging back to suck the air out. This dynamic means the mean airway pressure (MAP) competes with the backswing of the bellows or piston. As a result, we need to set a slightly higher MAP to compensate for the negative pressure during active exhalation. In contrast, the jet ventilator avoids this issue since it does not involve fighting against negative pressure from active exhalation. This means we do not need to set the MAP as high.
The jet ventilator likewise enhances airway clearance due to its unique transitional flow. This flow pierces through the middle of the airway, allowing for a more effective exhalation path along the airway walls. As a result, secretions can spiral out naturally, making the ventilation process more efficient and less taxing on the patient.
The main takeaway is that the jet ventilator's use of passive exhalation and lower MAP settings offers a gentler and potentially more effective option for patients, especially those with delicate or damaged lung tissues. In contrast, the oscillator requires higher MAP due to the active exhalation process, which can be more demanding on the patient's respiratory system. This fundamental difference highlights why the jet ventilator can be preferable in certain clinical scenarios.
One important consideration with jet ventilation is ensuring adequate exhalation time to prevent gas trapping. Similar to conventional ventilation, where we carefully set iTime and rate to achieve a good I:E ratio, we need to be mindful of the expiratory time with jet ventilation. Since exhalation is passive, it is crucial to set an appropriate expiratory time.
Inspiratory Time
When we discuss the settings on the jet ventilator, the first one to address is the inspiratory time, also known as the valve time. Typically, we start with a default minimum of 0.02 seconds. To put that in perspective, it is about 25 times shorter than a conventional iTime of 0.5 seconds. This incredibly short inspiratory time is key to delivering those tiny tidal volumes rapidly, but it also means we need to be extra careful to ensure that there is enough time for exhalation to avoid gas trapping and associated complications.
While the jet ventilator offers many advantages, such as lower mean airway pressures and enhanced secretion clearance, we must remain vigilant about setting appropriate expiratory times, avoiding gas trapping, and maintaining effective and safe ventilation for our patients.
When we talk about the inspiratory time (iTime) on the jet ventilator, we typically start at a minimum of 0.02 seconds. This is about 25 times shorter than the 0.5-second iTime often used in conventional ventilation. This extremely short iTime is particularly useful in our smaller babies in the PICU versus the NICU. The main advantage of this very short inspiratory time is that it minimizes ventilation of the injured areas of the lungs.
For example, a short iTime of 0.02 seconds on the jet ventilator allows us to deliver significantly smaller tidal volumes, around one milliliter per kilogram, because it pierces through the dead space quickly.
These smaller tidal volumes allow for the safe utilization of much higher levels of PEEP. Moreover, the combination of small tidal volumes and a short iTime ensures that the peak inspiratory pressures (PIPs) used on the jet ventilator do not transmit to the alveoli, reducing the risk of further lung injury. The jet ventilator's settings, especially the short inspiratory time, enable it to provide effective ventilation while protecting the lungs from additional damage. This is particularly beneficial for patients with fragile lung tissues, ensuring they receive the necessary support without exacerbating their condition.
It is important to address a common concern about increasing jet PEEP. People often worry that a PEEP of 35 means the alveoli are seeing that exact pressure, but that is not the case. Due to the very small tidal volumes and short inspiratory times, the pressure tapers off significantly as it travels down the airways. While the PEEP at the end of the ET tube might be 35, the actual pressure reaching the alveoli is much lower, reducing the risk of damage.
Some physicians find this misconception challenging to understand. They might see a high PEEP number and assume It is what is reaching the patient's lower airways. However, with the jet ventilator, the fixed inspiratory time means that adjustments to the rate primarily affect the expiratory time, not the tidal volume.
Longer expiratory times are beneficial for patients with obstructive disease processes or for managing larger patients. We have used the jet ventilator in our PICU, which is not super typical but might be more common in other institutions. An important point to emphasize with our team, especially since our NICU team, accustomed to NICU settings, had to adapt to PICU settings.
Understanding these nuances helps ensure that the jet ventilator is used effectively and safely, providing the best possible care for our patients while mitigating potential risks. To manage larger patients effectively, we need to ensure longer expiratory times by adjusting either the iTime or the rates.
A shorter expiratory time, on the other hand, will increase minute ventilation, which is beneficial for restrictive disease processes. There are various theories about maintaining a fixed inspiratory time and its effects on expiratory time, as well as the patient populations that benefit from these settings.
HFJV PIP
Now, let's talk about the jet peak inspiratory pressure (PIP). The visual here helps illustrate that while the PIP might be set high on the jet ventilator, the actual pressure that reaches the distal airways and alveoli is significantly lower. This means that even if you set a higher jet PIP, it does not translate directly to the alveolar pressure, reducing the risk of lung damage.
Typically, we set the jet PIP higher or slightly higher than what was used during conventional mechanical ventilation. Due to the rapid inspirations, the PIP decreases quickly as the jet breaths travel down the airway. The peak alveolar pressure ends up being much lower than the peak airway pressure. By understanding and appropriately setting the iTime and PIP on the jet ventilator, we can tailor the ventilation to meet the needs of different patient populations, ensuring effective and safe respiratory support.
You do not need to be overly concerned about safety when increasing the jet PIP. In fact, increasing the jet PIP is the safest way to decrease PCO2 levels. More peak inspiratory pressure means more pressure and volumes are generated in the distal areas of the lungs. To effectively decrease CO2, you should increase your jet peak inspiratory pressure.
Servo Pressure
The jet ventilator also has a unique feature called servo pressure, which you will not find on the oscillator. If you understand it correctly, servo pressure can provide valuable information. Think of servo pressure as your driving pressure. Any changes in lung mechanics or volumes will affect the servo pressure.
Servo pressure is a generalized number specific to your patient at a given time, and it is important to note its trends. If the servo pressure is increasing, it typically indicates improved compliance and decreased resistance. This might mean better lung function or possibly a significant air leak around the ET tube or in the tubing. Monitoring this trend gives you insights into the patient's condition. Increasing the jet PIP safely reduces CO2 levels while monitoring servo pressure helps track lung mechanics and compliance, providing crucial information for managing patient care effectively.
Conversely, if our servo pressure decreases, it may indicate worsening compliance and increased resistance. This could be due to several issues, such as an obstructed ET tube that needs suctioning or a tension pneumothorax. It might also signal a misplaced intubation, like a right mainstem intubation. These conditions increase resistance, which in turn decreases servo pressure. Essentially, servo pressure going up is a positive sign, while a decrease suggests potential problems that need addressing.
Since servo pressure is specific to each patient's lung mechanics, it is important to monitor its trends rather than rely on a specific number. When you put a patient on the jet ventilator, observe their initial servo pressure and note its trajectory. Is it trending up or down? Is there an acute spike or drop, or is the change gradual over time? These observations provide valuable insights into the patient's condition.
Conventional Ventilation
Using a conventional ventilator in conjunction with the jet is crucial for two main reasons. Firstly, it controls the PEEP, which is not set on the jet ventilator. Secondly, the PEEP on the conventional ventilator becomes the main determinant of mean airway pressure. This setup ensures that we can manage and monitor the patient effectively, leveraging the strengths of both ventilation methods.
Mean airway pressure (MAP) is essentially a byproduct created by the PEEP and jet PIP settings, along with any sigh breaths or similar interventions. When facing issues with oxygenation, increasing the PEEP on your conventional ventilator will provide the most significant improvement.
Regarding the mode of the conventional ventilator, the choice depends on the patient's condition. For instance, if a patient has hyperinflation or an air leak, CPAP (Continuous Positive Airway Pressure) is preferable. CPAP maintains a steady pressure and avoids large breaths that could worsen the condition. We do not want big sigh breaths in these cases, as they could exacerbate the air leaks.
On the other hand, if recruitment is the goal, assist control or pressure control modes are more appropriate. For example, when the ventilator is set to deliver occasional large breaths at a low rate (anywhere from zero to five breaths per minute), then these larger breaths, or sigh breaths, help re-expand collapsed areas of the lung. However, it is crucial to ensure these sigh breaths are not larger than the jet PIP to avoid interrupting the jet propulsion.
If hyperinflation or air leaks are present, we want to avoid these large stretches and sighs because the lungs are already fragile and prone to leaking. Instead, maintaining a steady pressure with CPAP can help stabilize the lungs without causing additional damage. Choosing the appropriate mode on the conventional ventilator—whether CPAP for stability in hyperinflated or leaking lungs or assist control for lung recruitment—depends on the specific needs and condition of the patient. This strategic use of ventilation settings ensures optimal care and minimizes the risk of further lung injury.
Often, we start with a CPAP mode to monitor and allow the air leak to dissipate. Once the air leak has improved, we can gradually transition to assist control/pressure control (AC/PC) to slowly recruit the lungs. We might start by setting the rate to one, then increase it to three, and gradually continue to see if the air leak reappears or if we observe lung recruitment and improvement.
Conventional Ventilation with HFJV
When comparing conventional ventilation with jet ventilation, the differences in how PEEP and sigh breaths affect mean airway pressure (MAP) become evident. On a conventional ventilator, if we set a PEEP of 6, the MAP is at a baseline level. Increasing the PEEP to 8 results in a significant increase in MAP. Further increasing the PEEP to 10 leads to another noticeable rise in MAP. This demonstrates that PEEP is the primary factor in raising MAP because it increases expiratory pressure.
When using sigh breaths to recruit the lungs, we start with a PEEP of 6. As we increase the PEEP, the MAP goes up significantly. However, introducing sigh breaths changes the dynamic. With a very low rate on the conventional ventilator, these sigh breaths involve larger volumes and longer inspiratory times, which temporarily increase the MAP more dramatically.
Managing ventilation effectively requires understanding how adjustments in PEEP and the use of sigh breaths can influence MAP. Starting with CPAP to stabilize air leaks and then transitioning to AC/PC for gradual lung recruitment helps optimize patient care.
HFJV Management
Even without adjusting the PEEP, introducing sigh breaths increases the mean airway pressure. This happens because the sigh breaths open and stretch the collapsed airways, which helps with lung recruitment. Sigh breaths can be used to re-recruit lung areas, while adjustments to PEEP are primarily for increasing mean airway pressure and improving oxygenation. For management, here are some suggestions based on what we use institutionally:
- Jet Valve Time: Start at 0.02 seconds. Always consider the I:E ratio and be cautious about increasing iTime without accounting for eTime to avoid air trapping.
- Jet Rate: For neonates, typically start at around 420 breaths per minute. For pediatrics, a bit lower at 300 breaths per minute to ensure sufficient eTime.
It is critical to balance these settings to optimize patient care and avoid complications like air trapping. By carefully adjusting the jet valve time and rate, we can provide effective ventilation tailored to each patient's needs. If you need to decrease CO2, you can increase the jet rate. Conversely, if you are concerned about air trapping or hyperinflation or if the expiratory time (eTime) is not long enough, you can decrease the jet rate.
The jet PIP is critical for adjusting ventilation. Typically, we start with a jet PIP that provides desirable CO2 levels. To blow off more CO2, you can increase the jet PIP, and if you have reduced CO2 too much, you can decrease the jet PIP to let CO2 levels rise a bit. For the conventional ventilator, if you are using a recruitment maneuver with assist control, pressure control style ventilation, set the rate between zero to five breaths per minute.
This helps recruit more alveoli and minimizes volume trauma or hemodynamic compromise. The conventional PEEP should be just high enough to achieve chest rise without interrupting the jet breaths. You do not want the jet propulsions to pause when a sigh breath is given, so it should be continuous.
By setting the PEEP appropriately, you can improve atelectasis and minimize volume trauma or hemodynamic compromise. PEEP can be adjusted as needed, though it can be a bit daunting, especially in the NICU world, depending on physician comfort levels.
- Jet Rate: Increase to decrease CO2; decrease to avoid air trapping or hyperinflation.
- Jet PIP: Adjust based on CO2 levels; increase to reduce CO2, decrease to allow CO2 to rise.
- Conventional Ventilator: Use assist control, pressure control with a rate of zero to five breaths per minute for recruitment.
- PEEP: Set high enough for chest rise without interrupting jet breaths, adjusting as necessary to manage atelectasis and minimize trauma.
PEEP is your main determinant of oxygenation. To improve oxygenation, you can increase PEEP. For weaning or if there is a hemodynamic compromise, you might need to decrease it, especially if you have generated too much mean airway pressure.
The conventional ventilator inspiratory time (iTime) should be set anywhere from 0.35 to one whole second. A longer iTime elongates the sigh breath, generates more mean airway pressure, and improves atelectasis. However, if there is volume trauma or hemodynamic compromise, you might need to decrease the iTime, just as you would adjust the conventional rate.
High Frequency Oscillatory Ventilation
Figure 3. Example of High Frequency Oscillatory Ventilation (Brian Hall, Public domain, via Wikimedia Commons).
What is HFOV?
Now, let’s discuss oscillatory ventilation seen in Figure 3. The oscillator might look old-fashioned, but it is effective—“if it isn’t broken, don’t fix it,” right? Here's an overview of the key components of the oscillator:
- Mean Airway Pressure (MAP): Located in the top left corner, this is created by adjusting the combination of the adjust knob and the bias flow.
- Alarm Settings: These are small but efficient and located conveniently for quick access.
- Piston Position: This is an essential part of the oscillator, which we will delve into shortly.
The oscillator’s setup includes various dials and knobs, which might seem complex at first glance, but each serves a critical function in managing ventilation effectively. The mean airway pressure, for instance, is crucial for maintaining adequate oxygenation and ventilation in patients, and it is controlled through specific settings and adjustments.
- PEEP: Increase for better oxygenation, decrease for weaning, or if there is hemodynamic compromise.
- iTime: Longer for better atelectasis management, shorter if there are issues with volume trauma or hemodynamic stability.
- Oscillator: Effective, with important controls like the mean airway pressure and piston position, providing precise ventilation management.
How does HFOV work?
Understanding and utilizing these settings appropriately can significantly enhance patient care and outcomes in both conventional and oscillatory ventilation scenarios. The oscillator, another type of mechanical ventilation, uses very small tidal volumes at very high frequencies, similar to the jet ventilator. However, it operates at a constant descending airway pressure, allowing you to set the mean airway pressure (MAP) directly. This is different from the jet ventilator, where MAP is secondarily created by PEEP, sigh breaths, and jet PIP.
Key Components of the Oscillator:
- Amplitude or Delta P: Controlled by the power knob, it affects the volume of oscillation.
- Percentage of iTime: This is set as a percentage, unlike the time settings on other ventilators.
- Frequency: Located below the iTime setting, it determines the rate of oscillation.
Advantages of the Oscillator:
- Lung Recruitment: By setting the MAP, you can maintain consistent lung recruitment.
- Avoiding Overdistension: Helps in avoiding overdistension of lung tissue.
- Decreasing Vent-Induced Lung Injury: Overall, it reduces the risk of lung injury caused by the ventilator.
There are two models of the oscillator:
- Oscillator A: HFOV A ≤35kg
- Oscillator B: HFOV B >35k
The FDA has a weight cutoff of 35 kilos for these devices. While It is sometimes necessary to exceed this limit based on patient needs, it should always be done with team approval and careful consideration of the patient's condition.
Diaphragm/Piston
The oscillator features a diaphragm piston, which plays a crucial role in its operation. This piston moves to create the oscillations needed for ventilation. By setting the MAP directly on the oscillator, you can maintain the desired pressure and lung recruitment without relying on secondary factors like PEEP or sigh breaths.
The oscillator provides precise control over mean airway pressure, making it effective for maintaining lung recruitment and minimizing lung injury. By understanding its components and operation, healthcare providers can use it to optimize patient care in critical situations.
Within the oscillator, there is a piston driven by an electromagnetic coil. This mechanism pushes a flexible diaphragm made of black canvas material. When the diaphragm moves forward, it creates active inspiration by pushing flow and pressure into the patient. When it swings backward, it creates active exhalation by sucking the air back out. This bidirectional movement generates the oscillation and pressure needed for ventilation.
Key Features of the Oscillator:
- Active Inspiration and Exhalation: The diaphragm's forward movement forces air into the patient, while its backward movement sucks air out. This active process differentiates the oscillator from other ventilators.
- Tidal Volumes: The oscillator can deliver tidal volumes that are less than or equal to the dead space volume, making it highly effective for delicate ventilation needs.
The oscillator delivers tidal volumes of about one to four milliliters per kilogram, which is slightly higher than what the jet ventilator provides. It also employs a more laminar flow compared to the jet's transitional flow. This difference means the oscillator is not as effective at piercing through dead space.
For patients with conditions like RSV bronchiolitis, the jet might be a better option because it can pierce through secretions and potentially help clear them from the airway. In contrast, the oscillator could push these secretions further down, potentially causing complications.
Mean Airway Pressure (MAP)
Mean airway pressure (MAP) is the primary determinant of oxygenation for the jet ventilator. If oxygenation issues occur, increasing the MAP is necessary. This adjustment helps ensure adequate oxygenation by improving overall lung recruitment and gas exchange efficiency.
- Oscillator Tidal Volumes: Slightly higher (1-4 mL/kg) with more laminar flow.
- Jet Tidal Volumes: Better at handling secretions due to transitional flow.
- Mean Airway Pressure (MAP): The primary determinant of oxygenation in
When adjusting the MAP on the jet ventilator, It is necessary to do so very slowly. Specifically, adjusting PEEP, it can take several hours to see the effects of the change, especially when weaning. If you encounter an eager attending who wants immediate results, it is important to be the voice of reason and remind them that patience is necessary. Adjusting the MAP should be done incrementally and then monitored over a few hours to ensure that it does not cause any complications.
Each patient has a different threshold or tolerance for high MAPs, largely influenced by their venous return. High MAPs can impact venous return and cardiac output, so close monitoring and gradual adjustments are essential to avoid hemodynamic instability.
- Slow Adjustments: Make changes to MAP slowly and wait several hours to observe the effects.
- Patient-Specific Tolerance: Each patient’s tolerance for high MAPs varies, influenced by their venous return.
- Monitor Gradually: Be cautious and monitor the patient closely after any adjustments to avoid complications.
While adjusting MAP is critical for managing oxygenation, it must be done with caution and patience. Ensuring a gradual approach and closely monitoring the patient’s response will help avoid potential issues and provide the best care. Depending on the state of their disease process, some patients can tolerate mean airway pressures in the 30s or 40s, while others may experience significant drops in blood pressure at much lower settings, such as 23. This variation occurs because the lungs and heart share the confined space within the thoracic cavity. When the lungs expand and take up more room, the heart has less space to function properly.
Effects of High Mean Airway Pressure:
- Reduced Cardiac Space: As the lungs expand with higher mean airway pressures, they can compress the heart.
- Impaired Cardiac Function: Compression of the heart can prevent it from contracting and relaxing properly.
- Inadequate Filling: If the heart cannot fill properly due to compression, it can lead to reduced cardiac output and potentially plummeting blood pressure.
Considerations:
- Individual Tolerance: Each patient’s tolerance to high MAPs varies widely, influenced by their specific condition and overall thoracic compliance.
- Monitoring: Close monitoring of blood pressure and cardiac function is essential when adjusting MAP to avoid adverse effects.
When adjusting MAP, It is vital to consider the unique tolerance levels of each patient. Monitoring and adjusting slowly can help prevent complications related to the confined space of the thoracic cavity and ensure optimal patient care. If the heart does not fill appropriately, it cannot pump blood effectively, leading to an acute drop in blood pressure. Each patient has a different threshold for mean airway pressure (MAP). A simple guideline we teach our respiratory therapists is if increasing the MAP from 24 to 25 causes the blood pressure to plummet, return to 24, and the blood pressure should stabilize.
Practical Tips:
- Threshold Awareness: Each patient has a unique MAP threshold.
- Immediate Response: If an increase in MAP causes a significant drop in blood pressure, revert to the previous setting.
- Team Discussion: Communicate with the healthcare team about the need for higher MAP and consider supportive measures.
When discussing with your team, consider the following:
- Fluid Bolus: Administering fluids can help support blood pressure.
- Vasopressors: If not already in use, adding vasopressors may be necessary to maintain adequate blood pressure.
By understanding and managing these nuances, you can ensure that adjustments to MAP are made safely and effectively, maintaining optimal patient care and avoiding complications. Having an arterial (art) line can be very beneficial for these patients. I understand that at our institution, we are trying to minimize the use of additional lines due to infection risks, only using them when absolutely necessary. However, if you do not have an art line, it is crucial to continuously monitor blood pressure, especially when making adjustments and initially setting up the oscillator.
One way to determine if you have set the mean airway pressure (MAP) correctly or if you have gone too high or have more room to increase it is by using a chest X-ray. For example, if the chest X-ray shows that the lungs are only expanded to eight ribs, this could indicate that the MAP might need to be adjusted. While minimizing infection risks is important, ensuring accurate and continuous monitoring of blood pressure is crucial when adjusting MAP. Utilizing chest X-rays can also provide valuable information to guide these adjustments and ensure optimal lung expansion and patient care.
When evaluating mean airway pressure (MAP), a chest X-ray can be extremely informative. For instance, if the X-ray shows lung expansion up to only eight ribs, you know there is room to increase the MAP to expand the lungs further. On the other hand, if the X-ray reveals that the lungs are expanded to 12 ribs, you should stop increasing the MAP to avoid the risk of causing a pneumothorax, even if the patient is hemodynamically stable.
- Chest X-Ray Monitoring: Use X-rays to gauge lung expansion.
- Under-Expansion: If only expanded to eight ribs, consider increasing MAP.
- Over-Expansion: If expanded to 12 ribs, avoid further increases to prevent pneumothorax.
In standard mechanical conventional ventilation, the pressures swing between inspiratory peaks and drops during exhalation. This pattern shows how pressure changes during the breathing cycle and how adjustments to mean airway pressure (MAP) can influence lung expansion. With conventional ventilation, the MAP is typically around 25. The oscillator, on the other hand, maintains a fixed MAP of 30. The piston in the oscillator swings back and forth, creating small, rapid oscillations. This process involves a Delta P, which we discuss in more detail, contributing to the consistent maintenance of the MAP.
Key Differences Between Conventional Ventilation and Oscillator:
- Conventional Ventilation:
- MAP: Around 25
- Pressure Swings: Large swings between inspiratory and expiratory pressures
- Lung Impact: Higher potential for lung damage due to larger pressure swings
- Oscillator:
- MAP: Fixed at 30
- Piston Movement: Small, rapid swings (Delta P)
- Frequency: Set frequency determines the rate of oscillation
- Lung Impact:
- Less lung damage due to smaller, quicker oscillations, maintaining higher MAP without large pressure swings
The oscillator achieves a higher MAP with much smaller swings, reducing lung damage. This method avoids the significant stretches of inspiratory pressure and the drops during the expiratory phase, providing a gentler and more consistent approach to ventilation.
Amplitude (∆ P)
When it comes to amplitude, also known as Delta P, this is what actually drives the size of our tidal volume. Amplitude is a secondary effect based on where we set the power knob next to our Delta P. Adjusting the power controls the piston's movement, determining the size of the swings and, consequently, the tidal volume. Manipulating the amplitude is crucial for ventilation management.
- Amplitude/Delta P: Determines the size of the tidal volume.
- Power Knob: Adjusts the piston's movement to set the amplitude.
- Ventilation Impact:
- Increasing Amplitude: Increases Delta P, which in turn increases tidal volume.
- Decreasing Amplitude: Reduces Delta P, thus reducing tidal volume.
By increasing the amplitude, you inadvertently increase the tidal volume, which helps to decrease carbon dioxide (CO2) levels. This is because larger tidal volumes enhance CO2 removal from the lungs, improving overall ventilation.
Practical Application:
- To Decrease CO2: Increase the amplitude (Delta P) to raise the tidal volume.
- To Increase CO2: Decrease the amplitude to lower the tidal volume.
Adjusting the amplitude is a vital tool for effectively managing a patient's ventilation needs. Understanding this relationship allows for precise control over CO2 levels and overall respiratory function. Conventional ventilation creates large pressure swings, with the tidal volume represented by the difference between the peak inspiratory and expiratory pressures. In the case of the oscillator, the Delta P represents the amplitude. The width of this Delta P determines the generated tidal volume.
Key Concepts:
- Conventional Ventilation: Features large pressure swings to achieve tidal volume.
- Oscillator: Uses Delta P (amplitude) to generate tidal volume.
- Delta P: The distance between the two dotted lines; a wider Delta P means a larger tidal volume.
One crucial aspect of Delta P or amplitude is that it controls the chest wiggle. This wiggle is a visible indicator that the amplitude is set correctly. For initial settings, ensuring that the amplitude is sufficient to create a noticeable chest wiggle is vital.
Practical Application:
- Delta P (Amplitude): Controls the size of the tidal volume and the chest wiggle.
- Chest Wiggle: A visual cue indicating proper amplitude settings.
By setting the amplitude appropriately, you can ensure effective ventilation and monitor the patient's chest wiggle as an immediate indicator of correct settings. When manually ventilating someone, you want to apply enough pressure to get the chest to move. With the oscillator, you want to set the amplitude high enough to get a noticeable chest wiggle. For children and adults, the wiggle should be visible from the chest down to the mid-thigh.
In neonates, it typically extends from the chest to the umbilicus. Neonates often have more pronounced wiggles, sometimes even extending to their toes, but ideally, you want to see it reach their umbilicus to ensure you have set a good initial amplitude.
When you are setting the oscillator, keep an eye on that chest wiggle. For adults and kids, look for movement down to the mid-thigh. For neonates, aim for movement up to the umbilicus, even if it sometimes goes further. This visible chest wiggle is your immediate cue that you have set the amplitude correctly, ensuring proper ventilation for the patient.
Frequency
When it comes to the oscillator's frequency, it is important to remember that it is different from the respiratory rate we are used to. Frequency controls the time allowed for the piston to move back and forth. Essentially, it determines how quickly the piston oscillates within a given time frame. To put it into perspective, the oscillator can operate anywhere from 3 to 15 hertz. Remember, 1 hertz equals about 60 breaths per minute. With the oscillator you are looking at frequencies ranging from 180 to 900 breaths per minute. It moves incredibly fast!
Key Points about Frequency:
- Frequency vs. Respiratory Rate: Unlike the traditional respiratory rate, the frequency on an oscillator determines the piston’s oscillation speed.
- Range: The oscillator operates between 3 to 15 hertz.
- Conversion: 1 hertz is roughly equal to 60 breaths per minute, translating to 180 to 900 breaths per minute on the oscillator.
Understanding this helps you set the oscillator correctly and ensure It is providing the rapid, small-volume breaths necessary for effective ventilation. Absolutely, the frequency of an oscillator has a big impact on tidal volume. When you lower the frequency, say to 4 Hz, you get a greater tidal volume. Essentially, when the frequency is lower, the piston has more time to move back and forth, which increases the tidal volume.
Now, this is where it gets interesting: at a cellular level, the slower the movement, the more time CO2 and O2 have to exchange and diffuse. This means that by moving slower, you allow for better gas exchange. Contrary to what we might initially think as respiratory therapists, decreasing the frequency actually helps blow off more CO2. Lower frequency means larger tidal volumes. Slower frequencies allow more time for gas exchange. Decreasing frequency helps blow off more CO2, which is a bit counterintuitive for us.
This is an important concept for effectively setting and managing the oscillator to ensure proper ventilation and CO2 removal. If you have blown off too much CO2, you will want to increase the hertz. We typically adjust this by about one hertz at a time since changing the rate by 60 breaths per minute is quite significant, and we prefer not to make overly dramatic adjustments.
Bias Flow
When it comes to the bias flow on the oscillator, it is important to set it correctly, as it controls the flow rate of the humidified fresh gas. You need to ensure It is neither too high nor too low, as this helps in generating the desired mean airway pressure. On Oscillator A, the maximum bias flow you can set is 40 liters per minute, while on Oscillator B, it can go up to 60 liters per minute.
If you need to fine-tune your settings:
- Increase the hertz in small increments to manage CO2 levels.
- Adjust the bias flow carefully to regulate the flow rate and support proper mean airway pressure.
By making these adjustments thoughtfully, you can effectively manage ventilation and ensure the patient is receiving the appropriate support. The bias flow, in conjunction with the adjust knob, is crucial for creating your mean airway pressure. You use the bias flow and the adjust knob to balance each other. The adjust knob has a specific range for optimal performance. If you imagine the knob as the hand of a clock, you want it to be between the 10 o'clock and 2 o'clock positions.
If the adjust knob is before the 10 o'clock position, it indicates too much bias flow, and you need to reduce it to bring the knob back within the desired range. Conversely, if the knob is at the 2 o'clock position, it means there is not enough bias flow, so you will need to increase it. Keeping the adjust knob and bias flow within this "happy" range ensures the ventilator functions optimally.
When I first started at Nemours, we did not have an ECMO team, and we relied heavily on the oscillator for very sick kids in our PICU. Often, we had to max out the settings, with the bias flow up to 60 and the adjust knob turned all the way to maximum. However, the ventilator does not operate efficiently when pushed to its limits like that. It is always better to keep the settings within their optimal ranges to maintain the ventilator's performance and avoid overworking it.
If you push the ventilator too hard, it can overheat and shut down. Maintaining the balance between the adjust knob and the bias flow is crucial to prevent overheating and excessive bias flow, which could potentially cause a pneumothorax. Keeping these settings in check ensures the ventilator operates smoothly and safely.
Inspiratory Time
We typically set the inspiratory time at 33%, which gives a 1:2 ratio. This setting is a result of the rate and a set percentage of the respiratory cycle. Although 33% is common, it is not fixed and can be adjusted. The diaphragm excursion can be asymmetrical, spending more time in the inspiratory phase. This can help create more mean airway pressure if needed.
While we usually stick to 33%, you can increase it up to 50% in certain situations. This can be a last-ditch effort to help with ventilation and generate larger tidal volumes, aiding in lung recruitment and potentially improving oxygenation. However, the literature supporting this is not robust, so it should be considered only when all other options are exhausted.
HFOV Management
Initial Settings at Nemours:
- FiO2: Start at 100% for these patients, then quickly wean down to less than 60% as soon as possible to maintain safe oxygen saturation levels.
- Mean Airway Pressure (MAP): Begin with the conventional MAP, then increase by about 3 to 5 centimeters above the conventional ventilator MAP. In the NICU, we usually go 2 to 3 centimeters above, while in the PICU, It is closer to 5 centimeters above.
- Inspiratory Time: Typically set at 33%, providing a 1:2 I:E ratio.
- Bias Flow: For Oscillator A, start at 15 liters per minute, and for Oscillator B, start at 20 liters per minute. Adjust quickly to maintain the adjust knob in the optimal position and achieve the desired MAP.
- Amplitude: Rather than setting the amplitude directly, adjust the power to achieve the desired chest wiggle. The power setting will dictate the amplitude, ensuring effective ventilation.
By following these initial settings and making necessary adjustments based on the patient's response, we can effectively manage ventilation with the oscillator. This approach helps ensure adequate oxygenation and ventilation while minimizing the risk of complications. Starting with the power settings on the oscillator, Vyaire's recommendations are a good guide. For Oscillator A, you can set the power to 2.0, place it on the patient, and adjust based on the initial amplitude you observe. From there, you adjust the power up until you see an adequate chest wiggle. For Oscillator B, start with a power of 4.0 and follow the same process.
I often joke with new therapists about how doctors sometimes "order" an amplitude, like 50, without a specific rationale. It is more of an estimation when initially setting up a patient. Using the power method takes the guesswork out of it and provides a reliable starting point. Frequency Settings Based on Patient Size and Disease Process:
- Premature Babies: Typically need a very high frequency, around 12 to 15 Hz, due to their delicate and small lung volumes.
- Neonates: A slightly lower frequency, about 10 to 12 Hz.
- Children: Frequencies are adjusted down further as the size increases, usually around 8 to 10 Hz.
- Adolescents/Teenagers: Frequencies are set lower still, around 6 to 8 Hz, to accommodate larger lung volumes.
By setting the frequency based on patient size and their specific disease process, you can ensure effective ventilation. This gradual adjustment aligns with the patient's needs and helps maintain optimal respiratory function. For adults, the frequency on the oscillator is typically set between 4 to 6 Hz. As the patient size increases, the frequency decreases accordingly. In pediatric care, seeing an oscillator moving slowly, with a low frequency, usually signals serious ventilation issues. For instance, if you see a child on a frequency of 4 Hz, It is not ideal and often means we are facing significant challenges with ventilation.
When it comes to medical management with an oscillator, improving oxygenation involves increasing the FiO2 and mean airway pressure. You achieve this by adjusting the bias flow and the adjust knob. If we are focusing on ventilation, increasing the amplitude is key. Since we cannot set the amplitude directly, we increase the power to generate a higher amplitude. Additionally, lowering the frequency helps, as does increasing the inspiratory time percentage—though that's more of a last-resort tactic.
There is also a technique called creating a controlled ET tube cuff leak. This helps with ventilation by allowing some pressure to escape. However, it must be done carefully to avoid losing the mean airway pressure you have worked so hard to maintain. If you just drop the cuff haphazardly, you could lose all that pressure, which could lead to problems with oxygenation.
To sum it up, when you are trying to improve oxygenation, you look at increasing the FiO2 and mean airway pressure by tweaking the bias flow and adjust knob. For better ventilation, you boost the amplitude by increasing the power, lowering the frequency, and maybe even extending the inspiratory time if necessary. If things are really tough, you might consider a controlled ET tube cuff leak to help with ventilation without losing your precious mean airway pressure. This kind of careful management ensures that we address the patient’s specific needs effectively.
A tactical way to create a controlled ET tube cuff leak is by first increasing your mean airway pressure (MAP) by five. For example, if your current MAP is 25, increase it to 30. Then, use a syringe to slowly deflate the cuff until the MAP returns to the original setting of 25. This method allows you to create a purposeful leak in a controlled manner, minimizing the risk of large swings in MAP that might occur with an uncontrolled leak. By doing this, you enable CO2 to exhale around the ET tube, mimicking passive exhalation. Since oscillators do not have passive exhalation, this technique helps improve ventilation by allowing some of the exhaled gases to escape around the ET tube cuff.
HFOV vs HFJV
When comparing the jet ventilator and the oscillator side by side, you will notice that both deliver tidal volumes of about one to four milliliters per kilogram. The iTime on the oscillator is a result of the rate and set percentage. For the jet ventilator, the iTime is set directly and results in a similar tidal volume range. To recap this method: increase your MAP by five units, then slowly deflate the ET tube cuff with a syringe until the MAP returns to its original value.
This controlled approach helps facilitate CO2 exhalation and can improve ventilation. The jet and oscillator ventilators both deliver small tidal volumes, but their mechanisms and control settings differ, with the jet having a direct iTime setting and the oscillator relying on rate and percentage for iTime.
The inspiratory time (iTime) on an oscillator is a result of the rate and a set percentage of the respiratory cycle, not measured in seconds but as a percentage. The oscillator features active exhalation, which is different from other ventilators. However, one drawback is the potential loss of mean airway pressure (MAP) during suctioning. When you first put a patient on an oscillator, suctioning is usually avoided.
Inline suctioning while the oscillator is running is often ineffective because secretions tend to be caked down. Effective suctioning would require disconnecting the patient from the oscillator and performing vigorous manual ventilation and suctioning. However, physically disconnecting the patient can cause a significant loss of MAP.
Key Points on Oscillator Use:
- Indications: The oscillator is particularly useful for conditions like RDS (Respiratory Distress Syndrome) and pulmonary hyperplasia. It is ideal for managing oxygenation issues because you can directly set the MAP.
- Contraindications: Hemodynamic instability is a potential issue because adjusting the MAP has a direct and powerful effect. High MAP settings can increase intracranial pressure (ICP). Additionally, air leak syndrome is not ideally managed with oscillators.
The oscillator’s ability to set MAP directly makes it excellent for oxygenation issues. However, caution is needed due to the potential for hemodynamic instability and increased ICP. For patients with air leak syndrome, other ventilatory strategies might be more appropriate. The jet ventilator delivers tidal volumes closer to one milliliter per kilogram, which is slightly smaller than what the oscillator delivers.
Unlike the oscillator, the iTime on the jet is physically set, and it operates with passive exhalation. This difference is crucial, as the jet’s passive exhalation makes it easier to suction patients. The helix flow of expiratory gases helps move secretions up around the ET tube, reducing concerns about MAP drops during suctioning.
Key Points:
- Jet Ventilator:
- Tidal Volume: Approximately one ml per kilo.
- iTime: Physically set.
- Exhalation: Passive, unlike the oscillator's active exhalation.
- Suctioning: Easier due to passive exhalation and helix flow, which assists in moving secretions.
Indications for the Jet:
- Pulmonary Interstitial Emphysema (PIE): The jet is effective for patients with air leak syndromes.
- Airway Clearance: Ideal for patients with many secretions, as it can facilitate better clearance.
- Ventilation Issues: More suitable for addressing ventilation problems due to its passive exhalation.
Contraindications for the Jet:
- Asthmatics: This is not ideal for patients with severe air trapping, as passive exhalation might not be sufficient to manage their condition.
Comparisons with the Oscillator:
- Flow Characteristics: The oscillator’s smoother, less transitional flow can lead to spikes in tidal volume and pressure in damaged lung areas, potentially hindering the healing process.
- Exhalation: The jet's passive exhalation contrasts with the oscillator's active exhalation, making the jet more suitable for conditions requiring gentle ventilation.
- MAP and Suctioning: The jet allows for easier suctioning without significant MAP loss, unlike the oscillator, which can lose MAP during suctioning.
The jet ventilator is preferable for conditions like PIE, significant secretion clearance, and ventilation issues due to its smaller tidal volumes, passive exhalation, and ease of suctioning. Conversely, it is not ideal for patients with severe air trapping, such as asthmatics. The oscillator, with its ability to set MAP directly, is better for managing oxygenation issues but requires careful handling to avoid complications from its active exhalation and potential for increased intracranial pressure.
Essentially, adding air trapping on top of existing air trapping is definitely not good. Let’s talk about how air is delivered to patients using different ventilators. When you look at the jet ventilator, you will notice the jet PEEP starts high but drops significantly from the trachea to the alveoli. This drop means you should not be too worried about the initial high jet PEEP setting.
However, you will also see the mean airway pressure (MAP) drops a bit as well, making the jet ventilator less ideal for patients struggling with oxygenation issues. On the other hand, the oscillator shows big swings in pressure. Although the pressure dissipates as it does in the jet, the oscillator maintains a more consistent MAP throughout the airway. This consistency makes it a better choice for tackling oxygenation problems.
Comparing the Two:
- The jet ventilator is great for patients with ventilation issues or those needing better secretion clearance. The drop in jet PEEP and MAP makes it less suitable for severe oxygenation problems.
- The oscillator, with its consistent MAP, is better for patients with oxygenation issues. However, it is not the best for those with air trapping or significant secretion clearance needs.
Next time you are in the NICU and a doctor suggests putting a patient on the oscillator, you can take a moment to evaluate the situation. If you think the patient might benefit more from the jet ventilator, you can speak up and explain why, based on the patient’s specific needs and the strengths of each ventilator. Understanding these differences allows you to make informed decisions.
Whether it is advocating for the jet for better secretion management and ventilation or the oscillator for consistent oxygenation, you will be able to confidently suggest the best option for your patient. The jet ventilator offers passive exhalation and transitional flow, which can be advantageous in many situations. Understanding these details helps solidify your expertise as RTs at the bedside.
Questions and Answers:
The ET tube size is greater than the jet ventilator adapter. What are some options?
It kind of depends. You just have to take into consideration that if you are trying to use a jet ventilator adapter or a life port adapter that is not the appropriate size for the ET tube; you are going to get leaks. I know we have all been MacGyvers in our units and gotten creative to eliminate those leaks. You could, although I do not really recommend this, put tape around the adapter to make it a little thicker, but just know it is not going to be the same quality. If you are looking for true jet ventilation, you really should be using the correct adapter size. So keep in mind, if it is not working effectively, it might not be that the jet ventilation failed your patient. I would say that we do not have the proper equipment to appropriately provide this care to this patient.
Is there an upper limit where increasing power further provides no added benefit or even becomes detrimental?
When you think about a conventional ventilator, there comes a point where, as we turn it higher and higher, we have to consider what we are really doing to those airways over time. When it comes to a patient being on the oscillator, you have to weigh your options. An oscillator is generally more gentle than pressure-control-style ventilation or anything like that. When you increase the power on an oscillator, it increases the amplitude, which then increases the tidal volume. You have to do what is best for the patient, making sure you are providing appropriate chest wiggle and ventilation. Unfortunately, it comes down to doing what is best for the patient. I do not believe there are any studies that show if you went up to a power of six and it gave you an amplitude of 120, that you are definitely causing damage. It is more about doing what is necessary to move the patient's chest at that point.
Regarding maximum bias flows on both oscillator models, are there any humidity or temperature considerations at those higher flow rates?
The oscillator uses a single-limb humidified circuit, so the inspiratory limb is humidified. As long as you maintain your heater, ensure it is filled with water, and everything is working correctly, you should not have to worry about humidity or temperature. However, one thing to consider is that the expiratory line of the oscillator is not heated. This can lead to condensation buildup, especially in areas with dependent loops. When the heated, humidified gas cools, it creates droplets that form puddles in the circuit. you will see these sloshing around, which can cause your mean airway pressure (MAP) to fluctuate. To manage this, try to keep the circuit as parallel as possible to the patient's bed. This helps prevent condensation buildup. But overall, at higher flows, the humidity should still be maintained as set by your heater.
Are there certain disease states or conditions where accurately judging the appropriate chest wiggle becomes more challenging?
100%. You have to consider patients who are experiencing a really bad surge response or severe anasarca. These patients have very fluid-overloaded tissue, making their skin very taut and puffy. Their skin can be so tight that you cannot really see the chest wiggle. In these cases, you might have to put your hand on their chest to feel the intensity of their wiggle. Getting close and observing at eye level can also help you see the subtle movement. For these patients, it is more about detecting any wiggle rather than the intensity of it. You may need to get a little creative in finding the best way to visualize the chest wiggle, especially in patients with anasarca or systemic inflammatory response syndrome where it can be very difficult to see.
References
Bunnell Incorporated. (2022). Bunnell Ventilator User Guide. Retrieved from https://bunl.com/bunnell-guides-manuals/
Vyaire Medical. (n.d.). Clinical Education. Retrieved from https://www.vyaire.com/clinical-education
Young, D., Lamb, S. E., Shah, S., MacKenzie, I., Tunnicliffe, W., Lall, R., Rowan, K., Cuthbertson, B. H., & OSCAR Study Group (2013). High-frequency oscillation for acute respiratory distress syndrome. The New England journal of medicine, 368(9), 806–813.
Vyaire Medical. (2020). 3100A High Frequency Oscillatory Ventilator Operator’s Manual. https://www.vyaire.com/sites/us/files/2020-05/33437-001-a-operators-manual-3100a-hfov.pdf
Miller, A. G., Bartle, R. M., & Rehder, K. J. (2021). High-Frequency Jet Ventilation in Neonatal and Pediatric Subjects: A Narrative Review. Respiratory care, 66(5), 845–856.
Citation
Massa, K. (2024). MD flavor of the month…high frequency jet versus oscillatory ventilation. Continued.com - Respiratory Therapy, Article 233. Available at www.continued.com/respiratory-therapy
May 28, 2024
1 CE HourMechanical Power at a Glance
Keith Lamb, RRT, RRT-ACCS, FAARC, FCCM
Editor’s note: This text-based course is an edited transcript of the webinar, Mechanical Power at a Glance, presented by Keith Lamb, RRT, RRT-ACCS, FAARC, FCCM.
It is recommended that you download the course handout to supplement this text format.
Learning Outcomes
After this course, participants will be able to:
- Define mechanical power its properties
- Describe the literature as it pertains to patient outcomes from excessive mechanical power.
- Explain how to minimize mechanical power applied to the lungs
Ventilator-induced lung injury (VILI), described as such in the literature, stems from our actions or patient-related events. This injury primarily occurs when a patient before you, who is intubated or tracheostomized and under mechanical ventilation, encounters factors often beyond our control—like MVCs, car crashes, viral or bacterial pneumonia, and aspiration incidents. Today, our focus is on areas within our control—ventilator-caused lung injuries.
It is important to understand the differences in those things that you, as a bedside clinician, can do to mitigate or minimize the amount of energy that is applied to the lungs that then, in turn, causes a ventilator-induced lung injury. Once that injury has occurred, no matter what the injury is from, there is an acute release of inflammatory mediators. We will talk more in-depth about that momentarily. Those mediators that are released into the system by that injury circulate systemically. What started in the lungs as a ventilator-induced lung injury then circulates systemically via those inflammatory mediators can cause multi-system organ failure, or those inflammatory mediators go to the liver, the gut, the heart, or the kidney.
What comes next are downstream effects involving other organs. Our prime concern revolves around this subsequent inflammatory reaction, an intensified response to the injury, and the crucial takeaway is that this exacerbation directly worsens outcomes and amplifies mortality rates.
- Ventilator-Induced Lung Injury
- Volutrauma
- Barotrauma
- Atelectrauma
- Biotrauma
- Biotrauma describes a secondary inflammatory response or a biologic response to injury.
- Caused by energy transferred from the ventilator to the lungs.
- Or by the patient P-SILI
For anyone who has responsible for patients under intubation and mechanical ventilation, it is vital to keep these various factors that could harm the patient via the ventilator in mind. The most prevalent concepts we discuss are volutrauma, barotrauma, and atelectrauma. We dive deeper into this shortly, but to offer a general preview, volutrauma denotes the lung stress and strain triggered by excessive tidal volume.
Barotrauma mirrors the lung's exposure to stress and strain under pressure. Atelectrauma signifies the stress and strain the lung undergoes due to the repetitive opening and closing of those alveoli, the delicate single-cell layers. This cycle can ultimately lead to injury or even alveolar fracture.
In the literature, the inflammatory process I previously discussed, should be approached as or leads to biotrauma. This biotrauma constitutes a micro-physiological inflammatory response originating from an injury. We will delve deeper into this shortly, but these are the terms commonly encountered in the literature.
We now explore a deeper understanding of how mechanical power, which is the energy produced by the ventilator, is transferred to the patient. This energy, coupled with the creation of heat, stress, strain, and deformation experienced by the fragile alveoli, eventually culminates in organ failure downstream—a phenomenon referred to as biotrauma in the scientific literature.
Today, we use this term to encapsulate the subsequent inflammatory or biological response to an injury. The patient's DNA and defense mechanisms can partially influence this response. While not entirely equivalent, it bears similarity to someone who gets stung by a bee: one person might feel irritation, while another might face an exaggerated anaphylactic reaction due to their heightened sensitivity to the bee's toxin, potentially leading to a fatal outcome.
A comparable scenario, or something quite akin to it, can be observed in ventilated intubated patients. Some individuals might showcase a substantial reaction to the stress, strain, and energy transmitted by the ventilator, while others may not display such responses. This energy and its corresponding reactions stem from the transfer of energy from the ventilator to the lungs.
As bedside clinicians and educators, we are all aware that positive pressure ventilation, to any degree, is not optimal for patients. It might serve as a temporary life-support measure, but the consequences arising from the energy response or energy transfer to the lungs can be grave. Furthermore, while we will not delve deeply into this aspect today, it is worth noting that the same energy principles—components that explain the details of mechanical power and energy transfer to the lungs—can be encapsulated by a couple of formulas. A relatively newer concept is that the patient's own responses can contribute to this process.
Figure 1. The normal alveolus (Left-Hand Side) and the injured alveolus in the acute phase of acute lung injury and the acute respiratory distress syndrome, Right-Hand Side. (CC BY-SA 4.0 via Wikimedia Commons).
It is fascinating to explore the intricacies of the alveoli and their role in respiratory health. In Figure 1, we have a visual representation that helps us understand the concept of a "sick" alveolus, particularly in the context of Acute Respiratory Distress Syndrome (ARDS). Here is a breakdown of the key features in the illustration:
Healthy Alveolus (Left Side):
- Alveolar Macrophage: This is depicted as a security guard against infections. These cells play a role in the immune response within the alveoli.
- Surfactant Layer: A thin layer of surfactant is shown, responsible for preventing the collapse of the alveolus by reducing surface tension. This is crucial for efficient gas exchange.
- Thin Cellular Structure: The alveolar wall is thin and delicate, enabling efficient gas exchange between the alveolus and the surrounding pulmonary capillaries.
Injured Alveolus (Right Side):
- Injury Response: When the alveolus is injured due to various factors like aspiration, inflammation, or infections, the normal structure undergoes changes.
- Inflammatory Response: Inflammation occurs in response to injury. Alveolar macrophages release pro-inflammatory cytokines, signaling molecules that trigger immune responses.
- Spread of Cytokines: These cytokines cross over from the alveolar capillaries into the bloodstream, affecting various organs and systems throughout the body.
- Neutrophil Infiltration: The cytokines attract neutrophils, a type of white blood cell, into the alveolar interstitium. This response contributes to the inflammation within the lungs.
The concept of biotrauma, a subject we have been delving into extensively, encompasses a secondary inflammatory process triggered by a biological response to injury or a microphysiological reaction to harm. This phenomenon operates at the intricate level of alveoli and within the alveolar-capillary system, intricately avoiding direct visibility. Unlike an evident pneumothorax that can be promptly addressed, biotrauma is not immediately observable. It eludes bedside detection, demanding the deployment of imagination, sophisticated imaging, and clinical insight to effectively manage the intricate transfer of energy from the ventilator to the patient. These inflammatory agents course through the body's intricate systems, implicating other organs, and ultimately culminating in multi-system organ failure. Regrettably, this cascade of events often leads to an amplification of mortality rates. It is worth noting that injuries and inflammation can lead to disruption of the delicate balance within the alveoli, impairing gas exchange and potentially contributing to the development of conditions like ARDS. Understanding these processes is crucial for medical professionals to effectively manage and treat patients with respiratory disorders.
VILI
- Remember that some alveoli are collapsed.
- Some are partially filled with fluid.
- Some are fully functional.
- Alveoli articulate with other alveoli, and what is happening in one alveolus might affect others.
- We refer to this as heterogeneous lung disease.
- One alveolus might “distort” others as they are stretched.
- Some alveoli will be exposed to more or less volume and pressure than others.
To give you a visual, think of the interstitium as the gaps between the alveoli. This is akin to the pleural space. This interstitium serves as a potential area. Typically, nothing interferes with a gas exchange or the permeability of the alveolar-capillary system, allowing for efficient gas exchange. However, when an inflammatory response triggers a release of cytokines – essentially a storm of signaling molecules – the alveolar-capillary membrane system begins to sustain damage. Ultimately, as the integrity of this membrane is compromised, the interstitium and alveoli become flooded with proteinaceous fluid. The once-effective surfactant can no longer maintain alveolar stability.
Consequently, the alveoli collapse due to the absence of surface tension. This dramatic collapse significantly impairs the patient's capacity to exchange gases – a pivotal aspect to consider. Our primary focus lies in understanding the transfer of energy from the mechanical ventilator through the patient's respiratory system.
Then there are those alveoli that remain fully functional. These alveoli untouched by the disease process are impacted directly when volume is introduced. They face the full brunt of stress and strain – terms we will define shortly – from the ventilator. Adding to the complexity, alveoli aren't isolated entities. They are rearranged in clusters, resembling a honeycomb pattern. A fully functional alveolus might neighbor a consolidated one or one that's only partially functioning. it is crucial to grasp this, as it is a reason static measurements on the ventilator might not always be completely reliable. These measurements provide a global pressure, neglecting the interactions within this honeycomb-like network of alveoli. Pressure, volume, stress, and strain experienced by one alveolus can influence another nearby.
The term "heterogeneous lung disease" reflects this complexity, meaning lung pathology is not uniform. Instead, certain areas may differ – dorsal to ventral, apex to base. it is not a consistent picture. Given this, considering that most ARDS cases are heterogeneous, a well-functioning alveolus might inadvertently distort others when overstretched due to pressure, volume, or flow. This might cause it to move away from consolidated alveoli, affecting nearby functional alveoli. This interplay is intricate in microphysiology, but it is essential to bear in mind when caring for these patients.
To put it simply, some alveoli will encounter different amounts of volume and pressure compared to others. Consider this image, which you've likely encountered in your practice. While a standard X-ray might not reveal the full extent of damage, a multidimensional CT scan of the same patient showcases the severity of lung pathology. In comparing the X-ray and the detailed CT slices, you will note that the ventral part of the lungs has some aeration, whereas the dorsal areas seem entirely consolidated. A closer look, however, reveals that certain lung units – individual alveoli – exhibit a mix of both patterns. This is what I mean when I say that numerous alveoli become partially obstructed or consolidated to varying degrees. As they move towards the dorsal regions of the lungs, these alveoli shift into a state of primary consolidation or dysfunction.
The LUNG SAFE Study: A Presentation of the Prevalence of ARDS According to the Berlin Definition!
A few years ago, our team significantly contributed patients to the LUNG SAFE study, conducted by Bellani et al. (2016). This international observational study focused on individuals with ARDS. The study divided participants into two groups: one from the Northern Hemisphere for a few months, and the other from the Southern Hemisphere for a similar duration. Participating healthcare professionals reported their patient data and P/F ratios during this period. The study employed the explicit Berlin definition to assess whether patients met the criteria for ARDS.
We examined a total of 29,144 patients. Upon comprehensive analysis of the collected data, approximately 2,400 of these patients developed ARDS within the initial 48 hours while undergoing invasive mechanical ventilation. When classifying these patients into categories of mild, moderate, and severe ARDS, it is worth mentioning that if you share my perspective – not being the most proficient respiratory therapist, but striving to improve – and if you possess a penchant for literature, you might be aware of the recent redefinition of ARDS.
In contrast to the previous definition, which mandated intubation, a level of PEEP, specific imaging criteria, and a P/F ratio assessment, the new definition takes a different approach. Although that is not our main focus here, I will briefly mention it. The revised definition does not necessarily require intubation, and patients can use a high-flow nasal cannula or non-invasive ventilation. The imaging criteria are more flexible, not exclusively tied to a chest x-ray but extend to other imaging modalities such as ultrasound.
Refocusing on our primary topic, within the cohort of ARDS patients we studied, it was found that 30% had mild ARDS. As a reminder from the Berlin definition, this corresponds to a P/F ratio falling between 200 and 300. Moderate ARDS, delineated by a P/F ratio ranging from 100 to 200, was observed in another group, while severe ARDS, indicated by a P/F ratio below 100, constituted the remaining portion.
The P/F ratio of pO2 to FiO2, offers a straightforward mathematical representation that helps us understand the underlying relationships. To illustrate, consider a scenario where pO2 is 60, and FiO2 is 100%—dividing the pO2 of 60 by the FiO2 of 1.0 results in a P/F ratio of 60.
Delving into the study results, it is noteworthy that 47% of the globally examined ARDS patients fell under moderate ARDS. Among the entire pool of ICU admissions included in the database, 10% of them presented with ARDS. Furthermore, of those patients necessitating mechanical ventilation, 23% were diagnosed with ARDS or fit into its specified classifications.
This presentation aims to convey a vital message from this extensive observational study encompassing 29,000 patients. It emphasizes how sometimes we, as clinicians, may fall short in recognizing evident conditions right before us. Recognition is crucial as it forms the basis for applying the principles of physics and microphysiology in tailoring our mechanical ventilation strategies.
The data underscores this recognition's importance, highlighting that ARDS's clinical awareness stood at 50% for mild cases and 78% for severe instances. This implies that in 20% of cases, severe ARDS went unnoticed. Shockingly, less than two-thirds of all ARDS patients were managed with tidal volumes of eight milliliters per kilogram of predictive body weight or less. Reflecting on the history, we recall the ARDSNet trial 23 years ago, which revealed that employing lower tidal volumes and targeting six milliliters per kilogram of predictive body weight substantially lowered mortality. Yet, even 15 years after this finding, adherence to these practices was lacking.
Exploring another facet of the ARDSNet trial, only 40% of ARDS patients had their plateau pressure measured. Furthermore, a significant 83% of ARDS patients received PEEP levels below 12. Recognizing the impact of PEEP on mechanical power and overall outcomes raises further concerns.
Considering prone positioning, a crucial intervention demonstrated to halve mortality rates in the PROSEVA trial, was astonishingly employed in a mere 16% of severe ARDS cases. Clinician recognition of ARDS correlated with heightened PEEP usage and a greater inclination towards neuromuscular blockade administration. This implies that while our ability to recognize ARDS might be suboptimal, we are more likely to apply appropriate measures once recognized.
Hospital mortality rates for ARDS patients ranged from 35% for mild cases, 40% for moderate cases, and 46% for severe instances. These findings underscore a global phenomenon: irrespective of geographical location, whether it is Charlottesville, Virginia, or diverse regions across the world, the mortality rate for moderate to severe ARDS hovers around 40%. To conclude, ventilator-induced lung injury encapsulates the core theme we have explored.
Biotrauma
The concept of biotrauma, which we have been exploring extensively, encompasses a secondary inflammatory process. It represents a biological response to injury or a microphysiological reaction to such harm. This intricate phenomenon operates within the confines of the alveolar level and the alveolar-capillary system, discreetly eluding direct visibility. It stands in contrast to the more conspicuous pneumothorax, an issue that can be promptly addressed. Biotrauma artfully sidesteps bedside detection, demanding the deployment of imagination, medical imaging, and clinical insight for the adept management of energy transfer from the ventilator to the patient. Within this complex cascade, these inflammatory agents traverse the body's intricate systems, implicating other vital organs. Ultimately, this intricate interplay culminates in multi-system organ failure, a dire outcome that frequently escalates mortality rates.
ARDS Outcomes ARDS (mortality)
Arguably, the most pivotal facet we will delve into pertains to the repercussions stemming from mechanical power or ventilator-induced lung injury. As previously highlighted, regardless of your global location, if a patient grapples with moderate to severe ARDS, their mortality rate typically spans the 40-45% range. Among those afflicted by moderate to severe ARDS, 40-45% do not survive. This juncture underscores its significance: fatalities solely attributed to hypoxemic respiratory failure emerging from severe ARDS are strikingly uncommon.
In fact, only 1 out of 10 ARDS non-survivors succumbs to hypoxemic respiratory failure. This occurrence is remarkably rare. Individuals can tolerate remarkably low pO2 levels. Often, we encounter individuals with severe COPD leisurely traversing malls, their pO2 hovering around 50, yet they persist in their daily routines. it is essential to note that hypoxemia in itself does not bear the sole responsibility for fatality. This uncommon event is so rare that only 1 out of 10 of these patients ultimately succumbs to hypoxemic respiratory failure. A staggering 90%—or 9 out of 10—meet their end due to multi-system organ failure. Grasping the significance of this phenomenon is pivotal, as it unveils a substantial avenue for intervention at our disposal.
Baby Lung
We hold the potential to wield a significant influence in diminishing ventilator-induced lung injury (VILI) by curbing the transmission of mechanical power from the ventilator to the patient. This reduction mitigates the downstream multi-system organ failure, leading to elevated mortality rates. Consider these contrasting chest CT scans of two 5'9" males grappling with considerable respiratory failure. Despite both experiencing severe respiratory failure, the patient on the left showcases less consolidation and alveolar involvement than the patient on the right. Notably, the latter exhibits a pronounced level of alveolar collapse and consolidation.
Now, let's delve into a pivotal question: In a scenario where both patients are 5'9" males, each adhering to a tidal volume of 6 ml/kg of predictive body weight, which patient's lungs would endure more stress? This question spotlights a critical element deserving of attention. When we refer to the predicted tidal volume chart for a 5'9" male and abide by the recommended guideline of employing six milliliters per kilogram of predictive body weight as an initial benchmark, we ascertain a tidal volume of 424 milliliters for each of these patients.
However, it is imperative to grasp that even individuals of the same height can possess varying lung capacities. Take patient A, for instance, who might present diminished alveolar surface area and reduced compliance. Consequently, in this scenario, the operational alveoli in patient A are subjected to elevated stress-strain energy compared to those in patient B, which boasts a more ample capacity.
While I strongly advocate for understanding the significance of the ARDSNet trial and the central role played by tidal volume in patient management, I emphasize that it is not solely the absolute tidal volume that holds influence. Rather, the pivotal factor lies in the interplay between tidal volume and the lung space available.
I hope this rationale resonates clearly. This remains a core principle weaving through today's discussions. This notion forms the essence: individuals do not universally share an identical alveolar surface area to accommodate pressure and volume. Even if both patients receive identical tidal volumes, remember that the chart or electronic medical record—much like the flow sheets employed in our setting—may suggest precise milliliters per kilogram of predictive body weight. While this initial starting point offers value, it is essential to acknowledge that it is not the sole avenue for evaluation.
Ventilation with Lower Tidal Volumes as Compared with Traditional Tidal Volumes for Acute Lung Injury and Acute Respiratory Distress Syndrome (Brower et al. 2000)
Precisely two decades and three years ago, a landmark trial emerged: the Acute Respiratory Distress Syndrome Network's study (Brower et al. 2000) made its debut in the New England Journal of Medicine. In this pivotal randomized controlled trial, patients were divided into two cohorts—one receiving a tidal volume of six milliliters per kilogram of predicted body weight, while the other received twelve milliliters per kilogram. The investigation also diligently tracked static plateau pressures during the course of the study.
Upon scrutinizing the paper, it becomes evident that the patients were randomly assigned to the twelve or six-milliliter groups. There exists an abundance of data here that we won't delve into today. Nonetheless, the findings revealed that the group subjected to lower tidal volumes (6 mLs) exhibited lower mortality rates compared to the 12 mL group, which experienced a mortality rate similar to the average ARDS patient. Even more noteworthy than this observation is the understanding that the individuals in the lower tidal volume group experienced extended periods before succumbing to non-pulmonary organ failures.
A remarkable three days longer, to be precise. This difference bears statistical significance, evident from the extremely low P-value. However, what holds greater importance is that this finding aligns harmoniously with the overarching theme established since the ARDSNet trial: inducing harm to the lungs predisposes patients to the subsequent development of multi-system organ failures. The occurrence of multi-system organ failure exhibits a substantial correlation with mortality. To illustrate this point, consider a patient afflicted by a single-lung failure—an asthmatic serves as a fitting example.
Upon admission, the asthmatic patient struggles with ventilation—intubation ushers in a complex phase of care. The asthmatic often arrives in a hypercarbia state, with CO2 levels potentially nearing 200 and pH levels potentially dropping below seven, say, to 6.9 or even 6.8. Provided we manage to preserve their lungs from ventilator-induced injury, their survival and subsequent discharge from the hospital is feasible. it is not solely the pH levels that pose the predicament; the primary concern is ensuring adequate ventilation. Once ventilation is optimized, pH levels improve, leading to extubation and liberation from interventions like ECMO. This scenario exemplifies a case of single-organ failure. However, the introduction of other organ complications, such as renal or liver failure, inevitably escalates mortality. This phenomenon, we posit, can be attributed, at least in part, to our ventilator management practices.
Another noteworthy aspect of this study underscores that the group subjected to larger tidal volumes—associated with inferior outcomes—exhibited higher mean PaO2 values. This phenomenon highlights that measures implemented to enhance oxygenation do not invariably translate to improved outcomes. A prime illustration of this concept is evident here. The individuals receiving tidal volumes of 12 milliliters per kilogram of predicted body weight demonstrated enhanced oxygenation and inflation. Yet, these markers of improvement were overshadowed by the smaller tidal volume group's superior outcomes and lower mortality.
We hypothesize that this discrepancy can be attributed to the heightened stress-strain energy imposed on the lungs when subjected to larger tidal volumes. Despite potentially improved gas exchange, the deleterious effects of this additional energy ultimately manifest in poorer outcomes.
Driving pressure and survival in the acute respiratory distress syndrome (Amato et al. 2015)
Fast forward to 2015, we encountered the paper titled "Driving Pressure Survival in the Acute Respiratory Distress Syndrome" (Amato et al. 2015). While not a prospective randomized controlled trial, we loosely regard this paper as a landmark due to its initiation of the notion that volume in relation to available space, as opposed to volume alone, might be pivotal. This paper retrospectively examines nine prominent ARDS trials encompassing 3,500 patients. Driving pressure is the focus, defined as the disparity between plateau pressure or static plateau measurement and PEEP.
If your PEEP stands at 10 and your plateau pressure at 20, then your dynamic or static driving pressure is calculated as 10. Upon analyzing these patients, the core of their realization is a discernible correlation: a driving pressure of 15 centimeters of water aligns with increased mortality. When revisiting the diverse ARDS trials—both retrospective and prospective—it becomes evident that a common denominator among the deceased patients is a driving pressure exceeding 15.
- Increasing driving pressure with fixed PEEP leads to higher mortality
- Increasing PEEP with fixed driving pressure has no effect on mortality
- Increasing PEEP leads to a decrease in driving pressure, survival improves
- Significant increase in mortality once driving pressure > 14 cm H2O
Several key insights stem from this trial in terms of interpretation. These insights are gleaned from the cumulative dataset analysis. When dealing with a ventilated and intubated patient, leaving PEEP unchanged but heightening the driving pressure yields unfavorable outcomes. Conversely, elevating PEEP while maintaining a constant driving pressure—unchanged from its initial value—elicits no discernible impact on mortality rates. This equivalence between mortality rates in both scenarios is mirrored within the framework of mechanical power. This brings us to the impending formula explanation.
Additionally, raising PEEP, if it results in a reduction in driving pressure, signifies recruitment of lung capacity. In cases where volume control ventilation is in play, an increase in PEEP coupled with a drop in the difference between plateau pressure and PEEP coincides with enhanced survival rates.
The need to monitor driving pressure emerges as a proxy for assessing mechanical power—essentially, the energy exerted on the lungs. Elevated driving pressure warrants attention. If it surpasses 14 centimeters of water, mortality rates rise, prompting intervention.
Mechanical power, though not delved into with exhaustive formulas, holds significance. The imperative is not universal comprehension of equations but rather an understanding that specific equation components correlate with unfavorable results.
Figure 2. Mechanical Power Equation.
Increasing the power hinges on a quick examination of the equation depicted in Figure 2. The power exerted on the respiratory system can be defined by several factors: the respiratory rate, the alteration in volume (termed delta in volume, corresponding to the tidal volume), the elasticity of the respiratory system, the ratio of inspiration to expiration (I:E ratio), and airway resistance. Notably, airway resistance stands out as a crucial factor—its significance surpasses other elements. Moreover, the change in volume multiplied by PEEP is included, which holds relevance. Any action that heightens or exacerbates these variables invariably results in an increase in power—a concept closely intertwined with ventilator-induced lung injury (VILI). To clarify, the term "power" should immediately evoke thoughts of VILI, and conversely, the term "VILI" should trigger associations with power.
Mechanical power serves as a descriptor for the quantity of energy administered to the lung parenchyma. Another term that might come up is "mechanical energy," often interchangeable with "mechanical work." These equations might be presented in varying formats across different sources—this variability is observable in the equations' structure. However, the takeaway is that within the references provided at the conclusion of this presentation, you'll find these equations delineated diversely. Consulting these references can furnish you with a more detailed grasp of the equation's essence.
The energy disbursed by the respiratory system during a single cycle of inhalation is designated as mechanical power. The terms mechanical power and energy delivered by the respiratory system during a single inspiration cycle are used interchangeably. This is a means of comprehensively portraying the mechanics underlying ventilator-induced lung injury (VILI), capturing its intricacies.
- Stress = Force applied to the lungs (Driving Pressure)
- Strain = Response to applied stress (Distortion)
- Frequency = number of cycles (rate)
- Mechanical Power is the relationship between stress, strain and frequency Joules/time
- If driving pressure of > 16 is injurious, then driving pressure of > 16 X 30 times a minute must be worse (more power applied to the lungs)
- Example = hopping on sprained ankle, once versus all day long
Mechanical Power: A New Concept in Mechanical Ventilation (Paudel et al. 2021)
Fast forward a few years to a couple of years ago, we encountered the emergence of a novel concept in mechanical ventilation (Paudel et al. 2021). To save time, I will not delve into the formulas any further. However, this recent paper essentially outlines our understanding of mechanical power and its constituent elements.
Let's delve deeper into the terminology we have previously mentioned. Stress, in literature, pertains to the actual force exerted on the lungs. Specifically, in this context, we refer to it as driving pressure. This driving pressure stands as the primary stress experienced during a respiratory cycle, defined as the difference between the lowest pressure (PEEP) and the highest pressure (plateau pressure) believed to be exerted on the alveoli.
Strain, on the other hand, represents the reaction to stress. When stress is applied, strain is the subsequent effect on the alveoli, akin to how each alveolus can bear varying degrees of strain. Frequency corresponds to the number of these cycles occurring within a minute—the respiratory rate. This could be either the rate administered by the ventilator or the patient's spontaneous breathing rate. Throughout the literature, you'll encounter descriptions of mechanical power as joules over time.
Mechanical power signifies the interconnectedness of stress, strain, and frequency. As an illustration, consider a patient with a driving pressure of 16, indicating injurious levels. If the rate of cycles increases beyond what's set, let's say 30 times a minute, it logically worsens the situation compared to a lower rate. This scenario should be averted as it results in heightened power applied to the lungs. To elucidate, think of someone repeatedly hopping on a sprained ankle—the analogy holds parallels to an injured lung. The constant, higher frequency of energy delivery exacerbates the situation.
A pertinent analogy involves bending a paperclip. Just as you apply stress to the paperclip by bending it repeatedly, the alveoli undergo a similar process. They experience stress from the cyclic opening and closing, leading to strain and injury. This mirrors the phenomenon of atelectrauma. Much like a sprained ankle, inflammatory responses are triggered—capillaries leak, cytokines are released, and an attempt to heal initiates, causing swelling. The alveoli, illustrated earlier, undergo comparable processes within the surrounding fluid environment.
Understanding these concepts aids in comprehending the interplay of stress, strain, and frequency within mechanical power—a comprehensive lens through which we examine ventilator-induced lung injury.
The Impact of Mechanical Power on Mortality in ARDS Patients in Intensive Care (Coppola et al., 2020)
The impact of mechanical power on mortality in ARDS patients in intensive care (Coppola et al., 2020) study presents intriguing findings. The key finding of this paper suggests that while the anticipation of mechanical power did not exert a significant clinical impact overall, there's an important distinction when comparing lungs with normal and abnormal compliance. Specifically, when applying the same energy to patients with these differing lung compliance levels, those with poorer compliance experienced worse outcomes.
Ventilator-related Causes of Lung Injury: The Mechanical Power (Gattinoni et al., 2016)
Another relevant study by Gattinoni, known for the PROSEVA trial and related literature on proning, provides another example of the mechanical power equation. This equation is essentially an advanced iteration of the equation of motion, incorporating factors such as respiratory rate, and more. You may find it valuable to explore these concepts in depth at a later time. The authors speculate that in the future, ventilators' software algorithms may evolve to report the energy applied to the lung, allowing for prompt reactions based on this information.
Reducing Mechanical Power
- Reduce the number of cycles
- Permissive hypercarbia
- Improve compliance
- Diuresis
- Treat infection
- Effusions
- Redistribute Stress
- Prone positioning
- PEEP
Figure 3. Scalar representation of driving pressure.
Figure 3 illustrates the graphical representation of mechanical power. I encourage you to take your time and familiarize yourself with it when you have the opportunity. Our ultimate goal is to reduce mechanical power. How can we achieve this objective? Let me share a recent patient encounter, though I will provide a concise overview due to time constraints. The trauma case patient required substantial pressure support due to shock and ongoing bleeding. Impressively, he received 90 units of blood products. His condition was characterized by shock and acidemia, resulting in a severe mixed acidosis with a pH below seven. His CO2 levels were also elevated in the 50s, even though his minute volume was as high as 18 liters per minute.
For a patient in such a challenging condition, the options available to mitigate mechanical power are inherently limited, given the intricacies of their case. This complexity underscores the necessity of a multifaceted approach. However, when dealing with a less intricate case, where the degree of acidemia is less pronounced, and the mixed acidosis is milder, the solution might be as straightforward as reducing the respiratory rate – embracing permissive hypercapnia. In this context, it is crucial to prioritize concern over the driving pressure and the quantum of energy being imparted to the lungs, rather than fixating solely on CO2 levels. This introduces a trade-off: if the choice lies between diminishing mechanical power and permitting a moderate CO2 elevation, a careful assessment of the patient is warranted to determine the risk-to-benefit ratio. As we navigate these considerations, one must not overlook avenues to enhance compliance.
Patients can potentially benefit from diuresis in cases where compromised compliance results from an infectious process or pleural effusions. These effusions can be drained if necessary to enhance compliance and minimize energy exerted on the lungs. Additionally, the concept of redistributing stress-strain ratios is pivotal. While an increase in pO2 might not always correlate with improved outcomes, it is plausible that this metric isn't the sole determinant. Take prone positioning as an example; it may not primarily elevate pO2, leading to better outcomes but rather the alteration in transpulmonary pressure. Reducing stress-strain levels could potentially correlate with lower mechanical power expenditure.
PROSEVA Trial: Prone positioning in severe acute respiratory distress syndrome (Guérin et al., 2013)
A valuable technique in enhancing compliance is Positive End-Expiratory Pressure (PEEP), which not only aids in alveolar recruitment but also curbs driving pressure. The PROSEVA study group (2013), a well-known landmark study in critical care, demonstrated the remarkable impact of proning. By proning patients with P/F ratios below 150 for 16-hour intervals, mortality rates were effectively halved.
Case Review
To illustrate the integration of these concepts, let's delve into a concise case study. A previously healthy 31-year-old male encountered a few days of illness, prompting his arrival at the Emergency Department due to fever and chills.
Upon assessment, he exhibited hypotension, tachypnea, and a somewhat elevated white cell count. Additionally, he was experiencing hypoxemia. A glimpse of his vital signs is presented here: marked hypotension, evident tachypnea, and hypoxemia even on room air. His white cell count showed a slight elevation, while other laboratory results remained within acceptable ranges. Notably, his primary acidemia was rooted in metabolic factors, highlighted by a base deficit of nine.
In response, the initial measure involved administering high-flow nasal cannula oxygen; however, this approach yielded no significant improvement. Eventually, the decision was made to proceed with intubation, utilizing an 8.0 oral endotracheal tube. Subsequently, a chest X-ray was conducted, and he was promptly transferred to the Intensive Care Unit. A central line was established, and normal saline infusion was initiated to address his hypotensive state.
The patient displayed significant ARDS, likely of viral origin. He was initiated on volume-assist controlled ventilation with a tidal volume set at six milliliters per kilogram of predictive body weight, amounting to approximately 380 milliliters. The respiratory rate was set at 10 breaths per minute, and the Positive End-Expiratory Pressure (PEEP) was maintained at 10. I have marked these values in red, highlighting what I consider to be the most potentially injurious aspects. Notably, he received 100% FiO2, yielding a plateau pressure of 36 and an abnormally elevated driving pressure of 26, signifying a significant concern.
Conducting a follow-up arterial blood gas analysis, we observe several changes in the patient's condition. His pCO2 has decreased, leading to a slightly improved pH level. However, his pO2 remains relatively unchanged, resulting in a P/F ratio of 67, which is indicative of severe ARDS. This raises a crucial question: What steps should we take next?
Our strategy revolves around addressing the driving pressure, especially since it was notably high at 26 immediately following intubation. Through strategic adjustments, such as reducing his tidal volume and increasing PEEP, we have successfully managed to lower his driving pressure to 16 – a significant improvement, albeit still somewhat elevated. Subsequent blood gas analysis reveals results that, while not ideal, are not causing undue concern.
While our goal is continuous improvement, our primary focus remains on preventing any adverse ventilator-induced effects. Our commitment to pursuing the correct course of action remains unwavering. Consequently, we maintained the same tidal volume while raising PEEP. His persistent high FiO2 requirement and elevated plateau pressure propelled this choice. However, it is noteworthy that the recruitment maneuvers led to a driving pressure below 15, signifying progress in this aspect.
Upon follow-up blood gas analysis, we observe positive trends in the patient's condition. His acidosis is improving, pO2 levels are increasing, and the P/F ratio is showing improvement as well. As a result of these positive changes, we are able to gradually decrease his FiO2 to 50%. Notably, his plateau pressure measures at 29. By subtracting the PEEP value, we calculate a driving pressure of nine, signifying a much safer condition. The application of PEEP for recruitment has played a crucial role in achieving this reduction in driving pressure and, consequently, mechanical power. This shift towards a safer state has also enabled us to lower the FiO2, further contributing to the reduction of driving pressure and overall mechanical power.
This case emphasizes the spectrum of solutions, which can range from simple to complex, as exemplified by the contrast between the patient mentioned earlier and the current case. In this particular scenario, PEEP recruitment has yielded positive outcomes. However, in scenarios where this approach may not prove as effective, alternative interventions could encompass reducing tidal volume while tolerating modest changes in pH, adjusting the respiratory rate with similar pH considerations, and implementing diuresis to maintain drier conditions for compliance, among other strategies. Furthermore, considering culture-specific antibiotics, when suitable, might enhance compliance and overall progress.
The concept of mechanical power revolves around the energy transmitted from a mechanical ventilator to the lungs during the breathing process. Acquiring a grasp of mechanical power offers valuable insights into the components of a mechanically-assisted breath that potentially contribute to ventilator-induced lung injury. Mitigating this energy burden on the lungs leads to improved patient outcomes. While reducing mechanical power is often straightforward, certain cases require a more intricate approach, demanding close collaboration among healthcare professionals and a multidisciplinary team. This collaborative effort involves exploring a range of strategies to optimize patient outcomes and minimize ventilator-induced complications.
References
Acute Respiratory Distress Syndrome Network, Brower, R. G., Matthay , M. A., Morris, A., Schoenfeld, D., Thompson, B. T., & Wheeler, A. (2000). Ventilation with lower tidal volumes as compared with traditional tidal volumes for acute lung injury and th e acute respiratory distress syndrome. The New England journal of medicine, 342(18), 1301 – 1308.
Amato, M. B., Meade, M. O., Slutsky, A. S., Brochard , L., Costa, E. L., Schoenfeld, D. A., Stewart, T. E., Briel , M., Talmor, D., Mercat , A., Richard, J. C., Carvalho, C. R., & Brower, R. G. (2015). Driving pressure and survival in the acute respiratory distress syndrome. The New England journal of medicine, 372(8), 747 – 755.
Bellani , G., Laffey, J. G., Pham, T., Fan, E., & LUNG SAFE Investigators and the ESICM Trials Group (2016). The LUNG SAFE study: a presentation of the prevalence of ARDS according to the Berlin Definition!. Critical care (London, England), 20(1), 268.
Coppola, S., Caccioppola , A., Froio , S., Formenti , P., De Giorgis , V., Galanti , V., Consonni , D., & Chiumello , D. (2020). Effect of mechanical power on intensive care mortality in ARDS patients. Critical care (London, England), 24(1), 246.
Gattinoni , L., Tonetti , T., Cressoni , M., Cadringher , P., Herrmann, P., Moerer , O., Protti , A., Gotti , M., Chiurazzi , C., Carlesso , E., Chiumello , D., & Quintel , M. (2016). Ventilator - related causes of lung injury: the mechanical power. Intensive care medicine, 42(10), 1567 – 1575.
Guérin , C., Reignier , J., Richard, J. C., Beuret , P., Gacouin , A., Boulain , T., Mercier, E., Badet, M., Mercat , A., Baudin , O., Clavel , M., Chatellier , D., Jaber, S., Rosselli , S., Mancebo , J., Sirodot , M., Hilbert, G., Bengler , C., Richecoeur , J., Gainnier , M., … PROSEVA Study Group (2013). Prone positioning in severe acute respiratory distress syndrome. The New England journal of medicine, 368(23), 2159 – 2168.
Paudel , R., Trinkle, C. A., Waters, C. M., Robinson, L. E., Cassity , E., Sturgill, J. L., Broaddus, R., & Morris, P. E. (2021). Mechanical Power: A New Concept in Mechanical Ventilation. The American journal of the medical sciences, 362(6), 537 – 545.
Ware, L. B., & Matthay , M. A. (2000). The acute respiratory distress syndrome. The New England journal of medicine, 342(18), 1334–1349.
Citation
Lamb, K (2023). Mechanical power at a glance. Continued.com - Respiratory Therapy, Article 196. Available at www.continued.com/respiratory-therapy
Jul 27, 2023
1 CE HourWhat’s Anesthesia Got To Do With It?
Steven Vela, CRNA, MSNA
Editor’s note: This text-based course is an edited transcript of the webinar, What’s Anesthesia Got To Do With It, presented by Steven Vela, MSNA, CRNA.
Learning Outcomes
After this course, participants will be able to:
- Recognize the role of the anesthetist in the hospital setting
- Identify airway equipment and strategies for intubation
- Determine induction agents as a tool for optimization of intubation
- Describe the differences in sedation strategies for the ventilated patient.
- Recognize the function of neuromuscular blocking agents
- Explain the importance of the cuff leak during planned extubation
Introduction
Nurse anesthetists, the first health providers dedicated to the specialty of anesthesia, have their roots in the 1800s when nurses first gave anesthesia to wounded soldiers on the civil war battlefields. Today, certified registered nurse anesthetists (CRNAs) are advanced practice registered nurses with graduate-level education who enjoy two high degrees of autonomy. CRNAs provide anesthetics to patients in every practice setting and for every type of surgery or procedure. They are the sole anesthesia providers in nearly all rural hospitals and the primary anesthesia provider to the men and women in the US armed forces. On average days, we might be on code pager duty, meaning we respond to hospital-wide airway emergencies, code blues, or consult for airway management. Sometimes, we are consulted for planned extubations with patients who are at higher risk for post-extubation stridor in intensive care units. We are in the operating rooms providing anesthesia for various surgeries or assigned to the obstetrician-gynecologist department where regional anesthesia is administered for labor and deliveries.
Anesthesia History
I want to get started by talking about anesthesia history. When people think about historical anesthesia, it is easy to conjure up images of the medicine man pouring a cocktail of some sort that would have mind-altering effects or even someone taking a shot of whiskey or some ancient form of alcohol and told to bite hard on a stick as the doctor worked on a wounded limb. Well, those theatricals are not too far from historical truth.
Early anesthesia is traced back to the true ancient times. The Babylonians, Greeks, Chinese, and Incas are ancient civilizations and all practiced anesthesia. The Egyptians used the combination of opium poppy and Hyoscyamus. A similar combination of morphine and scopolamine is still used for pre-medication today. Incan surgeons were known for chewing cocoa leaves and spitting saliva, presumably containing cocaine, which by the way, is a local anesthetic into the surgical site or wound. Around 1250, Theodoric Borgognoni, an Italian physician and Bishop, soaked sponges with opium and mandragora for surgical pain relief. In 1540 Valerius Cordus synthesized Sweet Oil of Vitriol in Germany by distilling ethanol and sulfuric acid, discovering that this oil had anesthetic properties.
It is important to note that most early anesthetics were inhalational, followed by local, regional, and finally intravenous anesthesia. Intravenous anesthesia was late to the scene because the hypodermic syringe and needle were not invented until 1855. It was destiny that the first eight anesthetics were inhalational.
As mentioned earlier, the Sweet Oil of Vitriol was later called Ether. At the time of its early discovery, its true potential was largely untapped. Ether was used by the medical community mainly for frivolous purposes. Traveling lecturers would dispense ether to a volunteer from the audience to test its mind-altering effects. These early frivolous uses are known in history as ether frolics. In 1842, William E. Clark and Crawford Long used ether independently on patients for various surgeries. However, they did not publicize this discovery. Such a shame is that most sources do not credit these two surgeons.
It was not until four years later that William TG Morton conducted the first publicized demonstration of general anesthesia using ether. The success of that exhibition led the operating surgeon to exclaim to an audience of skeptics, "Gentlemen, this is no humbug." Despite its early use, due to underutilization and lack of understanding, it only truly evolved in the mid 19th century and became firmly established less than six decades ago. The development of surgical anesthesia is considered one of the most important discoveries in human history.
Does anyone know who discovered oxygen? Historically, English chemist Joseph Priestley is credited with independently discovering oxygen in 1774 by the thermal decomposition of mercuric oxide in isolation. However, it is a trick question because Swedish chemist Carl Scheele likewise made the same discovery in 1772, two years prior, but Priestly publicized his findings first. Maybe this would be the equivalent of today, who posted on social media first. Thus a brief history of anesthesia is explained.
You might be asking, What's anesthesia got to do with it? Truthfully, a lot. My realization that there needed to be some content that bridges the gap between anesthesia and respiratory therapy did not come from my three years working as an ICU nurse alongside respiratory therapists (RT). It came from recently working with the courageous respiratory therapists who volunteered to work in our hospitals' COVID unit during this historical pandemic. As a young ICU nurse, I was too inexperienced to understand the actual value that respiratory therapists bought to the table. Sure, I knew the profession was knowledgeable and an essential part of the critical care team, but working side by side over the past year, I have grown a new appreciation for the ingenuity of the RT, the adaptability, the vast knowledge base concerning ventilator management of incredibly sick patients. I cannot tell you how many times our RTs would find ways to make equipment work or sort of “McGyver” things to function in times of shortages. When the system became stressed, the RT was not. The world of critical care is lucky to have such a valuable profession at its side.
Now begins our journey into anesthesia. We will start by talking about airway equipment, walk down the path of airway management techniques, discuss how pharmacology works and how it is used to help optimize the patient for intubation and ventilation. I will try to paint a picture of certain pitfalls you might encounter and discuss ways to navigate your way out of them, with preparation being the most crucial tool in your toolbox.
Airway Equipment
What do we need in our toolbox? In other words, if you are "it" at your hospital and you are called to an airway emergency for intubation, what are your essentials? I understand every person's different and how they practice or their approach. Some hospitals or institutions have certain medical personnel who are designated to intubate patients. However, for this presentation, I will assume you are intubating either alone or with me. Let's talk about the essentials we see in Figure 1 on airway equipment.
Figure 1. Airway Equipment. Source: Continued (licensed from Getty Images); Dr. Lorimer, CC BY-SA 4.0 via Wikimedia Commons.
A bag valve mask or Ambu bag is first. This fundamental piece of equipment. The ability to ventilate a patient should never be undervalued because an experienced provider can properly oxygenate and ventilate a patient until a secure airway device is placed into the trachea. Depending on where you are called, I always hope a suction setup is available, but sometimes this can be a luxury item if the patient needs assistance in an area where suction is not available, like a hallway, if they collapse outside of their room, or even in route to a procedure. For this scenario, let's assume we are needed in a patient's room, and we have the luxury of a suction apparatus. If we have difficulty bagging, always have an oral and or nasal airway available. If there is any doubt that we are not achieving adequate oxygenation and ventilation, including oxygen saturation is 70%, minimal condensation in the mask, chest rise is less than optimal, and suspect obstruction, always place an oral or nasal airway.
Genioglossus Muscle
Most times, in the anesthetized or unconscious patient, there is a degree of loss of airway muscle tone or weakness of the genioglossus muscle (as shown in Figure 2).
Figure 2. Illustration of Genioglossus muscle. Source: Primal Pictures.
This weakness allows for airway collapse, and you can see the picture in Figure 2. More specifically, the tongue and epiglottitis fall back against the posterior wall of the pharynx, rendering the patient unable to oxygenate or ventilate. The preferred method to offset this obstruction is repositioning the head or adding a jaw thrust. However, the placement of an oral or nasal airway and repositioning can help maximize airway patency and make life easier while other airway equipment is being prepared for actual intubation.
It is crucial to remember that a patient who has intact laryngeal reflexes may cough or even develop laryngospasm during oral or nasal airway insertion. If the decision to intubate has already been made, medication to help blunt this reflex is recommended. Because of the risk of epistaxis, a nasal airway should not be used in anticoagulated patients or patients with baseline skull fractures. The nasal airway should be lubricated and advanced long the floor of the nasal passage. Frequently we will see someone aim towards the apex of the nasal passage. This approach can lead to traumatizing the turbinates or roof of the nose and causing a bloody airway that is going to make things more difficult.
It is critical to place an airway device in patients smoothly. The placement of an oral airway can be facilitated by using a tongue depressor and selecting the correct size. You can "guesstimate" the size, but there is some evidence that reveals an easy way to determine the appropriate size for patients, and it does not require using a ruler measuring tape.
Oropharyngeal Airway Size in Adults
Research by Kim et al. (2016) supports a quick measure for the maxillary incisors (as shown in Figure 3). The angle of the mandible can help in your choice of size.
Figure 3. Oropharyngeal Airway Size in Adults. Source: Primal Picture; Continued (licensed from Getty Images).
If you are too short, you may not be behind the tongue, and if you choose a size that is too large, you may further worsen obstruction as it will bunch the tongue back into the oral pharynx. The nasal airway length is determined by measuring the distance from the nares to the meatus of the ear. It should be approximately 2 to 4 centimeters longer than oral airways because you have more ground to cover when approaching the nasal route.
Bag-Mask Ventilation (BVM)
In our scenario, we have taken our quick measurement and placed an oral airway—let's get to ventilating more effectively. The technique is critical. Often this essential step is lost in the chaos of the situation. The patient is coding, and chest compressions move the head and body; a room with multiple people can be overwhelming, including sensory overload, and focus can be easily lost. It is important to remember that your focus should remain on the task at hand, airway support. We always need a tight mask fit. The mask is held against the face by exerting downward pressure on the mask body by the left thumb and index finger (as shown in Figure 4).
Figure 4. Bag-mask ventilation (BVM). Source: Continued (licensed from Getty Images).
The middle finger and ring fingers should be grasping the mandible to help extend the atlantooccipital joint, a key point. Keep your fingers on the bone and avoid the soft tissue. This subtle technique maneuver can help to avoid further airway obstruction. Let's not forget the pinky. Place it under the angle of the jaw and thrust it anteriorly towards the ceiling. Never will your pinky feel more important. In certain situations, a two-hand mask technique is warranted for the morbidly obese patient, the patient with a beard, or with a large head.
Airway Management
Another device aiding ventilation is a laryngeal mask airway (LMA). The LMA is not an airway security device. These are not popular devices in a code situation or any situation that requires proper airway security. Think of it as more of an invasive way to mask-ventilate. It also carries with it the increased risk of gastrointestinal aspiration. Regardless, it is certainly something I keep in my toolbox when responding to airway emergencies or in preparation for a possible difficult airway. Each operating room has an abundant supply of various sizes in the hospital I work in because you never know when you might need it. Even some surgeries requiring general anesthesia can be done with an LMA, but of course, these are on patients that have been NPO (nothing by mouth) for at least eight hours.
If you ever see an LMA used in an airway emergency setting, things are likely not going as planned. Moreover, the placement of the LMA indicates a pathway for ventilation for a patient, which is not easy to intubate. It serves as a temporizing measure in patients with difficult airways. The advantages of the LMA are:
- Being easy to insert and has a relatively high success rate of 95- 99%
- Being used as a conduit for an intubating stylet - bougie, flexible bronch, or an endotracheal tube
- Available in both infant and adult sizes
In our scenario, we are proving we are effectively ventilating and oxygenating our patient. Our oxygen saturation is acceptable. We see chest rise. We have end-tidal CO2 monitoring connected and see an acceptable range of CO2 exchange. The patient remains obtunded. There is some degree of hemodynamic instability. We can occasionally see an effort to breathe, but the decision is made to intubate.
Endotracheal tube
What else do we have in our toolbox? The pinnacle of airway security is the endotracheal tube. As a CRNA, this is the airway device I place most often. A fundamental piece of equipment that should not be taken for granted. Known as the "breathing tube," the windpipe that goes into the windpipe. In my practice, various tube sizes are available in the operating room or when responding to emergencies.
Endotracheal tubes are not a "one size fits all tool." The standard endotracheal tube has a beveled tip, which you can see here, to aid in visualization and insertion through the vocal cords. Also, you notice that the side hole called Murphy's eye, located at the distal end of the tube. The Murphy's eye helps decrease the risk of occlusion if the distal tube abuts the carina or trachea.
Some formulas help determine internal diameter (ID) tracheal tube size, but 7 to 7.5 ID is generally acceptable for most adult females. Adult males usually require 7.5 to 8 ID, and even up to 9 ID. Usually, I see around 7.5 to 8 ID. If you examine the endotracheal tube, you will most likely notice a radiopaque line, which is when you want to confirm tube position on a chest X-ray—another endotracheal tube fun fact. You will also notice it as a natural curve to it. The Magill curve was a happy accident. When Sir Ivan Magill first used the single lumen rubber tubes for nasal tracheal intubation in the 1920s, he cut them from a coil of tubing; hence they were curved. He found the curve helpful. This natural curve allows for the omission of an intubating stylet in most patients.
In a highly controlled environment during training, most anesthesiologists and CRNAs do not routinely use a stylet for intubation in the operating room (OR) setting. Some training facilities prefer individuals training for intubations not to use a stylet as it creates a more rigid distal end, and the novice tends to "saw" or move back and forth the endotracheal tube as they are trying to get it into the trachea, causing airway trauma. I highly recommend using a stylet for any airway situation outside of the OR setting, precisely any airway emergency or code situation, because it is in the endotracheal tube if you need it, locked and ready to go. These patients are already compromised and usually have little oxygen reserve. The loss of valuable seconds because the stylet is not within the tube means further patient compromise. I am not willing to bend that rule. No pun intended.
Laryngoscopes
Back to our scenario, we decide to intubate our patient. We have a male patient of average size. We have our endotracheal tube ready with a stylet in place and the cuff intact, checked for integrity. What else do we need? We need the laryngoscope (as shown in Figure 6).
Figure 6. Types of Laryngoscopes: Mac and Miller blades. Source: DiverDave, CC BY 3.0, via Wikimedia Commons.
As we prepared, we have the most commonly used one. Herein lies an age-old question, Miller or Mac? This debate always makes me laugh a little bit. If you have ever listened to the argument by two seasoned laryngoscopists, each person will sound very passionate about why their blade is superior to the other. At the end of this debate, you will be convinced that both are superior blades. I will not get into this one too much, but I have discovered that the best blade is the one you are most comfortable with. Whoever is intubating, the RT, anesthesiologist, CRNA, pulmonologist, EMT, paramedic, should learn how to use and be proficient with both and then determine which they like best.
It is very subjective. The main difference, the Miller, is straight, and the Mac is curved. The Miller is placed underneath the epiglottitis. In contrast, the Mac is placed in the vallecular space to visualize the airway. In the last decade, Mac's direct laryngoscopy methods, e.g., videoscopes, have become popular, and some circles argue it will become the intubation standard in the future.
Glidescope
At the institution I work in, we have the GlideScope (as shown in Figure 7).
Figure 7. Example of a Glidescope. Source: DiverDave, CC BY-SA 3.0 via Wikimedia Commons.
The GlideScope is one variation of a group of videoscopes available, but this is the one that I am most familiar with. A videoscope is an excellent adjunct tool to have when there is little time to assess the patient's airway, such as a code situation or emergency. Evidence suggests that using the GlideScope yields a success rate of 90% within 120 seconds, within the first attempt, even for untrained personnel. In this particular study (Nouruzi-Sedeh, Schumann, & Groeben, 2009), these personnel only had mannequin training before human attempts. The evidence for the use of the GlideScope is compelling and certainly supports its use. In my practice, we always have a GlideScope available or within reasonable reach in the OR area, and we always take one with us to emergency airway calls. It is one of those things where it is better to have it and not need it than to need it and not have it.
Something I have found to be very profound as well, as mentioned, the anesthesia department where I work is responsible for airway calls throughout the hospital, including the emergency department. Before getting the GlideScope, the emergency department would call us at least once or twice a week for help with intubations. When they finally purchased the GlideScope, these calls dropped significantly. We might get a call from these guys, maybe once every two to three months. We know if they are calling us, the airway is genuinely difficult.
Pharmacology: Induction Agents
Let's say we have done all the things. Our patient is safely intubated, and for the RTs, security of the airway device and ventilator management becomes paramount. Thank goodness you have all the tips and tricks in airway security devices. In the operating room setting, CRNAs do a great job securing the endotracheal tube, but let's be honest, RTs do the best job. Our patients are under general anesthesia in the operating room, and patient movement is not an issue until it is time to extubate. There is less time or somewhat less of a chance of inadvertent extubation. In the ICU, it is an entirely different ball game. There are spontaneous breathing trials, prolonged weaning from the ventilator, awake intubated patients who may be uncomfortable, delirious, or agitated. The airway security device is critical and leads us to the next topic.
Our patient is safely intubated, an airway security device is in place. What is the best way to keep our patient comfortable on the ventilator? The answer is quite simple- pharmacological agents, anesthetic agents. Coming from an anesthesia background, in the OR, we have the benefit of inhalational agents. No, not ether but more modern and safer agents. I will talk a little bit about them later, but since you will not be seeing them, we will talk about the everyday things you will see outside of a surgical area. I recommend going over pharmacology and figuring out what agents are best for patient comfort while on the vent.
Back to our patient that we just intubated, first ask, what is still lingering from the intubation? Yes, we gave some medication for the intubation, but I wanted to keep the discussion of pharmacology in one area and keep the dialogue less convoluted. What is still lingering from the intubation? It will likely be a hypnotic sedative agent, specifically Etomidate, Propofol, or Ketamine combined with a paralytic agent. In most cases, the paralytic will either be Succinylcholine or Rocuronium.
Why are we using these agents? Our patient was semi-conscious or obtunded at worst. Will the patient remember anything? Well, we are not sure. Recall memory is hard to assess at that point, and we have to ensure safety and comfort for the patient before intubation. In this scenario, we used medication for intubation. Keep in mind that there will be times where medication is not necessary. Such as in the patient who is actively coding, but each situation is different. Again, in our case, we chose to medicate. Medication will aid in the optimization of the airway for intubation, and the choice of medication has to be tailored specifically to each patient. It should not be a cookbook or recipe-type thing. Ideally, you will need to ensure three things before intubation:
- Amnesia
- Analgesia
- Muscle relaxation
Amnesia will come by rendering and guaranteeing that your patient is unconscious with Etomidate, Propofol, or Ketamine agents. These are your brain scramblers, and we will talk about them in-depth shortly.
What is GABA?
Before we delve into it, I would like to mention one crucial neurotransmitter and receptor. You will hear it mentioned from time to time, and I want to ensure you have some detailed knowledge of it so what I am saying makes a little more sense. The important neurotransmitter and receptor is called the Gamma-aminobutyric acid or GABA (as shown in Figure 8).
Figure 8. GABA Receptor. Source: BruceBlaus, CC BY-SA 4.0 via Wikimedia Commons.
GABA is the primary inhibitory neurotransmitter in the brain and is a major inhibitory neurotransmitter in the spinal cord. Many anesthetics enhance GABA inhibition of the central nervous system. GABA receptor agonists appear to enhance anesthesia, whereas Gabba antagonists reverse some anesthetic effects. When you hear GABA, understand things are slowing down, and your neurons are less likely to fire on the action potential. For example, ever hear someone talk slower after a few glasses of wine? You can thank GABA for that.
Etomidate
Etomidate depresses the reticular activating system and mimics the inhibitory effects of GABA. It also may have disinhibitory effects on parts of the nervous system that control extrapyramidal motor activity. This inhibition offers a potential explanation for the 30-60% incidents of myoclonus with its use. What you might see is mild to profound muscle jerks or tightening shortly after Etomidate administration. The recommended dose for intubation is 0.2 to 0.5 milligrams per kilogram IV.
The benefit of Etomidate is it has minimal effects on the cardiovascular system. A mild reduction in peripheral vascular resistance is sometimes responsible for a slight drop in blood pressure, but I have rarely seen that.
Cardiac output and myocardial contractility are usually unchanged, and it does not release histamine. In terms of respiratory effects, even induction doses do not usually result in apnea. Some intensivists are concerned because it can cause adrenal suppression, but it is transient with a single dose. This medication is ideal for your cardiac patients who have heart failure or hemodynamically unstable, or both. Although you may not see apnea with a second dose, it can sometimes cause respiratory depression.
Propofol
Our second agent, Propofol, is probably the most widely used induction agent for intubation in the OR setting. Outside of the OR critical care areas, these drugs have to be used judiciously. It will induce a state of general anesthesia, and in my world, it is sometimes called Milk of Amnesia because of its milky white appearance. It works by facilitation of inhibitory neurotransmission mediated by GABA.
Usual induction doses range from one to two and a half milligrams per kilogram IV. It has a rapid onset and relatively rapid recovery time. The significant cardiovascular effect of Propofol is a decrease in arterial blood pressure due to a drop in systemic vascular resistance, cardiac contractility, and preload. May see hypotension after its use, after induction for intubation. Factors exacerbating the hypotension include large doses, rapid injection, and administration to the elderly. That is why the dose range mentioned previously is so broad. The older you are, the less you get, the sicker your heart is, the less you get, especially if you have heart failure and compromised heart function.
Propofol's respiratory effects are profound, and apnea occurs after an induction dose. Even when used for conscious sedation and subanesthetic doses, a Propofol infusion inhibits hypoxic ventilatory drive and depresses the typical response to hypercarbia. Although Propofol does not induce a histamine release, it is not contraindicated in patients with asthma as the histamine release is pretty insignificant. Of course, these side effects make Propofol sound dangerous, but with proper dosing, its safety profile is excellent, and it is ideal for most patients, especially when you are trying to achieve an apneic state before intubation.
Ketamine
Finally, we have Ketamine. Ketamine has multiple effects throughout the central nervous system, including blocking polysynaptic reflexes in the spinal cord and inhibiting excitatory neurotransmitter effects in selected areas of the brain. Ketamine functionally dissociates the thalamus from the limbic cortex, which is involved with the awareness of sensation. Although some brain neurons are inhibited, others are tonically excited.
What might you see clinically? Most patients appear conscious, have open eyes, can swallow, and have muscle tightness but cannot process or respond to sensory input. After administration of Ketamine for intubation, a glazed look on the patient appears as it takes effect. They may not close their eyes like they do with the Etomidate or Propofol. They may continue to stare out into space until the paralytic hits their system.
A quick anesthesia fun fact, Ketamine is a structural analog of phencyclidine. Does anyone know what phencyclidine is? Well, this is also known as angel dust. It is 1/10 as potent yet retains many of phencyclidine’s psychotic-mimetic effects. Even sub-therapeutic doses of Ketamine can cause hallucinations. Cardiovascular effects are quite the opposite of what we see with typical induction agents. We usually expect some drop or at least minimal change in hemodynamics, as discussed earlier with Propofol and Etomidate, but Ketamine is unique and sometimes casually referred to as Special K in the anesthesia world.
It increases arterial blood pressure, heart rate, and cardiac output. These indirect cardiovascular effects are due to central stimulation of the sympathetic nervous system and inhibition of the reuptake of norepinephrine. It is going to make the patient's heart work a little more. For these reasons, we try to avoid it in patients with coronary artery disease, uncontrolled hypertension, congestive heart failure, and unknown arterial aneurysms. Indirect stimulatory effects of Ketamine can prove beneficial to patients with acute hypovolemic shock.
From a respiratory standpoint, Ketamine's effects are well-established. The inhibitory drive is minimally affected by the usual induction doses of Ketamine. That induction dose is 1-2 milligrams per kilogram. A quick side note, doses needed for conscious sedation can be a great adjunct to the anesthetic because it minimally affects ventilation. Another thing that makes Ketamine unique is its known bronchodilator effects, making it the ideal induction agent for asthmatic patients. We might give it to patients who exhibit signs of bronchospasm post-intubation in the OR, and I have seen it work nicely. Another advantage is that Ketamine has analgesic properties as well. One of the drawbacks of this particular anesthetic is its ability to increase patient salivation. You might see increased secretions if this drug is used anytime during a patient's care.
Sedation Strategies
We have discussed some common induction agents, simply put, a stabilizer, a potential downer, and a stimulator, Etomidate, Propofol, and Ketamine, respectively, each with their unique characteristics can help provide optimal intubating conditions for the patient. Of course, we will add a muscle relaxant for our intubation. We will talk about that more in-depth later.
Let's get back to that guy. Remember the one you intubated smoothly. His heart was healthy, but because he had hemodynamic instability early on, you chose Etomidate, which worked well, but the Etomidate will not last forever. It is only a matter of time before he starts coughing and "bucking" the vent. How will we make him "like being on the vent" and keep him comfortable for his condition to be worked up and resolved? Again, more pharmacology.
Benzodiazepines
Let's talk amnesia. Breathing through a straw can be very stressful, an event most individuals do not want to remember. That leads us to a commonly used drug in the ICU, the group known as Benzodiazepines that interact with specific receptors in a central nervous system, particularly in the cerebral cortex. Benzodiazepine receptor binding enhances the inhibitory effects of various neurotransmitters. For example, the Benzodiazepine receptor binding facilitates GABA receptor binding, increasing chloride ion's memory conductance.
What does this all mean? It means that, again, things slow down, and it is harder for neurons to fire. Common Benzodiazepines include Versed (Midazolam), Ativan (Lorazepam), and Valium (Diazepam), and you will commonly see Versed, or Ativan drips in the ICU setting post-intubation. Effects on the cardiovascular system are minimal. Although it is not uncommon to see a slight decrease in blood pressure, a patient is more relaxed and less anxious, making sense. Effects on heart rate are variable but will often see the heart rate unchanged or slow down a little. Respiratory effects from Benzodiazepines, we know they depress the ventilatory response to CO2.
Your patient gets a big bolus of Versed, guess what? They may not breathe faster if their PCO2 rises. It could be good or bad, depending on what you are trying to achieve in the ICU. IV Benzodiazepines, in particular, are known respiratory depressants, and patients on Versed can even become apneic. This is great if you are trying to breathe for someone with sick lungs. Remember, we want the patient to “like” our vent settings because they were most likely intubated for a significant reason after all. We want to maximize comfort and minimize ventilator-associated lung damage.
Opioids
What other drugs will you see in combination with Benzodiazepines? Well, I did bring up comfort. How are we going to reduce the discomfort and/or pain of ventilatory support? Well, we need pain medicine. That brings us to the class of drugs known as Opioids. Fentanyl, Dilaudid, or Morphine infusions are pretty standard in the ICU. in particular, at my hospital, Fentanyl is usually the go-to. It is important to keep in mind that all Opioids have some sedation effects. They are most effective at producing analgesia. There are four major types of opioid receptors, Mu, Kappa, Delta, and Sigma. The pharmacodynamic properties of specific Opioids depend on which receptor is bound, the binding affinity, and which receptors are activated.
In general, Opioids do not seriously impair cardiovascular function. High doses of morphine and Fentanyl are associated with vagus-mediated bradycardia. That is why you might see the patient get bradycardic after a Fentanyl bolus, and it is producing its analgesic effects. It helps to attenuate the adrenergic response to stimulation. In our case, that stimulation is the vent in the endotracheal tube. Picture your patient in ICU on Versed and Fentanyl drips, the combination working synergistically, and with the addition of the Fentanyl, you see some bradycardia, venodilation, and decreased sympathetic reflexes. It is not uncommon to see blood pressure fall a little bit in patients supported on low-dose vasopressors. At least at my facility, there has been a trend of seeing fewer morphine infusions being used. I have not seen it used in years.
Fentanyl and Dilaudid have a reputation for being cleaner drugs in terms of clearance and side effects. Morphine also evokes histamine release, and it can lead to profound drops and systemic vascular resistance and arterial pressure, decreasing its popularity because its ability to depress ventilation is excellent for patients on the ventilator, particularly in patients who need full ventilatory support for sick lungs. The drive to breathe despite increased PCO2 is blunted with Opioids—also, the hypoxic drive decreases. The respiratory centers in the brainstem mediate these effects. It is also important to note that Opioids can induce chest wall rigidity severe enough to prevent adequate ventilation; this usually occurs with substantial doses not commonly given in the ICU. I have never seen it, but if we ever did see it, the treatment is a paralytic agent, which, again, we will talk about shortly. Finally, I would like to mention that Opioids can also blunt the bronchoconstrictive response to airway stimulation during intubation, making Opioids ideal drugs for pre-intubation or even "bolusing" for bronchoscopy in the ICU. You will notice lower peak pressures as bronchoconstriction resolves.
Dexmedetomidine (Precedex)
Another anesthetic agent you might see for sedation that is not used for standard and intubation but will undoubtedly be used to help with mechanically ventilated patients is Dexmedetomidine or Precedex. Precedex is a centrally acting highly selective Alpha2 adrenergic agonists properties that proved very useful in the intubated patient.
First, it has potent sedative and analgesic expiring properties. In therapeutic doses, it does not cause respiratory depression, making it extremely attractive for infusion sedation. However, it causes reduced sympathetic outflow. Blood pressure and heart rate drops can be seen. Because of its properties, it is a valuable agent in the ICU. Patients can even be weaned from other sedatives and mechanical ventilation faster with it on and be extubated without discontinuing this infusion. I mentioned the Opioid. We can reduce Opioid use in a patient on Precedex, subsequently avoiding unneeded respiratory depression when we need it from the ventilator.
Back to our patient, we now have a few drugs in our arsenal working for him, Versed, Fentanyl, maybe Precedex if he needs another. You can try a combination of all the medications we discussed, in particular Propofol and or Ketamine. Sometimes Propofol can be used alone if you anticipate a short intubation period due to relatively rapid recovery. However, our patient is sick. His lung compliance is worsening, showing signs of acute respiratory distress syndrome (ARDS). Our vent settings are unnatural with lung protective strategies in place.
Neuromuscular Junction
Despite all we are doing with pharmacology, he is dyssynchronous on the event, he is “desatting” despite sedation boluses your ABG is looking worse, you notice occasional bucking on the vent, and with each cough, there is significant desaturation. He is not happy with what we require on the vent for him. Along with fewer collaborations, the team decides he is receiving enough sedation and pain control. At a certain point, you and your ICU team need to consider neuromuscular blocking agents or paralytics—first, a little background on how these agents work and where they work with regular neuromuscular transmission. The neuromuscular junction is a region between a motor neuron and a muscle cell (as shown in Figure 9).
Figure 9. Illustration of the Neuromuscular Junction. Source: Paul Hege, CC BY-SA via Wikimedia Commons.
Cell membranes of the neurons and muscle fiber are separated by a narrow gap called the synaptic cleft, which you will see right here. The nerve action potential and various ion release, acetylcholine molecules, a neuro-transmitter, diffuse across the synaptic cleft to bind specific areas on the muscle membrane, the motor endplate. Right here, you'll see these acetylcholine receptors. Once an inflate potential is generated, the muscle here contracts, the breakdown of acetylcholine by an enzyme, acetylcholinesterase, eventually causes the muscle to relax. So our neuromuscular blocking agents are divided into two classes, the polarizing and nondepolarizing. The difference lies in the mechanism of action.
Succinylcholine
Let's go back in time to the guy we intubated. Once we decided to intubate, someone in the crowded room shouted, Can someone grab the succs? Succinylcholine is our only depolarizing muscle relaxant, similar to a seat of acetylcholine which causes the muscle to contract or depolarize. Succinylcholine will occupy the receptor constantly stimulated, supercharge the postsynaptic membrane and cause action potentials to fire over and over again. By doing this, they essentially tire out the postsynaptic membrane. This excitement to rephase is going to present as muscle contraction to you. We call these contractions fasciculations and will present as mild to intense depending on your patient's size or muscle mass.
I have had some elderly patients who may show little to no fasciculations and young adult females or males with strong ones. When I say strong, I mean pretty impressive, almost looking like they are trying to wiggle their way off the bed. Once after Succinylcholine administration, I had a physician at the foot of the bed shout, Hey, this guy tried to kick me. The popularity of Succinylcholine is due to its rapid onset of action, about 30 to 60 seconds, and its short duration of action, around 10 minutes, making it ideal for intubation. Despite its many advantages, it has some drawbacks to keep in mind because normal muscle releases enough potassium during Succinylcholine-induced depolarization to raise serum potassium levels by about 0. 5 milliequivalents per liter. It can be life-threatening and patients with hyperkalemia. We see this often in patients with renal disease, burn injury, or massive trauma, among other conditions. If you are ever concerned about a patient's potassium level, you are better off not using Succinylcholine for intubation. Aside from increasing potassium level, it can induce muscle pain, increase intraocular pressure, intracranial pressure, or even induce a life-threatening condition called malignant hyperthermia.
Nondepolarizing Relaxants
Let's say our guy, for whatever reason, had a potassium level of 5.8, and we were alerted he had a history of renal disease. For us, Succinylcholine is ruled out. What do we use? What was our paralytic of choice for our intubation earlier? Well, we played it safe and went with a class of paralytics known as the nondepolarizers. In contrast to our Succinylcholine (depolarizer), there is a wide selection of non-depolarizers, Rocuronium, Vecuronium, Cisatracurium, to name a few. Due to the drug agents' longer duration of action, they are ideal for muscle relaxation during surgery and, in our patient's case, for intubation who has a high potassium level and the need for paralysis to permit de-recruitment from asynchrony on the ventilator.
Why do we even need paralysis for intubation? Paralysis will drastically improve intubating conditions. Your patient will be flaccid, making it easier to ventilate them, their vocal cords will be relaxed, and paralysis guarantees no diaphragmatic movement. The literature on this is convincing. Studies have shown that emergent intubations without the use of paralytic agents lead to an increase in adverse events. More recently, Walls et al. (2011) looked at 8,937 emergency department intubations and found that the likelihood of any associated event was 1.7 times higher with sedation without paralytics comparing to using sedation with paralytics. It is important to note the paralytics do just that. They only paralyze. When administrating a sedative before a paralytic, make sure the onset of your sedative has the same onset of action as your paralytics as there will be no awareness.
That takes us back to our guy. We did that. We gave Etomidate and chose our nondepolarizing agent, Rocuronium, because you will often see it used for rapid sequence induction with the comparable onset time to Succinylcholine, but it will last a bit longer. A rapid sequence induction dose usually lasts about 45 minutes to an hour, depending on the patient's metabolism, but how is it working differently from Succinylcholine? Our nondepolarizers bind acetylcholine receptors and sit there, blocking all activity. To compensate for its longer onset time, we have to increase the standard dose for the rapid sequence induction, at least 1.2 milligrams per kilogram IV, and about 45 to 60 seconds for adequate intubation conditions is the waiting period.
Let's recap. We have done a lot for this patient in a short time. We have opted to intubate. We used our sedative Etomidate then administered Rocuronium, avoiding Succinylcholine due to its elevated potassium level. We knew the Etomidate would wear off within a few minutes, our nursing staff was ready with Versed and Fentanyl drips to maximize comfort, given he was on the ventilator as the Rocuronium that we used for intubation was wearing off. He began to cough, buck the ventilator, and sedation boluses worked until his lungs became challenging to ventilate. As our ventilator settings changed, he was not happy. We opted to maintain sedation and added a paralytic to avoid the recruitment, increased oxygen consumption, and dyssynchrony on the vent. Nice work.
Ventilator Weaning
Days pass and the patient's lungs begin to heal. The paralytic is no longer necessary. We begin to show signs of improvement overall. The set requirements are minimum, so how will we smoothly wean this guy off sedation for his extubation? Well, truthfully, weaning sedation should be tailored to the individual patient. As patient conditions improve, this is something that should be worked on daily. If you were to go on your computer and do a Google search, the yield would be high for various methods. Indeed, an arena of critical care medicine where the opinion-based practice is currently hard to avoid because robust evidence is lacking. I can give you some general guidelines, and my references will point you to a few areas for help, but this entire topic could easily be worthy of another separate presentation.
However, I will say that long-acting medications like benzos should be weaned first, and literature supports that. Remember also that there are medications that you can keep on while working on extubation. In my experience, low dose Opioids and or Precedex are preferable and perfectly acceptable to keep on as long as they do not affect your patient's respiratory status. Another thing to remember is that rapid and abrupt termination of an established sedative regimen should be avoided, primarily when longer-acting sedatives have been used. It could lead to withdrawal symptoms. Frequent signs of withdrawal include agitation, diarrhea, fever, tachypnea lacrimation, and hyperactive delirium. According to one recent study, patients who developed a withdrawal syndrome spent almost double the amount of time receiving mechanical ventilation. It is important to note that some of these symptoms may mimic respiratory distress on the vent that may lead you to think the patient is not ready for extubation. Imperative to use drug strategies to help for a smooth and uneventful wean.
Let's say, for our purposes, our patient is doing fine and as we wean, and his vent settings are minimal. He is doing great with spontaneous breathing trials, his Benzodiazepine has off, and he is following commands. He is on low-dose Precedex, and you alert the nurse when he gets tachypnea mildly. When the nurse gives a small dose of Opioids, in this case, Fentanyl, the patient calms down and continues to pull adequate volumes. Everything points to, hey, this guy is ready to extubate.
What About a Cuff Leak?
Kuriyama & Kamei (2020) concluded laryngeal edema and airway obstruction following extubation is a major cause of extubation failure. Post-extubation stridor, its clinical sign, has a reported incidence of 2–26% and frequently results in reintubation. Reintubation is associated with an increase in morbidity, duration of mechanical ventilation, and ICU stay. The cuff leak test has excellent specificity but low to moderate sensitivity for post-extubation airway obstruction. Your input and the Intensivist both decide the patient is ready, but the nurse says there is no cuff leak (see Figure 10).
Figure 10. Illustration of an endotracheal tube and inflated cuff. Source: Continued (licensed from Getty Images).
What are your thoughts? Should you hold off? Well, honestly, opinions vary on this topic. Most evidence suggests that the cuff leak test has excellent specificity but low to moderate sensitivity for post-extubation airway obstruction. It can be a valuable tool in deciding whether or not to extubate a patient, but the low sensitivity suggests that a negative test, meaning the presence of a leak, cannot wholly exclude post-extubation airway obstruction.
Therefore, this test should not be the sole variable in deciding to extubate if all other factors suggest you should. The team and their collaborative efforts should decide if it is safe and factor in other things such as, was the patient a difficult airway upon initial intubation? Does there continue to be airway swelling? Do you think there may be encrusted secretions accounting for no-leak rather than upper airway swelling? My point is here, what your team deems the higher-risk patient, it is probably safer to give steroids and wait, but if they are not, it might be perfectly acceptable to extubate. The global picture and context of your patient's history and condition should be factored in as well.
Clinical Pearls of Wisdom
Finally, to wrap it up, some clinical anesthesia pearls. When we, the CRNAs, come from the OR and you are in the ICU ready for us to transfer care, the detailed report should paint a clear picture of what is coming to you. Sometimes we bring intubated patients, extubated ones, wide-awake ones, sleepy ones, and some unpredictable. Ideally, the transfer of care is smooth and uneventful, but sometimes anesthetics can be unpredictable. If the surgery was long, then it is possible that the inhalational agent or anesthetic gas is not washed out of the patient's system. Quite commonly, you will see some mild tachypnea that is directly related to the inhalational agent. But this should resolve within a few minutes, something you to be aware of. So back to the toolbox. I mentioned a few things I keep handy, but there is so much more, keep in mind for this presentation. In our airway scenario, I talked about what we used and the must-haves, but we are never limited to those. Fiber optic scopes, bougies, colorimetric detectors are some other things I know are immediately available to me. You need to become familiar with what you have available at your facility. The last thing, in any clinical situation, do not to forget to look at your patient. With today's technology, we can sometimes become lost in the monitors, the numbers, labs, vent settings, and those things are plentiful in the holistic picture, but looking at and observing your patient should not be lost in the shuffle, after all, that is whom we are taking care of.
Question and Answers
Are there ever instances where you would absolutely not use a neuromuscular blocking agent for intubation?
That is a great question. Well, I do not like to ever think of absolutes, but I will say that I certainly do my best to avoid them in patients who have a history of a difficult airway. For these patients, I might try to intubate with higher doses of hypnotic sedative agents like higher dose Propofol and avoid paralytic and take a look with a video scope or depending on the history, what do you mean to consider awake fiberoptic intubation, where I would use local anesthetics to numb up the airway and keep them breathing on their own. At the same time, I enter the trachea with a scope first. Another situation that I would avoid paralytics is in the case of an anterior mediastinal mass. Why? There's a potential for major airway and vascular or compression with these patients, and the paralytic dose could be fatal to them. Useful strategies to consider for these types of patients include awake fiberoptic intubation, maintenance of spontaneous ventilation as mentioned avoidance of muscle relaxants, intubation distal to the airway compression with the ENT team presence, positioning changes, immediate availability of rigid bronchoscopy, and you might even consider elective cardiopulmonary bypass in extreme cases. And then, of course, as mentioned in my talk, sometimes a patient is actively coding, and for those patients, they are usually already flaccid. There is no need for paralytics or drugs, period.
Are the muscle relaxants reversible and how often do you use these reverse agents?
I did not talk about the reversal muscle relaxants. It is a good question. The classic paralytics known as the nondepolarizers that I talked about are reversible. We use a drug called neostigmine, which is in the drug class known as cholinesterase inhibitors. These drugs indirectly increase the acetylcholine available to compete with whatever nondepolarizing agent we use for paralysis. If timed right, the reversal process optimizes within about seven to 12 minutes. Because of the side effects and neostigmine, one being bradycardia, we always couple it with a drug that counteracts this bradycardia, known as glycopyrrolate or ropinirole. There is some art form to all this, and I will not go into detail, but these drugs have to be adequately timed and given to optimize the patient's condition for extubation. We usually give this combination of reversal agents at the end of an operation where we are getting ready for the emergence of anesthesia. Another more recently introduced agent is Sugammadex, and this is a reversal more specific for rocuronium and vecuronium, both of which are nondepolarizers. Its mechanism of action works differently, but its popularity is definitely on the rise, and you do not have to couple it with another medication. As far as the reversible agents for Succinylcholine, I have been asked that question specifically, is there a reversal for Succinylcholine? All I can tell you is if the only thing that reverses it is time, and luckily, because it is a short duration of action, that time is not too long, about 8 to 10 minutes. This is a topic that we can discuss more with RTs and anesthesia collaborating specifically in critical care. I mean, there is still so much more information out there, and the gap between anesthesia and respiratory therapy in critical care is narrowing, and there must be more overlap of the knowledge base.
References
Arroyo-Novoa, C. M., Figueroa-Ramos, M. I., Balas, M., Rodríguez, P., Puntillo, K. A. (2020). Opioid and Benzodiazepine Withdrawal Syndromes in Trauma ICU Patients: A Prospective Exploratory Study. Critical care explorations, 2(4), e0089.
Conti, G., Mantz, J., Longrois, D., Tonner, P. (2014). Sedation and weaning from mechanical ventilation: time for 'best practice' to catch up with new realities?. Multidisciplinary respiratory medicine, 9(1), 45.
Kim, H. J., Kim, S. H., Min, N. H., Park, W. K. (2016). Determination of the appropriate sizes of oropharyngeal airways in adults: correlation with external facial measurements: A randomised crossover study. European journal of anaesthesiology, 33(12), 936–942.
Kuriyama, A., Jackson, J.L., Kamei, J. Performance of the cuff leak test in adults in predicting post-extubation airway complications: a systematic review and meta-analysis.Crit Care 24, 640 (2020).
Lafferty, MD, K., Windle, PharmD, M., & Dillinger, R. (2019). What is the benefit of paralytic agents during tracheal intubation? Medscape. Published.
Morgan, G., Mikhail, M., Murray, M. (2005). Clinical Anesthesiology, 4th Edition (4th ed.). McGraw-Hill Medical.
Nouruzi-Sedeh, P., Schumann, M., Groeben, H. (2009). Laryngoscopy via Macintosh blade versus GlideScope: success rate and time for endotracheal intubation in untrained medical personnel. Anesthesiology, 110(1), 32–37.
Walls, R. M., Brown, C. A., 3rd, Bair, A. E., Pallin, D. J., NEAR II Investigators (2011). Emergency airway management: a multi-center report of 8937 emergency department intubations. The Journal of emergency medicine, 41(4), 347–354.
Citation
Vela, S. (2021). What’s anesthesia got to do with it? Continued.com - Respiratory Therapy, Article 94. Available at www.continued.com/respiratory-therapy
Jun 29, 2021
1 CE Hour