Course Articles
Autogenic Drainage: Technique for Airway Clearance
Duane Reed, RRT, RCP, EdD
Editor’s note: This text-based course is an edited transcript of the webinar, Autogenic Drainage: Technique for Airway Clearance, presented by Duane Reed, EdD, RRT, RCP.
It is recommended that you download the course handout to supplement this text format.
Learning Outcomes
After this course, participants will be able to:- Explain the indications for performing autogenic drainage
- Describe the benefits of implementing autogenic drainage
- Identify the procedure for set-up and troubleshooting autogenic drainage
Introduction
We will discuss autogenic drainage techniques for airway clearance management. We will demonstrate how respiratory therapists teach patients the autogenic drainage technique. One thing you need to know about it is it can take several days to learn. It is a difficult subject to teach someone, but once they learn it, it can help them be self-sufficient when trying to remove secretions. Another thing, the patient should know how to do the diaphragmatic breathing technique because it is similar and one of the things that will help the patient to understand what autogenic drainage is all about. The technique requires training, concentration, and effort from the individual. We will include instruction because we will teach the patient how to do this for themselves. We will talk about exactly what autogenic drainage will do and how it is an adequate technique for patients to move some of the secretions without buying expensive devices. In the hospital, we use positive expiratory pressure (PEP) devices and vests, but autogenic drainage is something that a patient can do at home. Once we can get this technique down, we can have the patient learn how to move the secretions without any devices. That is a good thing that I like about autogenic drainage.
What is Autogenic Drainage (AD)?
Autogenic drainage is an airway clearance technique that Jean Chevaillier developed in 1967. Autogenic drainage means "self-drainage" by definition. It is characterized by breath control and self-drainage. The different breathing frequencies are used to mobilize secretions from the lower to the upper airway. It is all about how the patient will control his breathing. The patient focuses on adjusting the rate, how fast the patient breathes, the depth of how they breathe, and the location. We are teaching the patient how fast to breathe, how deep to breathe, and where the location of the movement of the lung volume during respiration.
We are teaching the patient to do this technique to move their secretions from the lower airway until it gets to the upper airway. It sounds like a lot, but once you do it a few times, the patient gets it down. It is not as hard as it looks, but the first time you ever do it might be challenging. That is why I wanted to do this presentation. If you have more expensive secretion-moving devices the patient can use, that is totally different. This is for the patient to learn how to move secretions independently, which I think is a big deal if you can teach them how to do it. We know what will happen once the secretions get to the upper airway when the coughing mechanism occurs, and we can have them cough up the sputum. When we get to the coughing section, we will discuss the huff maneuver and the huff cough. This is also going to be a part of the autogenic drainage.
What is the Autogenic Drainage Principle?
Autogenic drainage is based on multiple principles in which the patient is able to achieve airway clearance independently. Autogenic drainage consists of controlled expiratory and inspiratory reserve volume breathing that is practiced at different levels of lung volume. In this, the subject self-adjusts the force or velocity of the expiratory airflow at different levels of inspiration in order to reach the maximum possible airflow generated in the bronchi without resulting in airway collapses during coughing. The respiratory therapist will teach the patient. Then the patient will be able to achieve airway clearance independently. Remember, it is adapted to their own pathology and pulmonary function. It might be a good idea to have a pulmonary function test on hand to understand the disease pathology that the patient has.
Indications for Autogenic Drainage
- Treat patients with retained secretions
- Treat patients with asthma
- Treat patients with cystic fibrosis
In the past mainly, this was done for cystic fibrosis patients, but as we go through the presentation you will see that it is not only for those patient populations. In the 1980s, the autogenic drainage technique was used throughout Europe for the treatment of patients with asthma who had retention of secretions in the chest and difficulty in clearing the secretions. Who will use autogenic drainage? Anyone with retained secretions is eligible to do autogenic drainage. Retained secretions will decrease flow and lung volume, causing atelectasis and other complications. As we mentioned, it was originally used to treat patients with cystic fibrosis and asthma, but it is not the only thing we can use it for. Anybody with retained secretions that you think will benefit from autogenic drainage, I would try it.
Benefits of Using Autogenic Drainage
- No equipment needed
- Can perform airway clearance as an independent procedure
- Less coughing effort is needed for sputum production
In the past mainly, this was done for cystic fibrosis patients, but it is not only for those patient populations. In the 1980s, the autogenic drainage technique was used throughout Europe for the treatment of patients with asthma who had retention of secretions in the chest and difficulty in clearing the secretions. You do not have to look for equipment, nor is it required. PEP devices, acapella, and vest equipment are not needed. We teach a technique that has been lost in many of the therapy of today because there is much equipment out there. The patient can perform airway clearance as an independent procedure. We know that many patients, if they are weaker, have trouble with their cough, and they are not able to cough effectively as you would think. With this procedure, it requires less coughing because you are going to move the secretions with the technique, and in order to get it to the areas or "zones" that you need to get to, you will not have to cough as effortfully. It is almost like the PEP device where you can do the huff maneuver that would cause you to cough as well. We will talk about it when we get to that section.
Disadvantages of using Autogenic Drainage
- Patient needs to be over the age of eight
- Technique can be difficult to teach
- Patients need the cognitive ability to understand the physiology behind the methods you are teaching
There are always disadvantages to anything, even though we are not presenting or using a device. One is age specific. The patient needs to be over the age of eight years old. If you are going to consider using autogenic drainage on patients, including patients with cystic fibrosis, we want to make sure that the patient should be at least eight or over the age of eight years old. Yes, the technique can be difficult to teach. As we get through this presentation we hope to make it a little easier for you to understand. It can be difficult to teach, and you might have to do it multiple times. For example, you may have to practice for up to three or four days sometimes before the patient is able to grasp it. It depends on the patient and their condition. The patient will need some cognitive ability to understand the physiology behind the methods you are teaching. If they have some cognitive impairments and cannot follow directions, they might not be a good candidate for autogenic drainage. So not a lot of disadvantages to something that you can teach someone to do.
Autogenic Drainage Rationale
Autogenic drainage aims to reach the highest possible expiratory airflow in different generations of the bronchi simultaneously with an active but not forced expiration. We are going to say that again. Autogenic drainage aims to reach the highest possible expiratory flow rate. Breathing out in different generations of the bronchi. It can be from the large bronchi all the way down to the terminal bronchi in three phases, starting in the smaller areas and working our way up. Chevaillier previously described these three phases as ‘unstick,’ ‘collect,’ and ‘evacuate.’ Nowadays, these phases are not looked at as separate, yet rather that they blend into one another.
The different levels of the lungs we call zones. Autogenic drainage is a technique that requires commitment from the individual. Autogenic drainage is a controlled technique of breathing that uses different depths and speeds of exhaled breath to move mucus up the airways resulting in a spontaneous or voluntary cough. It can be used without help but requires training, concentration, and effort. The rationale for the technique is the generation of shearing forces induced by airflow. The speed of the expiratory flow may mobilize secretions by shearing them from the bronchial walls and transporting them to the central airways. The main objective is to transport secretions to the upper airways by using the principle of shearing and flow. Autogenic drainage aims to move the secretions to a different area.
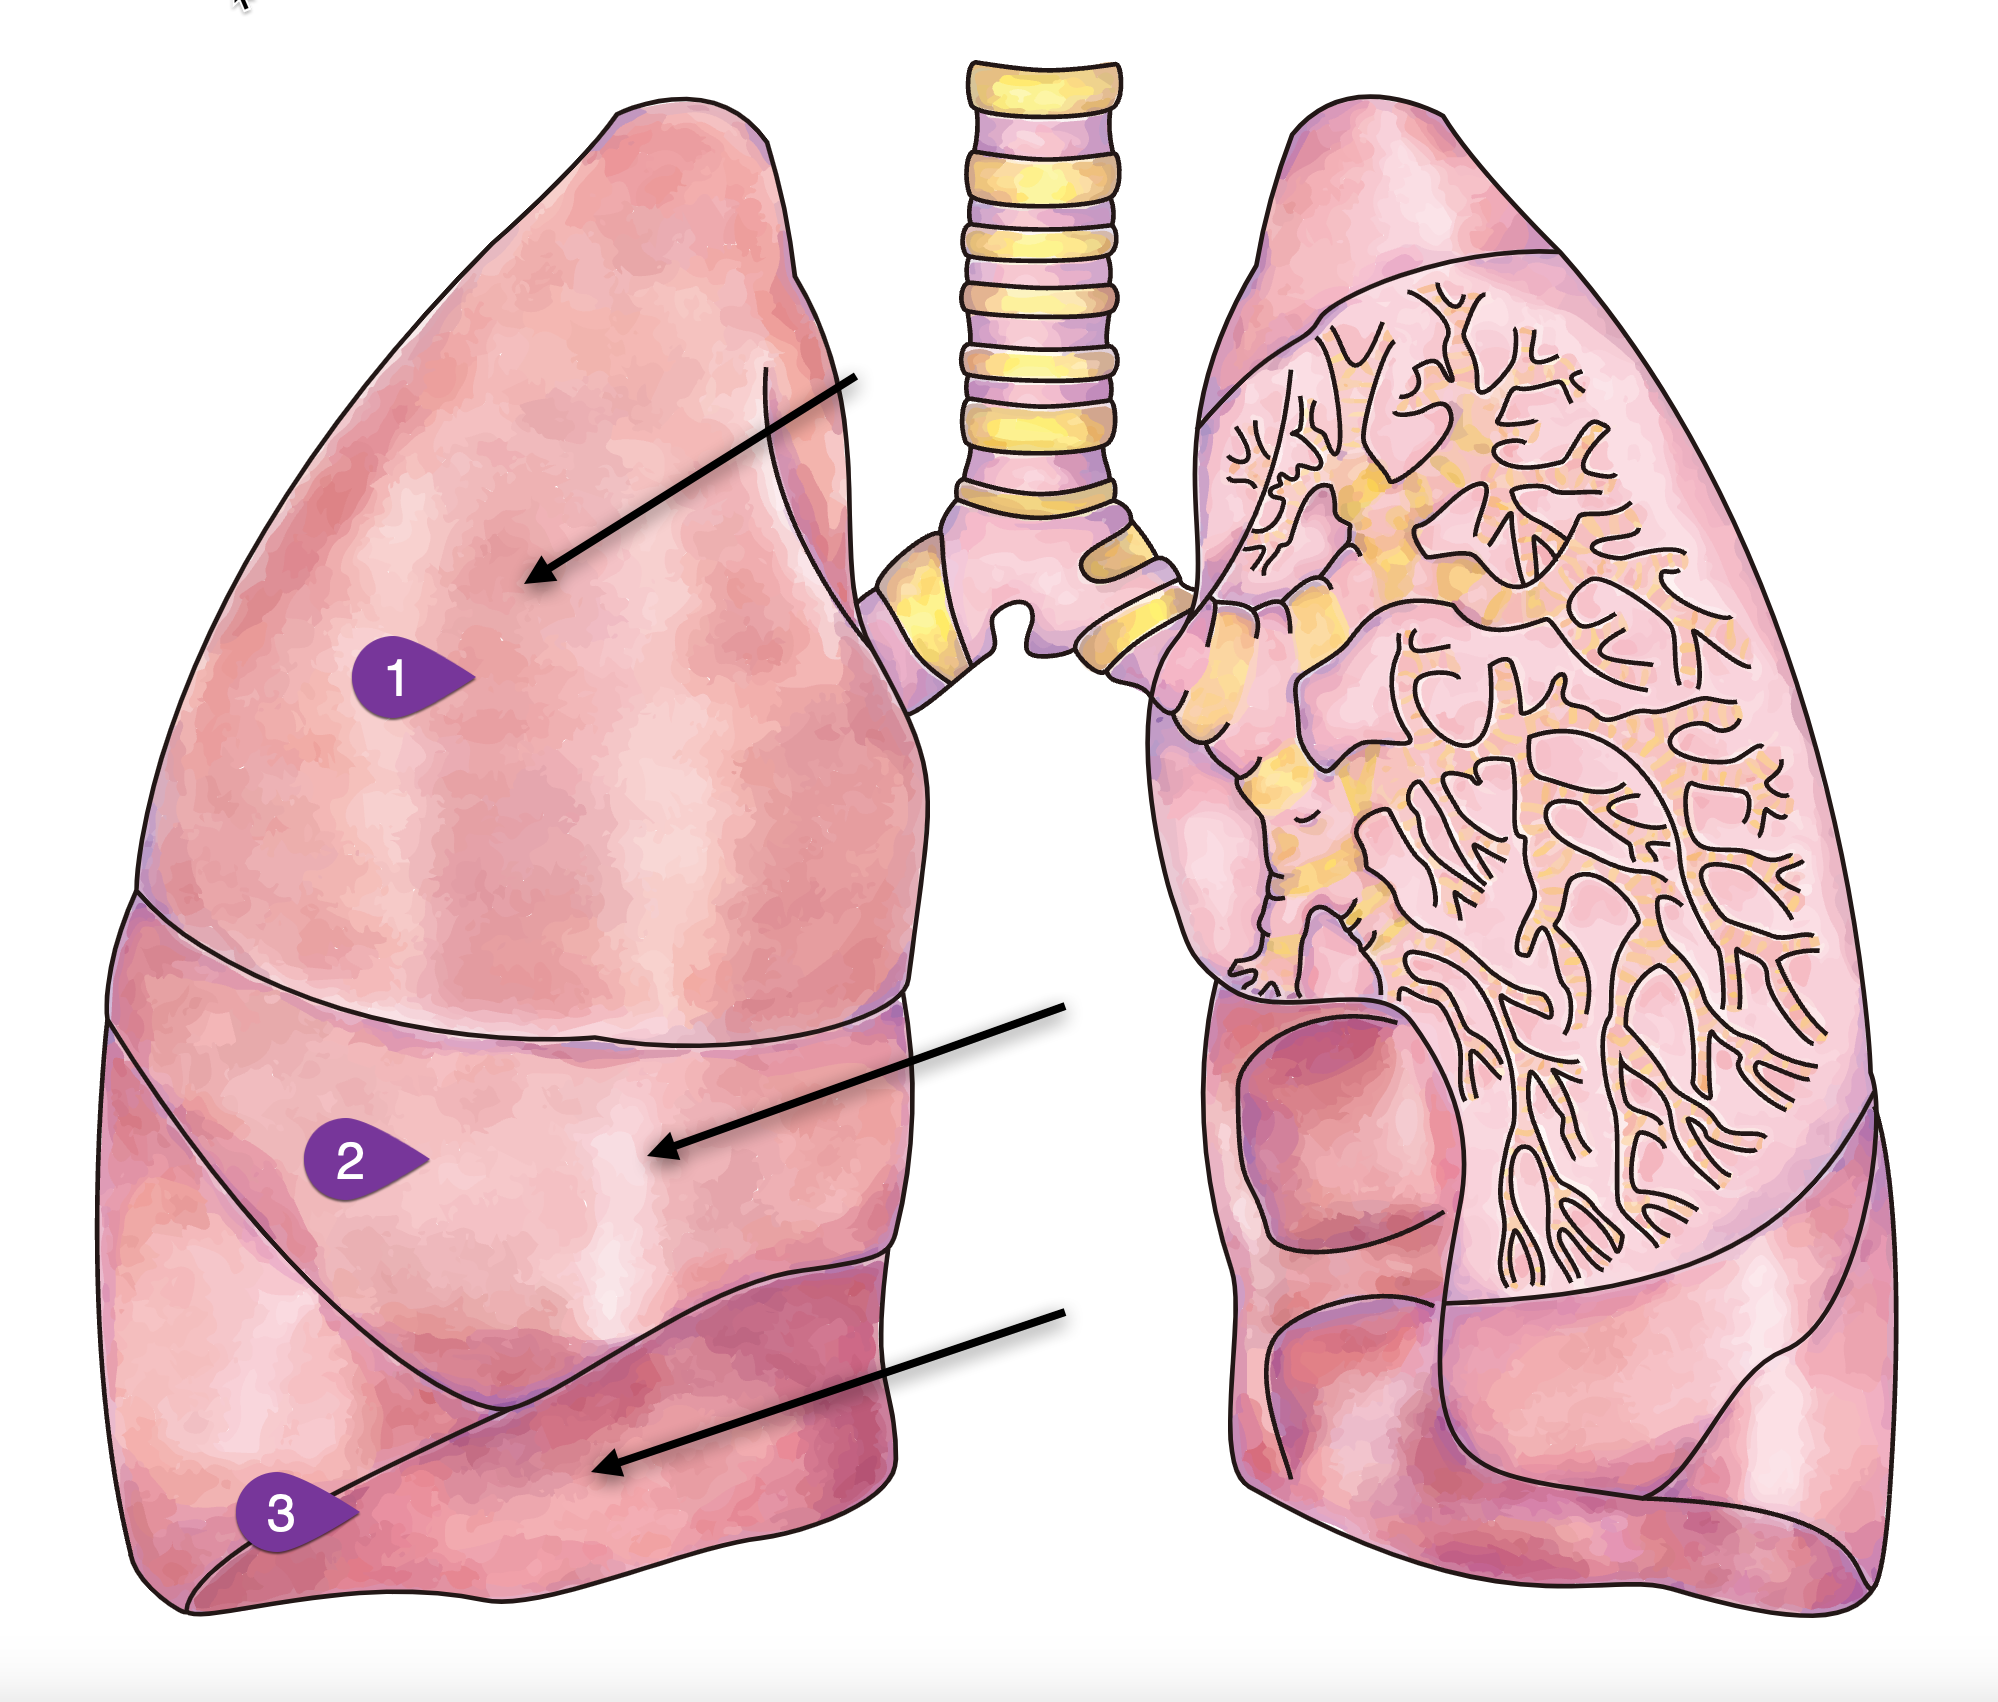
We are going to start low, at the lower generations of the lungs, and we are going to work up by using this technique. We talk about the different areas of the lungs, which are called drainage zones. In Figure 1, you have three drainage zones. We will use our technique to move secretions from zone one, your smaller peripheral airways, which are deeper into your lungs. Then from zone two, we call that your middle airway. Finally, zone three is going to be your large central airways. Our goal is to use the zones from one to three, moving those secretions from the peripheral airways, middle lobes, and then to your larger central airways in order to be able to cough up the secretions. When we talk to the patients about that, they sometimes do not understand the technique.
In zone one, we are going to try to unstick the mucus. The smaller airways are where your zone one is, and it does not take much to decrease the radius in that area. It is where your mucus gets stuck, and we have to unstick them with autogenic drainage therapy. When we move to zone two, we can start getting ready to collect the mucus. When we go to zone three, that is what we call excavating or coughing it up at that point.
Figure 1. Illustration of lung drainage zones.
What Is the Goal of Autogenic Drainage?
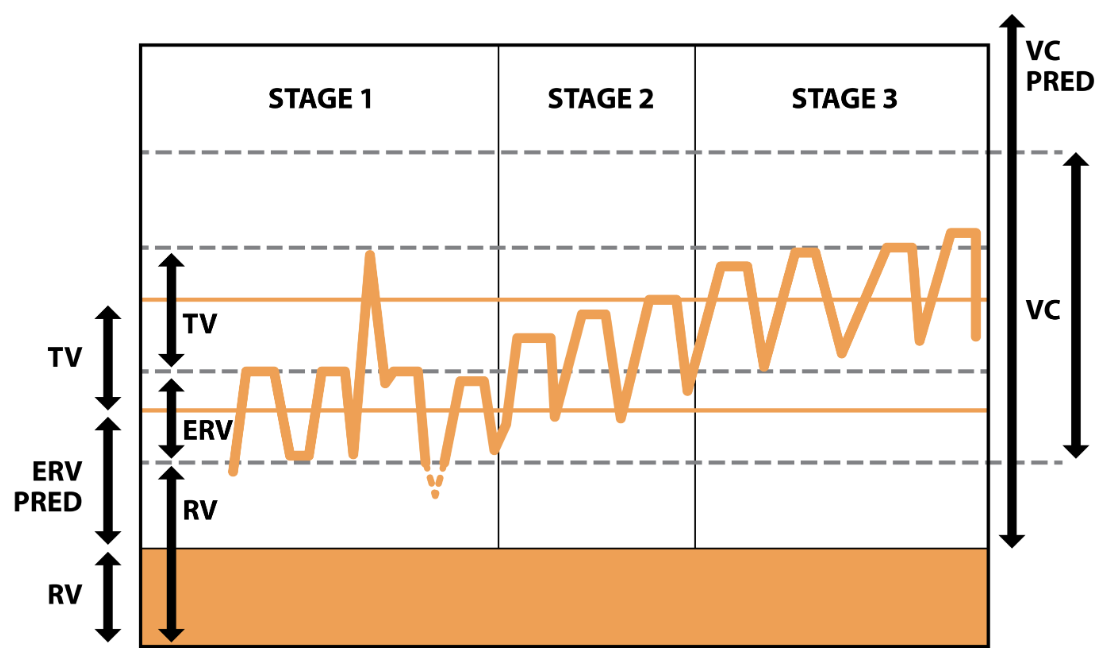
Figure 2. The 3 phases of autogenic drainage (Image source: physiopedia.com).
- Stage 1: Low lung breaths to mobilize secretions from the peripheral airways
- Stage 2: Medium (tidal) volume breaths to collect mucus from the middle airways
- Stage 3: Large volume breaths enabling expectoration from the central airways
Now we are talking about the secretions systematically transported from the peripheral airway to the more central airways by breathing at lower lung volumes. From the expiratory reserve volume (ERV) to progressively higher lung volumes in the inspiratory reserve volume (IRV). We call these stages (Figure 2). The expiratory reserve volume is below your tidal volume. We will start low and then go higher to your inspiratory reserve volume. Your inspiratory reserve volume sits on top of your tidal volume, and it is closer to stage three, where we are trying to cough it all out. It helps to know a little about your pulmonary function tests (PFT), which, if you are a respiratory therapist, you understand what ERV and IRV are. If you look at the graph in Figure 2, you see Stage one, Stage two, and Stage three. Stage one is where the low-volume breaths mobilize secretions from the peripheral airways. Stage two is the medium tidal volume breath to collect mucus from the middle airways. Stage three, the large volume breaths would enable expectoration or coughing up from the central airway. If you take a snapshot of your lungs or do a PFT simultaneously performing autogenic drainage it would look similar to Figure 2. Starting low, remember the ERV is below the tidal volume, then you would go up to your inspiratory reserve, above the tidal volume. If you can visualize how your lungs are moving secretions from the lower to the upper part of your airways, then you can cough it out. A lot of times, when we look at the PFT graphs, we do not think about it simplistically enough.
Autogenic Drainage Frequency and Length of the Sessions
The autogenic procedure sounds more difficult than it is, but I have to admit you have to do this a few times before you get the hang of it. Do not let it discourage you when you are trying, and your patient does not feel the mucus, or you do not see it but feel it. If you keep doing the procedure, it is very successful but takes some work. Once a patient understands how a procedure works and are asked to do the procedure themselves, they usually will continue to do the procedure.
- The length and frequency of a session is dependent on the disease severity, knowledge of the technique, quantity of secretions, etc.
- The goal is to clear the most secretions possible by the last of the treatment so that previously obstructed areas of the lung re-expand.
- The more retained secretions, the more frequency times and/or sessions per day are recommended
Stage 1
Phase 1: Moving the mucus from the small airways (unsticking)
- Start with breathing control: air in, air out
- Relax
- Take in a deep breath and blow all of the air out of your lungs until you feel like the lungs are empty of air
- Once the lungs are empty take in a small breath of air through your nose.
- Hold the breath for three seconds then exhale all of the air out
- Repeat this two to three times (cff.org)
Stage one is located in the lower peripheral airways, and in this stage, it is basically used to what we call "unstick secretions." First, the patient breathes in as much air out of their lungs as they can. Second, they take a small breath, feeling their stomach, and breathe at the bottom of the chest using their hands. If you demonstrate it to yourself, you can see what the patient is doing when the patient is trying to unstick their secretions. You breathe as much air out of your lung and then start taking smaller breaths while holding the bottom of your stomach and abdomen area. During Stage one, you may hear, or they may hear secretions, and it starts to crackle. At this stage, we are in the lower peripheral airway. The patient resists any desire to cough during this stage.
By using slow deep air movement, the patient will loosen the peripheral secretions by breathing at low lung volumes. You start taking big, deep breaths, which will probably force you to cough. Even though you might hear secretions start to crackle, this is not the time for the patient to cough, and you must tell them that. As we go through the procedure, secretions are not ready to come up because they are still deep in the airways, but it is a good technique to loosen them up. We are "unsticking" the secretions. All we are trying to do is to unstick the airways during this stage.
Stage 2
Phase 2: Moving mucus from the small airways to the medium-sized airways (collecting)
- Take in a normal sized breath
- Hold the breath for three seconds
- With some gentle force exhale all of the air out of your lungs. This may make you feel like you want to cough but hold the cough to the very end
- Repeat three times (cff.org)
Stage two is used to collect secretions as the crackles of the secretions start to get louder, and why you want the patient to resist coughing in stage one. When you start to hear a lot of crackles during this time. As the crackles get louder, you tell the patient to take medium breaths. As the secretions move upward we can breathe in a little more, but we will continue the small breaths out. You have to remember that when you are teaching the patient how to do autogenic drainage, remind them not to exhale forcefully. You tell the patient to continue to take the small breaths out but to have them breathe in more.
Once you finish stage two, you need to repeat it. Do not jump to stage three. You will repeat stage two for at least three breaths. Continue collecting secretions to the central airways by breathing at low to middle lung volumes. Remember when you were in stage one, you were breathing only low lung volumes, but now you are increasing from low to middle lung volumes, and the breaths are slow mid-range air movements. We are not to the point where we are ready to start telling the patient to cough, but we are getting there, and the patient can feel the secretions in the mid-central area of the lungs. You have to make sure when teaching it will take some time to learn. The breathing pattern is going to be big when it comes to being successful in teaching someone autogenic drainage.
Stage 3
Phase 3: Moving mucus from the medium-sized airways to the large airways to be coughed out (evacuation)
- Take in a deep breath
- Hold for three seconds
- With gentle force, exhale all of the air out of your lungs
- Repeat three times
- Do not cough until after the third breath
- Each phase should take two to three minutes to complete. Completing all three phases (one cycle) should take about six to nine minutes to complete
- Repeat the cycle until you have cleared your lungs as much as possible, which should take between 20 and 45 minutes (cff.org)
We have moved the secretions up midway, and now we are ready for stage three to excavate the secretions. Stage three is used to move the secretions when the crackles are louder. The patient will take long, slow, full breaths into maximum inspiration while continuing to take small breaths out. Remember, the expiratory phase is going to remain small. The patient will repeat stage three for at least three breaths. The patient will expel secretions from the central airways by breathing at mid to high lung volumes (shallow air movements). This is the stage where you will start to get rid of the secretions. Here we can have the patient do the huff cough that can cause the patient to want to cough up as well. The patient inhales a deep breath which is to be followed by the huff cough maneuver. The patient should never huff cough to the point of exhaustion.
The huff cough is a gentle way of coughing, which speeds up airflow while you keep the throat open. To save energy and oxygen, you must practice and master the method of controlled huff cough.
- Begin in a sitting position with your chin slightly upward
- Use your diaphragm (stomach muscle) for breathing in slowly
- Hold your breath for 2 to 3 seconds
- Force the breath out your mouth in one quick burst of air
- Make sure the back of your throat is kept open
- Perform 2 or 3 huff breaths
- Cough when you feel the mucus collected in your breathing tubes
- Repeat the huffs until you feel you have cleared mucus or you become tired
The patient will repeat stage three for at least three breaths. Then you allow the patient to expel the secretion, and the velocity of the force or the expiratory flow will help.
- Stage 1 - low volume breaths to mobilize secretions from peripheral airways
- Stage 2 - medium (tidal volume) breaths to collect mucus from the middle airways
- Stage 3 - large volume breaths enabling evacuation from central airways
Stage one, you are in the peripheral airways, and you tell the patient to have low-volume breaths to mobilize secretions. When trying to "unstick," remember the term unstick the secretion. Then stage two is when the patient can breathe in more. In this phase, you want them to exhale with not a lot of great force. In stage two, when they can breathe in medium breaths, we are "collecting the mucus" from the middle airways. When the patient gets ready to cough up, we want him to be able to cough up by having those secretions up go up to the middle and loosen those up in the middle and have that collected there. We can get ready to bring it up to the larger airway, which is stage three. The large volume of breaths, when they take deep breaths on inspiration, enables them to eliminate the secretions from the central airways. Those are the stages that you are going to have to go through, and a lot of people when who get ready to do autogenic drainage may not understand the concept behind it. If you do not do it correctly, it will not work.
Autogenic Drainage
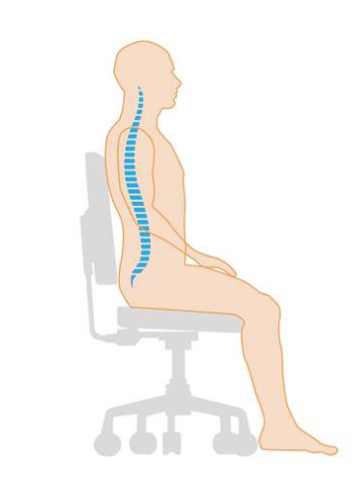
Now the actual procedure. When the doctor writes an order for autogenic drainage, what are you going to do? The first thing you need to do is choose a breathing-stimulating position like sitting or reclining. The patient can be lying down or sitting up, and they should be relaxed with the next neck slightly extended. It is better, I think if they are sitting upward, but they do not have to be. Make sure they are sitting straight up, as shown in Figure 3.
Figure 3. Illustration of sitting position.
First, have the patient clear their throat by blowing their nose and using the huff maneuver. Remember the huff maneuver that you may have seen in positive expiratory pressure devices, and there are different brands. We are getting the same result without any particular thing or device. Huffing is a technique that helps move mucus from the lungs. It involves taking a breath in, holding it, and actively exhaling. Breathing in and holding it enables air to get behind the mucus and separates it from the lung wall so it can be coughed out. Huffing is not as forceful as a cough, but it can work better and be less tiring.
Huff coughing technique:
- Sit up straight with chin tilted slightly up and mouth open
- Take a slow deep breath to fill lungs about three-quarters full
- Hold breath for two or three seconds
- Exhale forcefully, but slowly, in a continuous exhalation to move mucus from the smaller to the larger airways
- Repeat this maneuver two to three times and then follow with one strong cough to clear mucus from the larger airways (cff.org)
When breathing in, slowly have the patient breathe in through the nose to keep the upper airways open. Place hands on the diaphragm and /or abdomen if possible. Second, have the patient inhale a large breath and hold it momentarily. The patient will then breathe all the way out for as long as possible (this is low lung volume). Then the patient will take a small to normal breath in and pause. They will then hold their breath for about 3 seconds.
When breathing out, the patient will breathe out through the mouth to keep the airways open. At the low lung level, the patient will breathe using their abdominal muscles to squeeze all the air out. If you can depict or use your abdominal muscles to squeeze all the air out, that is what you will tell a patient to do. You will hear mucus when this is done correctly. You can have the patient feel the mucus vibrating. During this procedure, the patient may better understand if you let them feel. High frequencies mean that the mucus is in the small airways. Low frequencies mean that the mucus is in the large airways. Repeat the cycle and perform a huff cough to remove mucus. An example video demonstrating autogenic drainage can be viewed by clicking here.
Summary
What I want to do now is summarize what we talked about because we did talk about a lot of stuff and procedures. It is not a hard procedure, and it is not a long procedure. It is one of those procedures that you have to do correctly. We are trying to teach the patient how to move his secretions—bottom line. We talked about some indications for autogenic drainage, mainly patients that have retained secretions. Then we talked about patients who are asthmatics who also can benefit from autogenic drainage. Originally this technique was designed for cystic fibrosis patients over eight.
Some of the benefits include no equipment. The patient does not have to buy anything. All you have to do is teach them how to do it. They can use it for their self-care, which is a good tool to have as well. The hardest thing I had to do was resist, get them to resist the cough when it wasn't time. The autogenic sessions can last up to 30 minutes or longer. You continue until the patient has cleared all the secretion. If the patient cannot continue the procedure, do not wear them out, they have to stop. Do not think you are just going to go in there for a few minutes and your autogenic drainage procedure is done. No, it will take a while, and it might take some days before you say this patient has it. The patient can do this at home. You might want to explain this to the family, as it is always good to do that. When describing the technique to them, do not be in a rush.
Your main job when you working with autogenic drainage is coaching. If you ever wanted to be a coach, this will be one of those procedures where that is what you will be doing. Challenges can arise if you have some patients who may not understand and have low mental capacity, you might have difficulty trying to teach them autogenic drainage. They might be better off buying or getting devices to help them move secretions. I wanted to make sure that you are familiar with the procedure, and if you get a chance, you can try it because it does not cost anything. You want the patient can help themselves. Home care and rehab that is what it is all about having a patient become sufficient. When they call you, and they need you, you have to go and do what you need to do. The first goal of home care is to help the patient become independent. The autogenic procedure allows the patient to become independent and move their secretion independently without help.
Poll and Audience Questions & Answers
Poll 1: During phase 1 of autogenic drainage, the RT instructs the patient to breathe:
A. At low lung volumes
B. At regular tidal volumes
C. Out using large-volume breaths
D. Normally using short breaths and holding every 3 secondsWe have results from our first poll question, 88% chose answer A (at low lung volumes). We had a few that chose answer D (normally using short breaths and holding every three seconds). Let's take a look and see what the correct answer was. The correct answer is A. Remember that it is phase one. The patient takes a deep breath in and blows all his air out, and once he blows all his air out, that is at the low lung volume area. Then the patient can inhale some smaller breaths.
Poll 2: The RT explains to the patient that the reason for using autogenic drainage is to move secretions from:
A. From the larger airways to the smaller airways
B. From the smaller airways to the larger airways
C. To the midsize airways to larger airways only
D. From the large airways, onlyWe will give everyone a chance to answer the question, and then we will return and look at the poll results. From the audience, 18% chose Answer A (from the larger airways to the smaller airways), and 82% chose answer B (from the smaller airways to the larger airways). The correct answer is B (from the smaller airways to the larger airways). Most of you got that one, which is excellent. We do have a couple of questions that were in the question and
[Audience]: Is there a difference between autogenic drainage and ACBT?
ACB is an active cycle breathing technique. There is really not too much difference between those two. Mainly the terminology has changed a little bit, but both are basically trying to allow the patient to manage their secretions.
[Audience]: Can this technique be used for tracheostomy patients with thicker secretions who may tolerate capping for longer durations?
Yes, this can be used for anyone with retained secretions, whether they have a tracheostomy.
References
Bokov, P., Gerardin, M., Brialix, G., Da Costa Noble, E., Juif, R., Foucher, A. V., Le Clainche, L., Houdouin, V., Mauroy, B., & Delclaux, C. (2022). Beneficial short-term effect of autogenic drainage on peripheral resistance in childhood cystic fibrosis disease. BMC pulmonary medicine, 22(1), 241.
McCormack, P., Burnham, P., & Southern, K. W. (2017). Autogenic drainage for airway clearance in cystic fibrosis. The Cochrane database of systematic reviews, 10(10), CD009595.
Burnham, P., Stanford, G., & Stewart, R. (2021). Autogenic drainage for airway clearance in cystic fibrosis. The Cochrane database of systematic reviews, 12(12), CD009595.
Citation
Reed, D. (2022). Autogenic Drainage: Technique for Airway Clearance. Continued.com - Respiratory Therapy, Article 176. Available at www.continued.com/respiratory-therapy
Mar 10, 2023
1 CE HourHigh Flow Nasal Oxygen: What’s What!
Jessica Fino, RRT, EdD
Editor’s note: This text-based course is an edited transcript of the webinar, High Flow Nasal Oxygen: What's What!, presented by Jessica Fino, EdD, RRT.
Learning Outcomes
After this course, participants will be able to:
- Describe the different approaches to providing high flow oxygen.
- Identify the indications for use across high-flow devices.
- Recognize the role of respiratory therapists in device selection and progression of non-invasive support.
Introduction
I wanted to talk to you a little bit today about high flow nasal oxygen. There are a lot of terms that are tossed around. From my perspective, when working with students, I know there can be some confusion as some terms mean the same thing. For example, we have similar terms: high-flow nasal cannula, high-flow nasal oxygen, high-flow nasal therapy, heated high-flow nasal oxygen, heated high-flow nasal cannula. I have experience using these in acute care, the ICU, and the NICU.
What is High Flow Oxygen?
- High flow oxygen systems include those that can supply a flow that meets or exceed the patient’s peak inspiratory flow.
- These systems use air-entrainment or blending systems to create precise Fi02.
For oxygen devices, there are high-flow, low-flow, and reservoir systems. Many times, the terms high-flow and high liter flow all get mixed. When by definition, they are quite different. A high-flow oxygen therapy system includes those that supply a flow that meets or exceeds the patient's inspiratory flow demand. Many of these terms are used synonymously when they are very different. You might have learned the magic box or some other formula to calculate the total flow of an oxygen device. When we are talking about total flow, that is how we get a true high-flow device.
Although they can get to higher liter flows, traditional oxygen delivery devices are often diluted by room air, so the patient is breathing oxygen and room air. The FiO2 then becomes variable. These devices cannot meet the definition of true high-flow because they do not bring any additional flow from another source to increase the total flow of the device. Systems that do meet this are high-flow air entrainment and blending systems. An entrainment system, for example, would be a venturi mask. A blending system would be just like it sounds-- a machine that has a blender built inside of it so it can create a precise FiO2.
Who Needs High Flow Oxygen?
- Typically high flow oxygen is reserved for severe oxygenation issues.
- Patients with high inspiratory flow demands
- Patients who need help in C02 removal
- Can be used in all patient populations
What kind of patients need this type of therapy? Some patients potentially have severe oxygenation issues but also need to breathe spontaneously. However, they need to be able to protect their airway. They can do mild to moderate work of breathing but not severe work of breathing. Usually, by the time they have reached that level of muscle fatigue, it is too late in the game to try high-flow nasal oxygen.
Those with high inspiratory flow demand are another group that needs high flow oxygen. This is one of those terms that is not tossed around in everyday language when talking about taking care of patients. Terms that may be a little more familiar to you would be large tidal volumes, short inspiratory times, and increased minute ventilation. They have increased work breathing or an increased drive to breathe. Those are the type of patients you will see with increased or high inspiratory flow demands.
An aspect of high-flow nasal oxygen therapy is that it is also capable of CO2 removal. Sometimes, this device gets intertwined with non-invasive therapy, but the way CO2 is removed using this type of therapy is slightly different. We will discuss this a little bit later.
A considerable benefit to high-flow nasal oxygen and nasal cannular therapy is that it has been designed for all patient populations. Depending on the device or the model you are using, which I will also discuss in just a little bit, some therapies will work great for the neonatal population to the adult population and everything in between.
One question that I am frequently asked when teaching this to students or discussing high flow with someone who is not well versed in using it is, "Why cannot I just put a non-rebreather on this patient?" If we are looking at giving them higher FiO2, the non-rebreather mask goes up to 15 liters. However, in these cases, we need to provide them with more FiO2. It has been tossed around about starting with a non-rebreather mask first, but there are instances where you should and instances where you should not.
Alternative Types of Masks/Devices
Non-Rebreather Masks
- Non-rebreather masks are capable of higher liter flows.
- They are not high flow (total flow) devices.
- Fi02 is variable
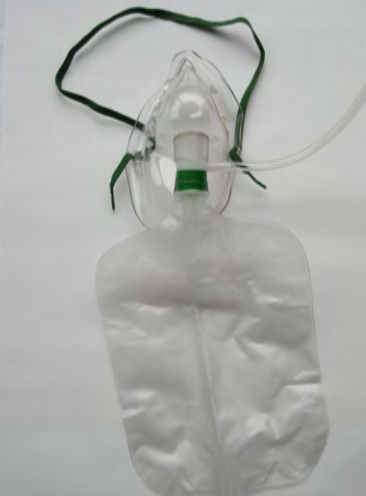
Here is a quick review of the non-rebreather mask. It runs up to 15 liters a minute. It does have a high liter flow, but it is not a high flow total flow device.
Figure 1. Non-rebreather mask.
When we look at total flow, we have to have some kind of entrainment of air/oxygen mixture. This is where we are increasing the total output that the device is capable of delivering. The non-rebreather does not do that. The non-rebreather can provide approximately up to 70% FiO2, but again it is variable. The reasons why it is variable depends on the way the patient is breathing. It also depends on how well the mask fits the patient's face. You could see two patients put on the same settings of a non-rebreather, but if you were capable of measuring the FiO2 being delivered, it could be pretty different even if they were both on a 15-liter non-rebreather mask.
There are quite a few variabilities in the non-rebreather. This is not saying it is not a suitable device or should not be used, but it is in a different category. It is sometimes intertwined with high flow oxygen when people talk about delivering higher FiO2s and higher liter flows.
Venturi Masks
- Venturi masks/ AEM masks are true high flow (total flow) devices.
- The air - entrainment increases the total output of flow.
- Deliverable FiO2 is lower but generally more precise.
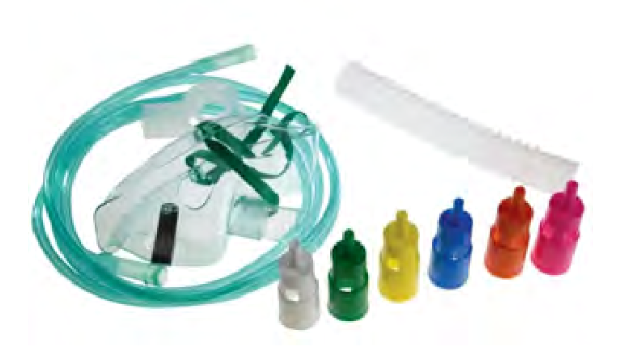
There is the venturi mask (Figure 2).
Figure 2. Venturi mask.
The venturi mask is sometimes referred to as the air entrainment mask. This is a true high-flow device. Remember, it can meet or exceed the patient's inspiratory flow because it mixes the air and oxygen to increase a total flow and a greater output. The deliverable FiO2 is precise, and the color-coded devices give a specific FiO2. A downside to these is that most devices, or at least the most familiar ones, max out at about 50%. As there are patients that need more than 50% FiO2, what do we do in these situations? We need to give them a total flow device to meet that inspiratory demand. They need more than 50% FiO2, thus creating the need for high-flow nasal cannular devices.
High (Liter) Flow Cannula
- High (liter) flow cannulas deliver oxygen at greater flow rates than a standard nasal cannula.
- Most max out at a flow of 15 lpm and require humidification.
- In most situations, this is not a high flow device and the Fi02 is variable.
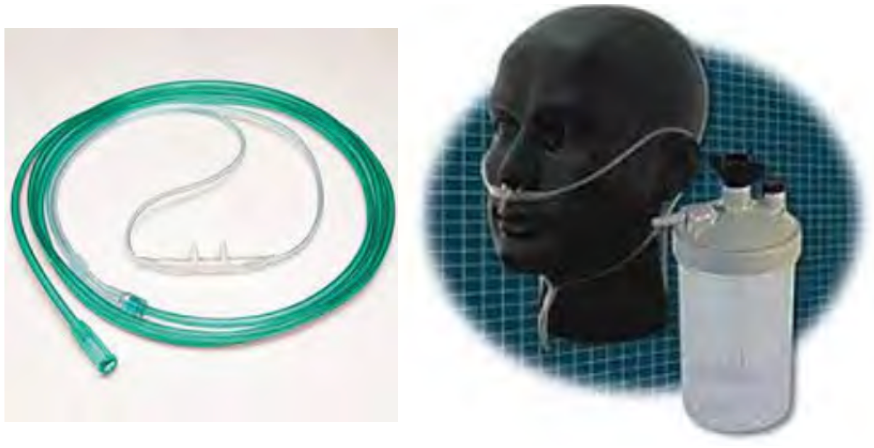
This is another one that I have seen out there that can be confusing. This particular device is referred to as a high flow nasal cannula, as seen in the two examples in Figure 3.
Figure 3. Examples high flow cannulas.
It is not only a high flow nasal cannula, but it is a high liter float nasal cannula. If you are familiar with using this particular cannula, it will go up to approximately 15 liters. I used this cannula several years ago when I first started practicing, and then it disappeared. It has resurfaced again in recent times. This cannula is designed like a traditional cannula, but it does not max out at that 6-8 liters that a conventional nasal cannula will. This one will go up to 15 liters per minute, but it does require humidification. You can see the refillable humidifier device in the right picture. A downside to this is there is a potential for cross-contamination when you use refillable devices. If this device works well for your patient, that is great.
A higher FiO2 will meet some client's oxygen needs. Again, this is still a variable FiO2 variable device, and it is not a total flow device. It is a high liter flow device because the patient will still be able to breathe room air around the prongs, around their nares, and through their open mouth. The amount of oxygen that they are taking in will be diluted, and the FiO2 will be variable.
When These Are Not Enough
- High inspiratory flow
- High tidal volume
- Fast rate of breathing
- Large minute ventilation
- Short inspiratory time
There are some instances when the devices I have just talked about are not enough. What is going to be the right approach? How do you know when you should start with a high-flow nasal cannula versus some of the other devices that I just mentioned? It is not that those devices are harmful. Except for the air entrainment or the venturi mask, all of the others are genuinely low-flow devices. There are instances where we would start a patient on a high flow nasal cannula instead of some low flow devices. They include someone who does have a high inspiratory flow, a high or a large tidal volume, or an individual with a fast breathing rate, so the respiratory rate is elevated. Another way of describing that is large minute ventilation with a short or a quick inspiratory time. These specific conditions make using a high flow nasal cannula more favorable to meet the patient's inspiratory needs.
High Flow Nasal Cannula (HFNC) Review
- High flow nasal cannulas offer flow rates up to 60 lpm with precise FiO2 concentrations up to 100%.
- Humidification is often incorporated into the device setup.
- Indications are continually evolving with numerous benefits in both adult and pediatric populations.
- New devices are being developed frequently to meet the demand for this type of device.
Here is a quick review of high flow nasal cannula therapy before breaking down some of the devices and looking in a little more detail. In general, high flow nasal therapy or high flow nasal cannulas offer flow rates up to 60 liters per minute while offering a precise FiO2. Most of the time, those concentrations will go up to a hundred percent. One of the tricks that I teach my students is the rule of four, where one liter is approximately 24% oxygen, two liters is about 28, 3 liters is 32, and so on. High flow nasal cannulas have a blender system already incorporated into the device. The air and oxygen are blended manually. I can offer a precise FiO2 that is no longer dependent on liter flow with this device. For example, I can deliver 50% oxygen at 40 liters. I can offer 100% oxygen at five liters in a NICU setting. Oxygen concentration and amount of liters are no longer dependent upon each other in a high flow nasal cannula, differentiating it from some of the other oxygen therapy systems.
Humidification is often incorporated in the high-flow nasal cannula setup. I will talk to you in a minute about why that is so important. The indications of HFNC use are continually evolving, with numerous benefits in pediatric and adult populations. There are new devices that are constantly and frequently being developed. High-flow nasal cannula therapy is gaining widespread use in the treatment of COVID, especially in the early-onset trying to avoid intubation. There are several benefits that I will break down and talk about in just a few minutes.
The Role of Humidity
- All humidity is NOT equal!
- Heated humidity is required for all HFNC.
- The flow rates generated by HFNC can cause the isothermic saturation boundary to shift distally.
- This can lead to further complications.
The reason why humidity is so essential in HFNC is that all moisture is not equal. Some of the traditional devices, like the ones I just showed you, are not heated. If we are using a high-flow nasal cannular therapy, it has to have heated humidity.
Isothermic Saturation Boundary
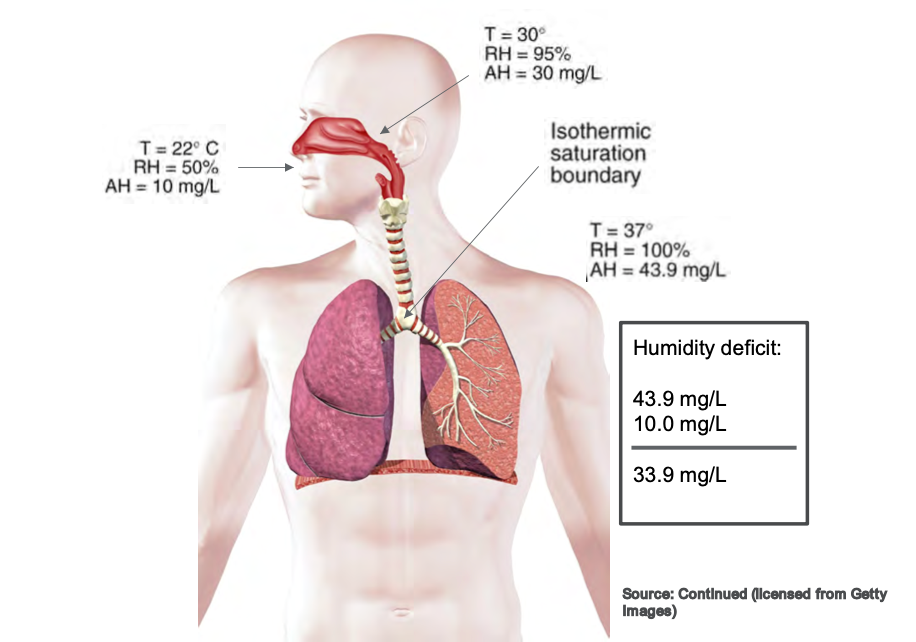
The flow rates generated by a high flow nasal cannula can cause the isothermic saturation boundary to shift. When that occurs, we can cause all sorts of complications in the airway, and the isothermic saturation boundaries shifts. This can cause mucosal trauma, dried secretions, and impaired mucociliary escalator function. It results in a myriad of complications that we do not want in the upper airway because we want our patients to cough, clear their airways, and maintain normal function of the upper airway. Whenever we use high flow therapy, those flows are too significant for the regular operation of the isothermic saturation boundary to overcome. This is why we have to add heat so that we can help balance that out. Figure 4 shows a picture of the isothermal saturation boundary.
Figure 4. Illustration of the isothermic saturation boundary. Click to enlarge the image.
The primary function of the nose is to warm and humidify inspired gas. If the temperature was approximately 22 degrees Celsius, the relative humidity would be about 50%. If we increase the temperature by the time it reaches the oropharynx at the back of the throat, we are looking at a higher temperature of about 30 degrees Celsius and relative humidity of 95%. Movement from the nose to the oropharynx causes a significant increase in temperature and relative humidity. By the time it reaches the isothermic saturation boundary around the carina before it enters the lung, we want it to be full relative humidity at a hundred percent saturated and our average body temperature of 37 degrees Celsius. That is a whole lot of words to say that the nose warms the inspired air typically. When we put a nasal cannula in someone's nose, we are potentially disrupting that normal function.
When we use heated high flow therapy, we are generating flows that far exceed the patient's normal inspiratory flow, and the nose cannot warm those gases fast enough. It is imperative that we use heated humidity for high flow therapy because we do not want to negatively impact the humidification and the normal function of the upper airway itself.
HFNC: How It Works
- HFNC improves oxygenation by:
- Washing CO2 from end expiration
- Reducing dead space
- Providing positive end-expiratory pressure
- Optimal PEEP levels are directly linked to a regular breathing pattern and a closed mouth
(Dres and Demoule, 2017)
It improves oxygenation in these three ways. First, it washes out the CO2 from the end expiration. Every time a person exhales, they have end-expiratory gas that remains in the upper airway. Whenever they exhale, there is a little bit of CO2 that is left in that end expiration. Whenever we use higher flows, we wash out CO2 to have a more oxygen-rich environment when the patient goes to inspire, and there are fewer traces of those end-expiratory gases. Ultimately, this increases the oxygen that is being delivered to the patient.
We can also reduce dead space. Dead space is anywhere that oxygen exchange cannot occur. Oxygen exchange cannot happen in any upper airways like the nose, sinuses, or trachea. Oxygen exchange cannot occur until deep in the lungs, where it crosses over in the alveoli and membranes there. If we can reduce dead space by generating flows that get the oxygen down to where it can be absorbed, not only are we going to improve oxygenation, but chances are we will also improve the work of breathing. The patient is not having to work as hard to overcome their normal anatomical dead space to get that oxygen down into their lungs where it needs to be.
Over the last few years, there have been varying studies about whether high flow therapy provides PEEP or positive end-expiratory pressure. Dres and Demoule (2017) reported that optimal PEEP levels were directly linked to a regular breathing pattern and a closed mouth. This means that if the patient has a normal rate and pattern, they can get up to approximately seven centimeters of pressure. However, we know that that is not always the case. Sometimes our patients are talking, eating, or taking medications, and their mouth is open. We cannot get them to keep their mouth closed at all times. So yes, PEEP is possible.
We know that PEEP increases the alveoli's surface area, creating lung expansion and improving the potential for oxygenation. However, it is a catch-22 when we look at it as a non-invasive support device. I will talk about that in a little bit more detail later. Another interesting aspect I found about this study is that they also reported not only positive end-expiratory pressure but also for every 10 liters of the flow used on a high flow therapy device, there was an increase in central airway pressures. This was a .69 increase if the patient's mouth was closed and a .35 increase for the same user if the patient's mouth was open. These are not huge increases, but if you have a patient with high main airway pressures, you need to be mindful of this.
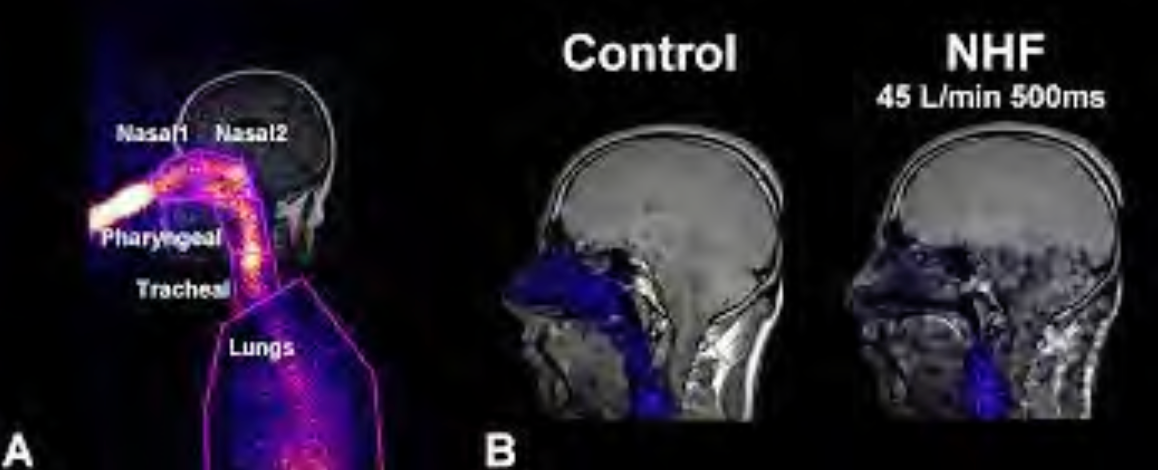
Looking at the CO2 and nasal washout, this is an excellent illustration in Figure 5 that Moller et al. (2017) saw in their study.
Figure 5. CO2 and nasal washout using tracer gases. Click here to enlarge the image.
They had the patient inhale a tracer gas to see a visual of the nasal washout. Looking at the first picture, the gas is inhaled so that it can be seen. In the middle, you can see that the end-exhalation gases remain in the nasal and upper airways in the control subject. However, with the individual on high flow therapy (45 liters per minute), you can see that those gases are almost non-existent in the nasal airway. There is a drastic improvement in oxygenation because we have washed out CO2 and primed that nasal cavity for higher oxygen concentrations. This is why it is particularly effective in individuals who have hypoxemic acute respiratory failure.
Types of HFNC
Let's now look at the different types of high-flow nasal cannulas. I am just going to talk about a few. I do not claim to be inclusive of all devices that are on the market. I spoke with a few therapists that I know, and these are the main ones that everyone seems to be currently using.
Optiflow
- Provides flowrates from 2-60 lpm
- With Airvo 2, this device can be used during transport
- Several interfaces available to increase patient comfort and compliance
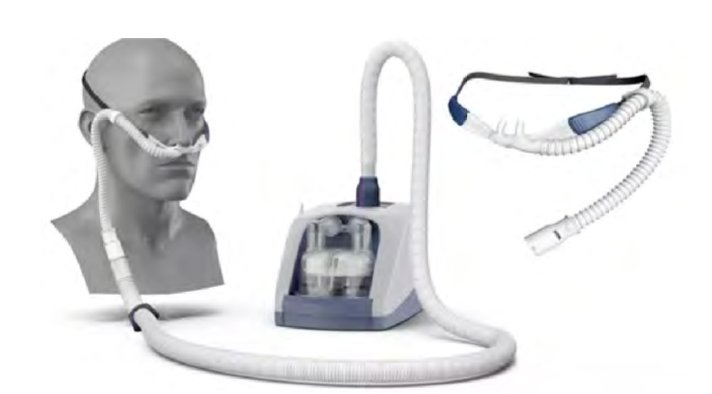
The Optiflow is one of them. This version is made by Fisher & Paykel, and this device uses flow rates of 2-60 liters per minute. It has several patient interfaces to fit the needs of various patient populations. A benefit to using this device is that it has compatibility with the Airvo 2. The Airvo 2 is a humidification integration device that has a built-in humidification and flow generator. It generates its flow, making it easier to set up and transport per the feedback I got from many therapists. Figure 6 shows an example of this.
Figure 6. Example of an HFNC device with a humidification integration device.
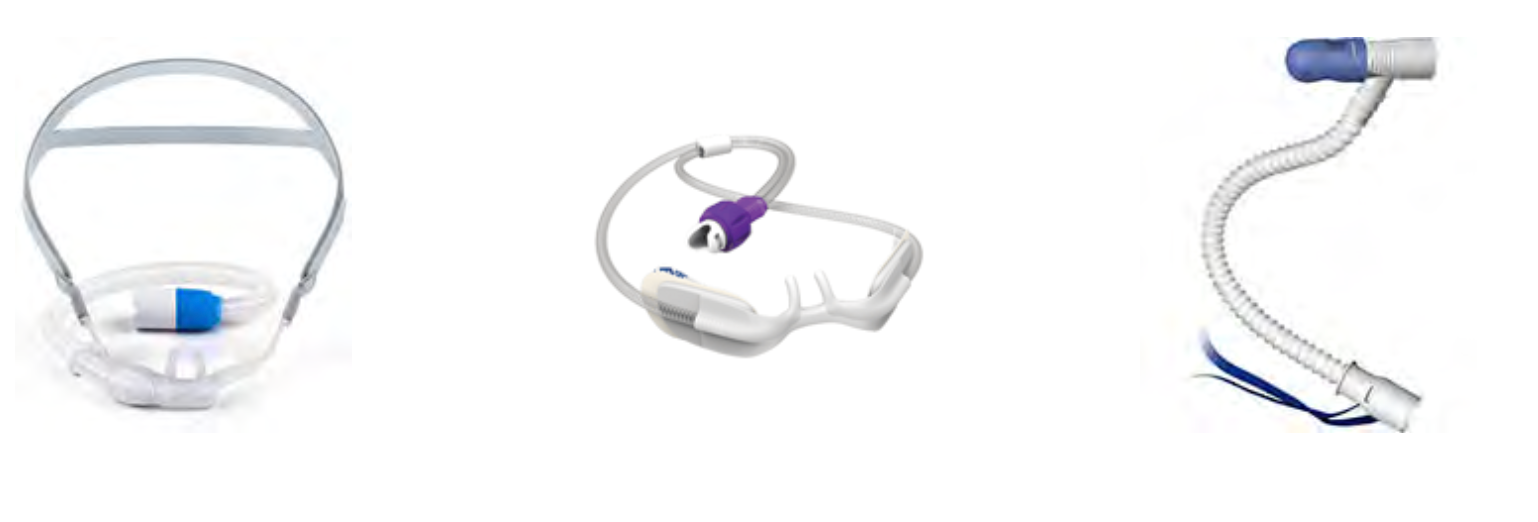
It also improves the accessibility of this device. In one older hospital where I worked, some floors did not have multiple oxygen outlets, or some of them only had oxygen outlets and no air outlets. I know this may still be the case in some areas. Ideally, all hospitals should have multiple oxygen and air wall outlets for multiple device access. The Optiflow has its flow generator, which helps with accessibility. Figure 7 shows several interfaces available to increase patient comfort and compliance.
Figure 7. Examples of Optiflow patient interfaces.
These can range in sizes from infants to adults. Adult models come in small, medium, and large, and there are infant and pediatric sizes and trach attachments. If you get on the Fisher & Paykel website and look up their Optiflow, there was also a mask interface. I could not find much information or any patient testimonials, but there is an aerosol-type mask that will also work with the Optiflow. I asked around, but I do not know anyone who has used it.
Vapotherm
- Flow rates of 1-40 lpm
- Can be integrated into EMR and nurse call systems.
- HeliOx compatible for 80/20 mixture
- Multiple cannula sizes are available (premature, infant, pediatric, adult, adult large).
Vapotherm is the HFNC that I am well-versed in as I used it quite frequently. This particular device has flow rates of 1-40 liters per minute, so a little bit lower than the Optiflow (Figure 8).
Figure 8. Vapotherm on a rolling stand.
The newer models can be integrated into the EMR, and the nurse call light systems. This is something new that I found out when preparing for this lecture. If they were to run out of humidification in the past, you would have to be in pretty close proximity to hear it alarming. There was also a concern that these devices might overheat. It is a gravity-feed liquid system, but it just has to be watched and replaced from time to time to ensure that the humidifier continues to function the way it is supposed to. Now, this system can be integrated into the existing call light, which is a huge benefit to this device. It is also compatible with HeliOx with an 80/20 mixture. I searched, and I did not find many patient studies about the use of a high flow HeliOx therapy, but it could be because it is brand new. This is an area that I will also continue to look at to see how it is integrated into practice.
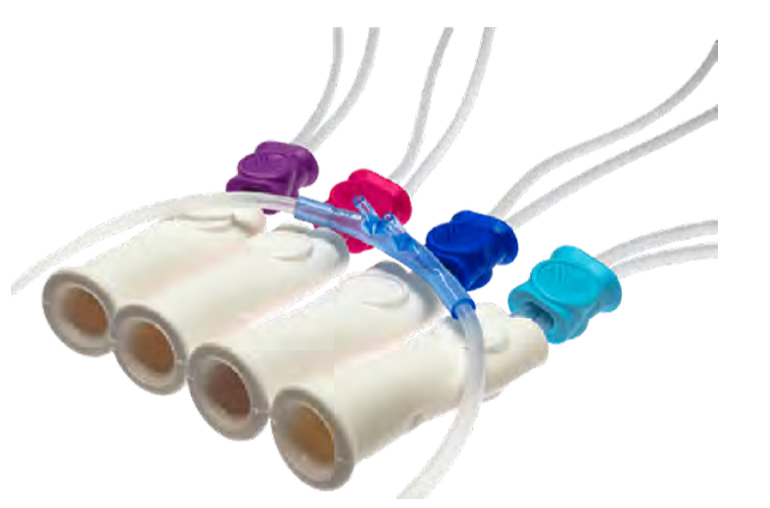
The Vapotherm also offers quite a few interfaces, even more so than the Optiflow (Figure 9).
Figure 9. Various size interfaces of the Vapotherm.
There are cannulas for preemies, infants, children, adults, and even adults large. Eight different interfaces are available on the market through the Vapotherm site. There are various settings, as shown in Figure 10.
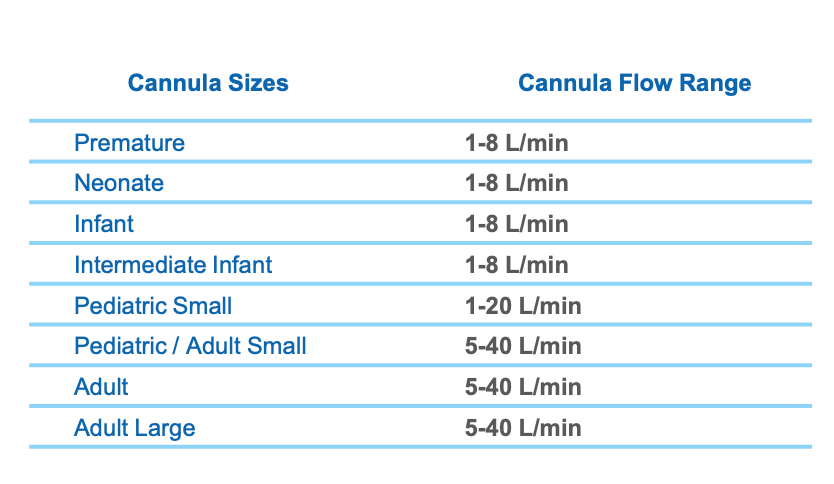
Figure 10. Cannula sizes and flow range chart for various ages.
The premature style ranges from 1-8 liters per minute; neonate, infant, and intermediate infant all have that same liter flow range. The spacing and the size of the prongs help you to determine how best to fit a client. The pediatric setting is a flow of 1-20 liters. Once we get up to the adult small, can crossover from pediatric, the flow range is 5-40 liters per minute.
Why are there so many different sizes? Everyone's nose is different, like the spacing of their nares and how far apart they are. I know this was my experience. It is essential, especially in the NICU with the preemies, that it fits correctly. Even in the adult setting, there was a lot of variability in nose structures. As we know, compliance is dependent on patient comfort.
HFNC Convertible Ventilators
- Some ventilator models have HFNC capabilities integrated into the vent.
- ▪ Hamilton C-6, G-5, C3, C1, and T1
- ▪ Offers more complex features in addition to
- HFNC
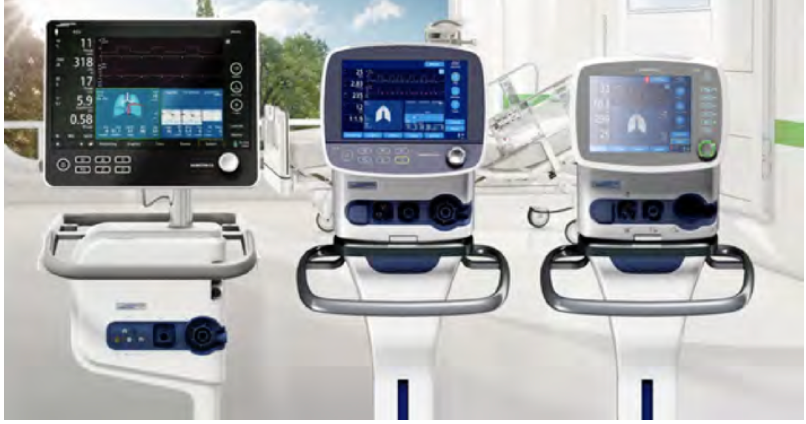
A few ventilators on the market today are convertible to high-flow nasal cannular devices (Figure 11).
Figure 11. Ventilators that convert to HFNC.
In particular, the Hamilton models (C-6, G-5, C3, C1, and T1) can be converted. I have not used any of these. I know at Midwest State, where I teach, we have the Hamilton G-5. This is a ventilator with widespread use in many of my clinical affiliates. It offers a lot of additional monitoring. High-flow nasal cannulas provide a built-in SpO2 monitor. The Hamilton is not only a ventilator that can convert to a high-flow, but it also has SpO2 capabilities.
The flow rates of these devices are up to 60 liters per minute. The G-5, in particular, offers integration with the Aerogen nebulizer. You can also incorporate the nebulizer capabilities with this device to be delivered through the high flow nasal cannula. The interfaces that are available with this device include adult, pediatric, and neonatal varieties and trach attachments.
These are all of the high flow nasal cannula studies that I could find.
HFNC Vs. NIV
- HFNC does generate PEEP however it varies across patients.
- When compared to traditional oxygen masks and NIV, the outcomes were similar.
- However, when initiated early in patients with hypoxemic ARF intubation rates were significantly lower.
(Dres and Demoule, 2017)
How do you know when to use high-flow nasal cannula therapy versus non-invasive? Or, when should you have started non-invasive instead of high flow? We do offer the PEEP and expansion, so there are some of the same similarities here. How do you know which one is best? Unfortunately, there is not a hard, fast rule. In my opinion, they offer some similar features, but it is like comparing apples and oranges.
The high flow nasal therapy does offer PEEP. However, it varies across patients and interfaces. As mentioned, depending on if your patient has their mouth open or closed, their PEEP will vary all day long. Whereas, with NIV, you can set the PEEP and inspiratory/expiratory pressure depending on the modes you are using. This is pretty much what you will get with the high flow if they are opening their mouth, talking, awake, sleeping, etc.Compared to traditional oxygen masks and non-invasive ventilation, HFNC had very similar outcomes in a study by Dres and Demoule (2017). I want to discuss that a little bit. They evaluated patients who were admitted primarily for pneumonia. Once the patients were admitted, they were assigned to traditional oxygen masks, NIV, or HFNC. Initially, the study found that the outcomes were similar in almost half of the subjects. Across all three categories, subjects failed and had to be intubated. Most of the time, high flow nasal cannula therapy failure is marked by the need for intubation, not the progression to non-invasive. This is where I think a lot of therapists ask the question, "If high-flow nasal cannula therapy fails, do I go to non-invasive, or do I go to intubation?" All of the studies that I found marked high-flow nasal cannula therapy failure as the movement to intubation, not the progression to non-invasive. For individuals who presented with severe hypoxemic acute respiratory failure and used high flow nasal cannula therapy, their failure rate was significantly lower. So, when you look at the patients who not only had pneumonia but also had a hypoxemic acute respiratory failure with frequent or early-onset initiation of high-flow nasal cannula therapy, they did have a favorable outcome. Their intubation rate was lower compared to individuals who were put on non-invasive or traditional oxygen masks.
Recommendations for Clinical Practice
- Assessment of Need: Determined by measurement of inadequate oxygen tensions and/or saturation, and the presence of clinical indicators.
- AARC Clinical Practice Guidelines for Oxygen Therapy
- Adults: Acute hypoxemic respiratory failure,
- Postoperative support, pre- intubation,
- post-extubation respiratory failure, DNR/DNI
- Pediatric: Asthma, bronchiolitis, pneumonia
- Neonatal: RDS and stabilization of preterm infant, post-extubation
Recommendations for clinical practice were somewhat challenging to find. I think many therapists would agree that there are no cut-and-dry recommendations for high flow nasal cannula therapy. There are significant variations in how it is used, when it should be initiated, how to determine its failing, when it should be started, when it is appropriate, early initiation versus late initiation, and how to determine if it is failing? I began to look at some studies to see any trends in clinical practice or types of appropriate patients.
The AARC has clinical practice guidelines for oxygen therapy. For one, it has to be determined by a measurement of inadequate oxygen tensions and/or saturation, so either blood gases or monitoring in the presence of a clinical indicator. It also looks at the work of increased breathing, hypoxemia, dusky appearance, and all of those things where a client needs oxygen.
High flow nasal cannula therapy was indicated in acute hypoxemic respiratory failure, in postoperative support, and in particular, postoperative support of cardiothoracic surgeries, which I will discuss in the next slide.
In pre-intubation, setting up a whole high flow system is not the norm while preparing to intubate someone. Still, it was found that high flow nasal therapy was successful or adequate in providing oxygenation to an individual who was already on it but clinically needed to be intubated. So, there are instances in which it will meet the oxygenation needs while preparing for intubation
Post-extubation respiratory failure is another indication. This is for an individual who has been successfully or relatively successfully weaned from a ventilator but still needs a little bit of support. This is a great example where high-flow could offer some assistance for PEEP to ease and assist with work of breathing while also offering appropriate FiO2s. This is where we are waiting for them to regain their strength and control and the ability to breathe on their own.
Additionally, there are instances in which it is appropriate for our "do not resuscitate" and "do not intubate" clients. If you have a patient who is adamant that they do not want to be intubated, but they are presenting with some oxygenation needs, many times you will find that families and patients are more accepting of the high-flow nasal cannula as it looks similar to a traditional nasal cannula. Although we know that it is not and has additional functions, it is frequently more accepted.
In pediatric patients, individuals who are suffering from an asthma exacerbation may benefit from HFNC treatment. This supports them with increased flow and oxygenation through the higher FiO2 capabilities. This is similarly true for bronchiolitis and pneumonia. It is a necessary treatment in the neonatal setting, particularly with respiratory distress syndrome and the stabilization of preterm infants. High flow treatment is different from C-PAP as the neonate can begin to eat and take oral food when using it. If they were on C-PAP and positive pressure devices, they would have to wait and have different forms of nutrition. High-flow nasal cannular therapy, if the patient tolerates it, is a favorable option. And for post-extubation, it offers the babies additional support versus just putting them on a traditional low-flow nasal cannula.
Early Intervention
- Early intervention shows promising results in HFNC therapy
- When compared to conventional low-flow devices, HFNC was associated with reduced escalation of therapy/ length of stay.
(Wang, Huang, Ni, & Liang, 2020)
There is an argument that early intervention is vital. It states that the earlier you get clients on high-flow nasal cannula therapy, the more favorable the outcomes are going to be. In this particular study, they compared conventional low-flow devices to a high-flow nasal cannula. They found that HFNC was associated with reduced escalation of therapy, and ultimately, a decreased length of stay. They also evaluated the initiation of high flow nasal cannular therapy following extubation of these cardiothoracic surgical patients. Most of them I believe had a CABG. High-flow nasal cannular therapy met their oxygenation needs and got them off the ventilator. It got them back to using their own muscle strength, but it also eased their work of breathing. After the thoracic area is opened in these types of procedures, they are usually very painful. If we can offer that little bit of PEEP to help keep their oxygen levels up and provide lung expansion, this will promote breathing and reduce the risk of developing postoperative pneumonia. So, it was very favorable in that setting. It not only reduced the need to escalate to either non-invasive or reintubation, but it also helped with decreasing their overall length of stay in the hospital and ICU.
Too Good To Be True?
- Absolute clinical practice guidelines are still very limited.
- HFNC failure was associated with the delayed application of NIV support or intubation.
- Another concern is that HFNC is repeatedly being initiated directly from low-flow devices with no documentation of other O2 device attempts.
(Kim et al., 2020)
On the other hand, there are arguments out there that claim that high-flow nasal cannula therapy is too good to be true. Their belief is that there are no clear guidelines for when we should take it off the HFNC or when we should determine that they have failed and need either non-invasive support or intubation. There is the argument that early initiation is how patients are more successful. The other argument is that signs of failure are not being recognized quickly enough in patients on high-flow nasal cannula. We are delaying therapy that could be more beneficial increasing the potential for complications and increased lengths of stay. There are both sides of the story here.
This study compared the failure rates of high flow nasal cannula and found that the cases were widely varied. I think all therapists would agree there is no set path for certain signs and symptoms. Again, there are not those hard, fast rules for HFNC use, but there are criteria for low-flow. So, they looked at the particular group of patients and found that there was such varied use that it was hard to even compare them. However, one finding from this study is that high-flow is often initiated with no documentation of any other O2 attempts. There is also no use of reservoir or low-flow devices used. Instead, clients are immediately put on high-flow. Again, there was not a lot of information on that. Another conclusion that they found was that failure was associated with who prescribed the high-flow. For example, there was a higher failure rate among residents versus pulmonologists. Thus, if residents were the ones prescribing the high-flow therapy, there was a higher failure rate. I do not know why this is other than to say I would hope that pulmonologists would be better at recommending equipment as that is their specialty. It also could be dependent upon the patients and environment.
Spo2/FIO2: Breathing Frequency
- ROX Index- indicator for HFNC failure
- ROX= Spo2/FIO2
RR
- It has been used to predict failure at 2, 6, and 12 hrs.
- Success is determined when the ROX index stays above 4.88.
(Roca et al., 2019)
There is a model for determining high flow nasal cannula failure called the ROX Index. I found a few studies that used this as a clinical indicator for outcomes. For more information, I would encourage you to review the F&P Optiflow website. They have a section that is called Flow Matters. This study is linked on the site, and this calculator is linked at the bottom of that page. This calculation tells us the patient's SpO2 as compared to their FiO2 in relation to what their breathing frequency is or respiratory rate. We plug these numbers into the above formula, and we get what is called a ROX Index. For example, a patient has a SpO2 of 95, their FiO2 is 21% on room air, and have a normal respiratory rate of 12. Using this formula, their ROX Index is probably going to be somewhere in the 30s. That would be a normal index. This particular calculation is evaluated upon initiation at 2 hours, at six hours, and then at 12 hours of use. If we see a steady decline in those numbers, that indicates that the high flow therapy is essentially failing. If at any point we get below a 4.88, we should start looking at intubation. Actually, the scale that I found was anything greater than 4.88, there is little risk for intubation; a score between 3.85 to 4.87 is an increased risk for intubation; and at 2.85 to 3.84, we should monitor them in the ICU setting if at all possible as they have a highly increased risk of intubation. If their ROX score is less than 2.85, we should consider intubation at that time and not wait. And, if you get less than a 2.85 at two hours, you would consider it a failure and not continue to measure for 6 hours.
Role of RT
- Progression and Weaning
- The success of HFNC is undeniable although the devices have limitations
- Specific to patient condition and underlying cause
- Monitoring is Key
What is our role? What is the role of the respiratory therapist when working with high-flow? There are lots of areas that we need to be involved in, and I understand that in current times we are pulled in every direction. I feel like that is all of healthcare in general, but there are some areas that we should specifically focus on in order to determine and best optimize the use of high-flow nasal cannula therapy.
Should you wean FiO2 first, or should you wean flow first? I really do like that ROX indicator score. It has not been validated widespread, but there I have seen studies on its use as early as 2019, a couple in 2020, and one in 2021. I think it has promising outcomes when using it to assess the progression of high-flow nasal cannular therapy and knowing when it has been successful or when it has failed. In my experience, I always weaned flow first and then FiO2 taking a stair-step approach. For instance, if they could tolerate less flow and did not have an increase in work of breathing, then I would drop the FiO2. I would look for the same signs and symptoms and continue to stair-step this down until we could wean them off of it.
It is very important that the respiratory therapist is involved in the weaning of high flow because no one understands oxygen therapy quite as well. Sure, there are great allied health professionals, nurses, and doctors that understand what an oxygen device does, but no one is going to understand all the treatments options like low-flow, high flow, reservoir, cannula, trach, humidity, etc.
The success of high-flow nasal cannula therapy has shown promise in the treatment of COVID. If we can avoid intubation in those patients while meeting their oxygen needs, that is the best for this patient population.
It has limitations. If the patient begins to have an increased work of breathing or muscle fatigue, high flow nasal cannula therapy is not going to be enough. We need to recognize the signs and symptoms so that we are able to intervene appropriately. Their oxygen saturation may still be 95 or even 90, but if we see that they are retracting and using accessory muscle, we know that it is time to make a change.
There may be underlying causes that we have to consider. The most successful application of high flow nasal cannula therapy is for acute respiratory failure associated with hypoxemia. We also have to consider what other comorbidities and conditions they have. As I said in the beginning, we need to know if they spontaneously breathing and are able to protect their airway. We also need to know if they have been huffing and puffing for a long time, and they are ready to give out because they are so tired. We need to continuously monitor these patients, which I know is easier said than done because we can be pulled in so many directions.
Again, we are so well versed in oxygen therapy that we know the limitations, indications, and different parts and pieces of this equipment. We need to hold our ground and make our presence known when it comes to the use of these types of devices.
In conclusion, I wanted to let you know is that the ROX Index is available in an app and can be downloaded through Google Play or Apple Stores. I also want to encourage you to review the existing literature on high flow nasal cannulas. I found tons of literature just in the year 2020 especially for the treatment of COVID. I could find the arguments for both sides of whether it was successful or not. I particularly one study on the Fisher & Paykel for Optiflow website that is included here.
I want to thank you for your time today. I hope that you learned something new and interesting about the use of high flow nasal cannula therapy.
References
Available in the handout.
Citation
Fino, J. (2021). High flow nasal oxygen: What's what!. Continued.com - Respiratory Therapy, Article 106. Available at www.continued.com/respiratory-therapy
Sep 16, 2021
1 CE Hour